• Welcome to The Truck Stop! We see you haven't REGISTERED yet.

    Your truck knowledge is missing!
    • Registration is FREE , all we need is your birthday and email. (We don't share ANY data with ANYONE)
    • We have tons of knowledge here for your diesel truck!
    • Post your own topics and reply to existing threads to help others out!
    • NO ADS! The site is fully functional and ad free!
    CLICK HERE TO REGISTER!

    Problems registering? Click here to contact us!

    Already registered, but need a PASSWORD RESET? CLICK HERE TO RESET YOUR PASSWORD!

What did you do with your GMT400 today...or yesterday....

I have never had an issue with the spray bottle Gunk cleaner damaging wire insulation, looms or connectors. And of course, I never directly blast up close any of the Weatherpack connectors with my little power washer to prevent any possibility of water intrusion.

You could also try some 3X concentrated Dawn dishwashing soap, available at your local grocery store. I've been amazed at how well it cuts through the grease and gunk on my hands after working on a vehicle.
 
well unfortunately I still have oil leaking. after trying the hold downs I can see that it did help some, the drivers side seems to only be leaking at the front lower corner now and the passenger side is leaking in the same area plus it seems to be leaking like a siv at the back corner. I have oil running down the manifold on the passenger side and has already covered the frame area where the lower control arm rear bushing is dripping to the ground. not to mention keeping the starter rust free! and this was seen just after a single trip to town to the grocery store and back today.

I guess I need to make plans to pull it all down and replace gaskets. might attempt this next weekend. it seems that the rear of the passenger side is the problem area for most iirc.

What's the consensus on using cork gaskets or just going with a thick bead of the right stuff sealant? I looked at the 6.2 engine I have and see there are no gaskets where whoever installed the covers just used red RTV on them is this a better route to go?
 
You have tweaked the sheet metal. It done. Buy new covers.
Use NO gaskets, only the right stuff. Clean the heads well, apply the right stuff to the heads. You do the bead exactly the width of the metal lip of the head. Let it tack up just like the instructions say. Put on the new covers, tighten the bolts to hand tight with socket on short extension, then split the torque into thirds like you do any other item like the heads or the mains.

I tried a bunch of other tricks- nothing worked but this way. Since I started doing this method- none ever leaked. I have removed covers after doing this and never had too much silicone going inside that there was a problem of silicone chunks breaking off.
 
Here's another thought before tearing into valve covers again. Is the turbo oil feed line/fitting leaking and peeing oil out onto the passenger valve cover and then running down the back and over the rear of the block, or possibly the turbo oil drain tube at the upper connection is leaking?
 
The feed line isn't leaking but I did not get a good look at the drain line where it connects to the turbo. it's not leaking so bad that I have had to add oil since my last change just the other day, but it's enough that I can see wet area on the frame and manifold, though where it's dripping off the manifold I could not get to with the power washer and it's also wrapped with some heat wrap there to keep the wires to the starter and glow plugs from melting. that wrap is saturated in oil. the saturation running off could be residual from before installing the hold downs. I will have to give it a better look plus run my hand down around the head under the valve cover lip in that area to see if it's fresh oil leaking.
 
The jury is split on gaskets or no gaskets. I didn't want to use them when doing final assembly in 2013 but was convinced to do so. No leaks after a couple of retorques.

I utilized good but used valve covers that member 635 had media blasted and inspected for straight/even/correct edges. One corner was turned up so I straightened it, checked with a straight edge etc.

So, should you go with the gaskets, what worked for me:
RTV/Right Stuff as Will described. Butter the gaskets as well. Studs help keep things lined up after sealant gets a tacky. Snug down until an even bead protrudes the way around. Let it set a while, I think we left them alone overnight. Torque in thirds.
 
Lazy day after attending the great Utah @ USC football game.

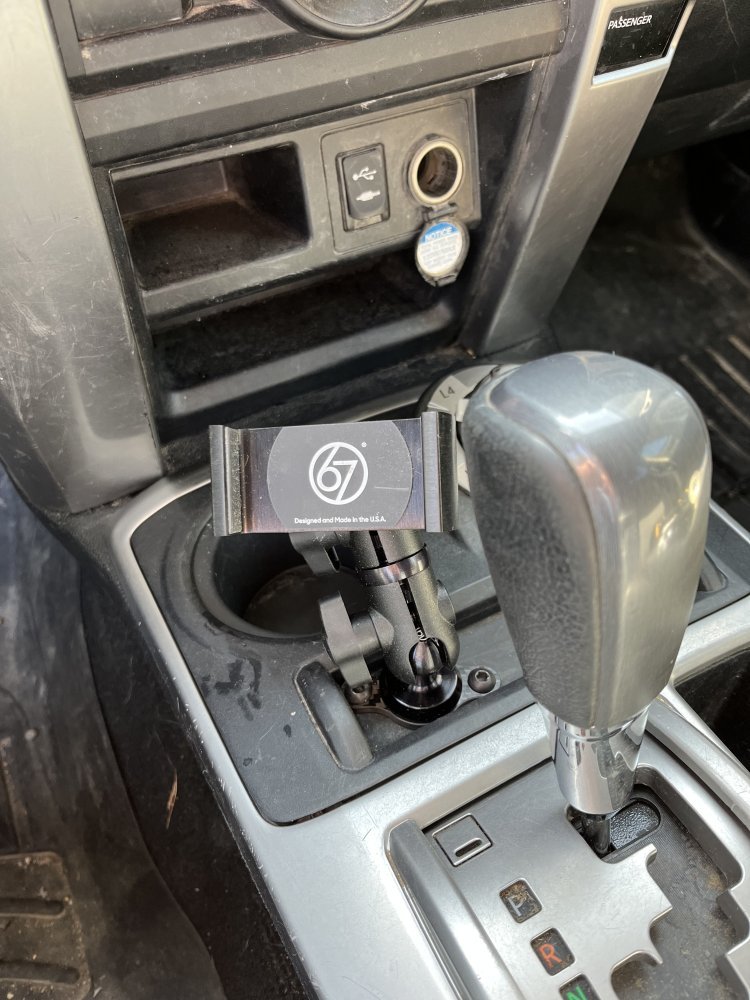
First I installed a 67 Designs Phone Mount in the 2014 4Runner. Wife had been using some cheap holder that dropped into the front cup holder. This one is bolt mounted through the coin holder in front of the cup holder. The coin holder was useless and never used:

71969565321__8B254D2A-7F2F-42D6-AC75-56E9020909DE.jpeg

Later on I soaped and pressure washed the ‘99 Suburban to clean all the bugs and dirt from last week’s trip. Took it on a run and shot a video of all the blowby (none):

 
The feed line isn't leaking but I did not get a good look at the drain line where it connects to the turbo. it's not leaking so bad that I have had to add oil since my last change just the other day, but it's enough that I can see wet area on the frame and manifold, though where it's dripping off the manifold I could not get to with the power washer and it's also wrapped with some heat wrap there to keep the wires to the starter and glow plugs from melting. that wrap is saturated in oil. the saturation running off could be residual from before installing the hold downs. I will have to give it a better look plus run my hand down around the head under the valve cover lip in that area to see if it's fresh oil leaking.
A difficult task getting the right amount of sealer in the right places on the heads.
I could not get the tube and applicator fit to the back sides so I used My flingers and squirted the right stuff onto them then laid it onto the head flange by reaching back in and around. That seemed to work quite well. I also think I got it laid on about a 1/4” thick too.
That seemed to get it sealed quite well. I did use Leroys stud/girdle kit and on the top side I also installed those smaller triangulated pressure spreaders like what You are showing. The lower side has the injector tube holding fixtures and I put those direct to the covers and those does well at spreading pressure on the lower sides.
I do believe that my current oil leak is the front lip on the oil pan to the timing cover. If it is not that then it will be the front cranking shaft seal, that was new with the fluid dampener, maybe 10,000 miles ago or less.
Time will tell. My engine will be coming out of the hole. Transfer case and transmission too. They too are getting resealed and I believe that I’ll be kitting the transmission.
260,000+ miles, it must be ready by now.
 
I loosened the bolts for the driveshaft at the differential to check and see if there was any binding and, as I thought, no issues there. It moved back and forth at the transfer case without restriction. Put it all back together and for the heck of it, gave the transmission pan (Mag Tech) a couple of raps with an orange mallet. Apparently, a little blunt force trauma or the mechanical version of 'spare the rod, spoil the child' worked. Either that (and more likely) the transmission powers that be smiled upon me and normal shifting function has been restored.
Still keeping the appointment with the rebuilder shop though. I'm never this lucky.
Curiosity as it is, wondering if the main connector had a loose connection of some kind and you just smacked it silly reminding it to act right! one of the newer members is going though some pains with his tranny.
 
Curiosity as it is, wondering if the main connector had a loose connection of some kind and you just smacked it silly reminding it to act right! one of the newer members is going though some pains with his tranny.
Shift solenoid commanding full line pressure. Dead battery might have given it an attitude. From what I understand, each start cycle (Key On) everything in there gets a quick test cycle. Repeated KOKO must have cleared either the attitude or, worse, a small piece of contamination cleared with the KOKO episodes or, blunt force trauma. Like I said, I’m taking it in regardless and I’ll ask them to replace the solenoid/servo/thingamajig.
 
Got the grandson working on the headlights. After he pulled the grille, turn signals and one head light I had him install just one of the new LED units. Not just bulbs in OEM housings. Weird part about these are you can't adjust them once they are installed. The instructions in CKO English say you can but, only if you drill holes in the core support after removing the batteries.

Looking at them from where they should be aimed (3" drop at 25') they looked brighter (picture is a bit off) and very intense pinpoints of light vs. the wide glowing OEM units. Will definitely need to ensure they are properly aimed and aligned before buttoning things up.
1698171885226.jpeg

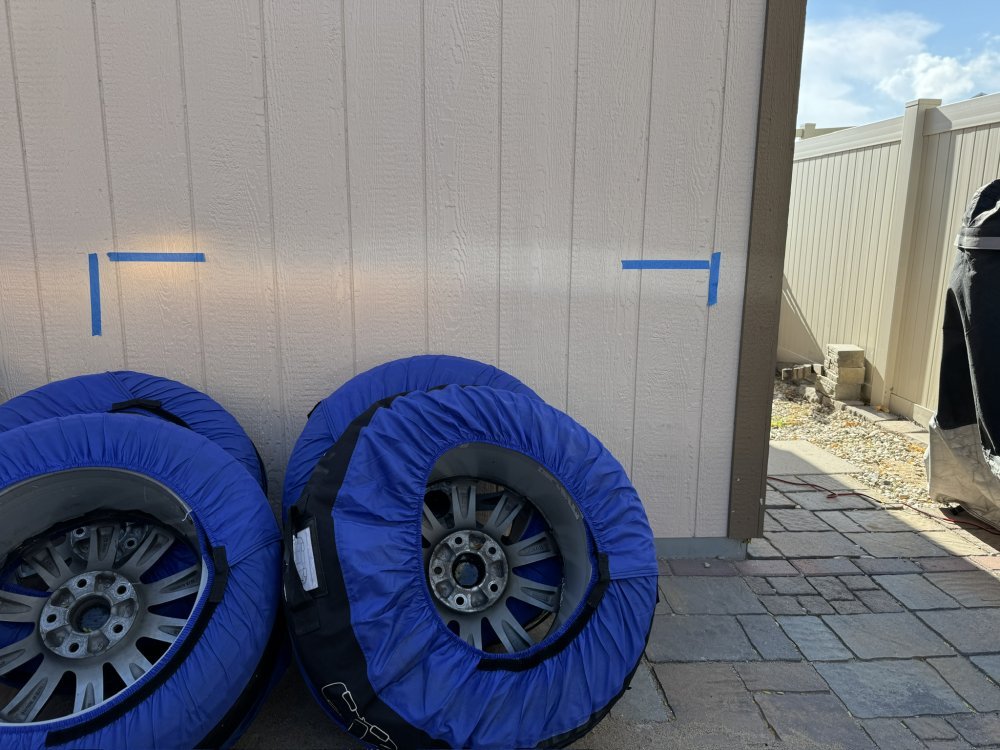
Looking at the cast light on my shed in the daylight (at only about 15ft), their brightness isn't even close to the Sylvania bulbs in OEM housings.
1698171452107.jpeg

We're going back out after dark and do another cast light comparison at the adjustment distance of 25' against the shed. Interesting results so far though.
 
Got the grandson working on the headlights. After he pulled the grille, turn signals and one head light I had him install just one of the new LED units. Not just bulbs in OEM housings. Weird part about these are you can't adjust them once they are installed. The instructions in CKO English say you can but, only if you drill holes in the core support after removing the batteries.

Looking at them from where they should be aimed (3" drop at 25') they looked brighter (picture is a bit off) and very intense pinpoints of light vs. the wide glowing OEM units. Will definitely need to ensure they are properly aimed and aligned before buttoning things up.
View attachment 84120

Looking at the cast light on my shed in the daylight (at only about 15ft), their brightness isn't even close to the Sylvania bulbs in OEM housings.
View attachment 84119

We're going back out after dark and do another cast light comparison at the adjustment distance of 25' against the shed. Interesting results so far though.
I did not lose sleep wondering if you would be our LED headlight Guinea Pig. Give it until nightfall to assess the light as they are different colors and different housings.
 
Last edited:
What worries me is if the LED's are replaceable from the housings. I looked at the ad on the jungle site and it seems that they are molded into the housing as one piece. I do like the look of the wrap around LED strip in them though.
 
I did not lose sleep wondering if you would be our LED headlight Guinea Pig. Give it until nightfall to assess the light as they are different colors and different housings.
Amazon Purchase with the turn signals. Easy to return if they were a fail.

Grandson got back from errands, raced upstairs to track me down and said, "Its after sunset grandpa!"
" 'Bout time you got home. Let's go champ."

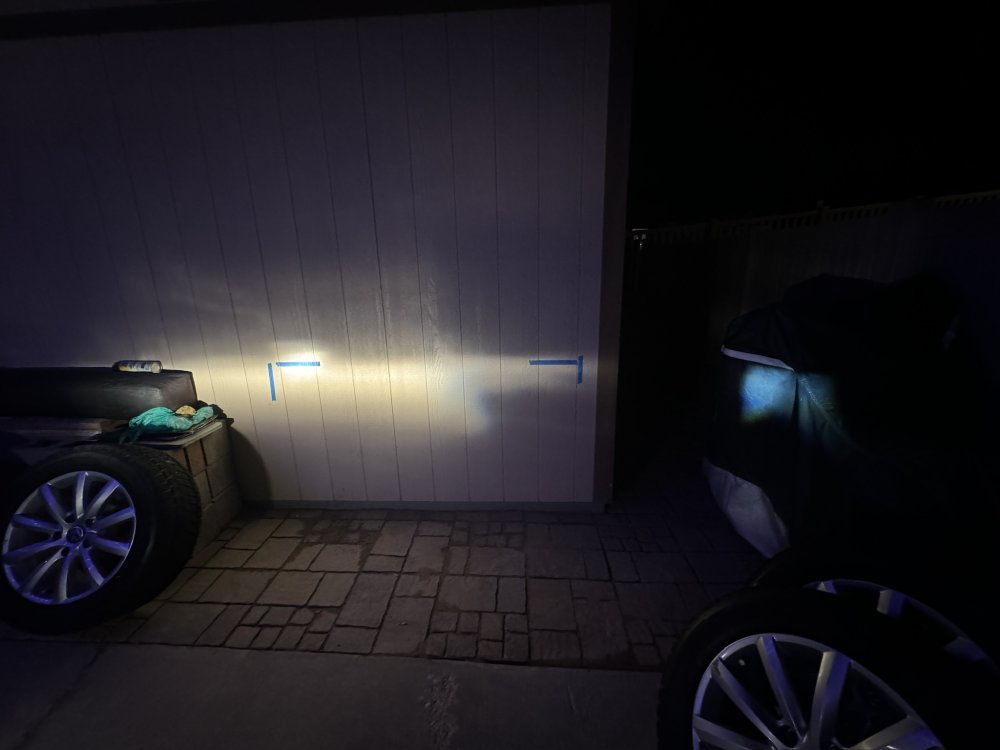
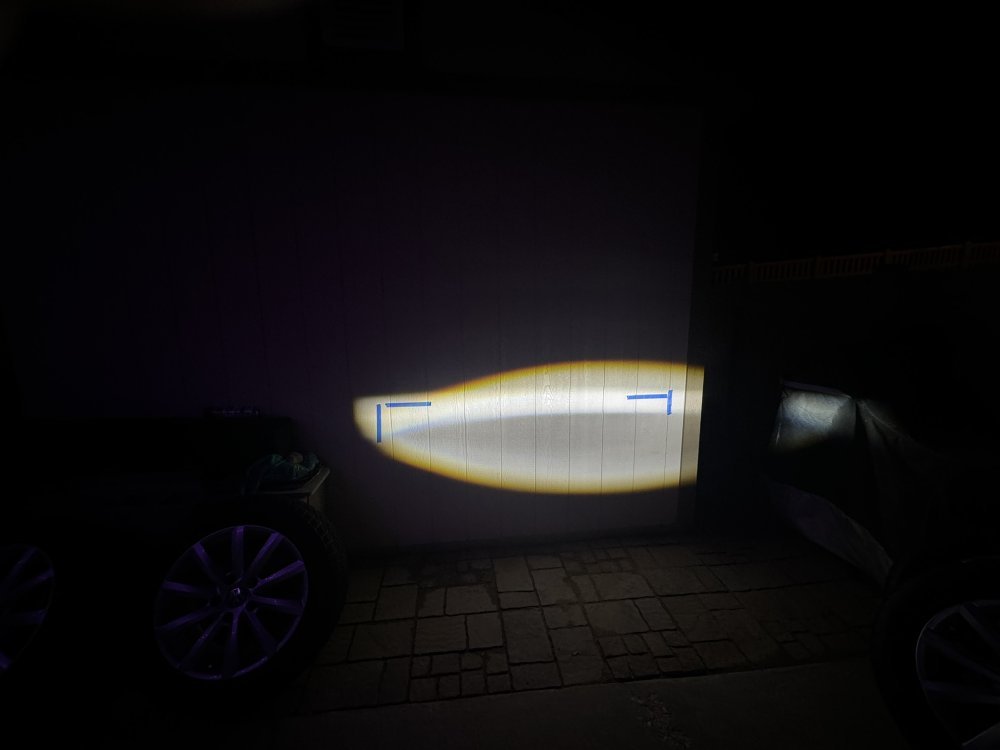
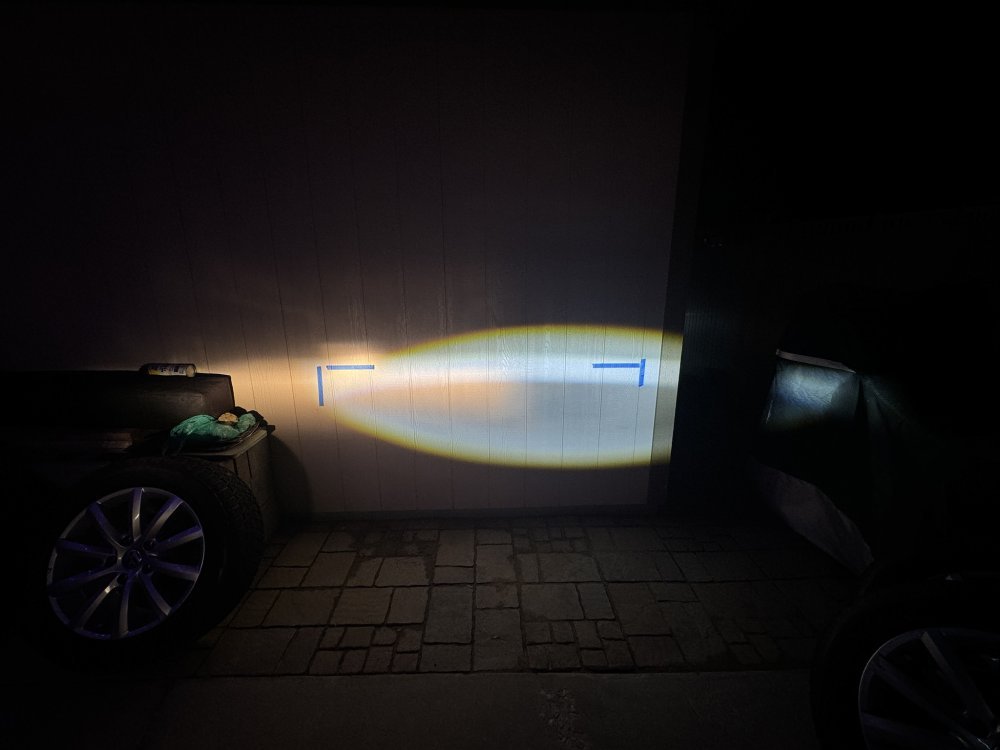
Truck is parked about 10 from the shed. Different colors, patterns and intensities. Interesting....
OEM left only (standing in front of LED [a little LED spill on the scooter cover).
IMG_8397.JPG

LED Only.
IMG_8396.JPG

Together.
IMG_8395.JPG

What worries me is if the LED's are replaceable from the housings. I looked at the ad on the jungle site and it seems that they are molded into the housing as one piece. I do like the look of the wrap around LED strip in them though.
Yeah, they are sealed units so, just like my 2017 Touareg, if the light goes out, so does the wallet. Only these aren't as pricey as the Touareg. Z.b. Brake light element on the lift gate was $400.
 
Last edited:
Back
Top