• Welcome to The Truck Stop! We see you haven't REGISTERED yet.

    Your truck knowledge is missing!
    • Registration is FREE , all we need is your birthday and email. (We don't share ANY data with ANYONE)
    • We have tons of knowledge here for your diesel truck!
    • Post your own topics and reply to existing threads to help others out!
    • NO ADS! The site is fully functional and ad free!
    CLICK HERE TO REGISTER!

    Problems registering? Click here to contact us!

    Already registered, but need a PASSWORD RESET? CLICK HERE TO RESET YOUR PASSWORD!

Codes. Truck won’t move

If the solenoid code returns immediately and it ohms slightly out of spec (5.5 ohms), my money is on that its bad.

If I had this at the shop I would pull the pan and test the wiring from the TCM to the solenoid just to eliminate any connection issues at the transmission or the internal harness as the cause of the problem. I would bulb check it, then ohm the each wire from end to end and see if there is enough resistance to make it read out of spec. If that's good then put a new PCS in it and retest it.
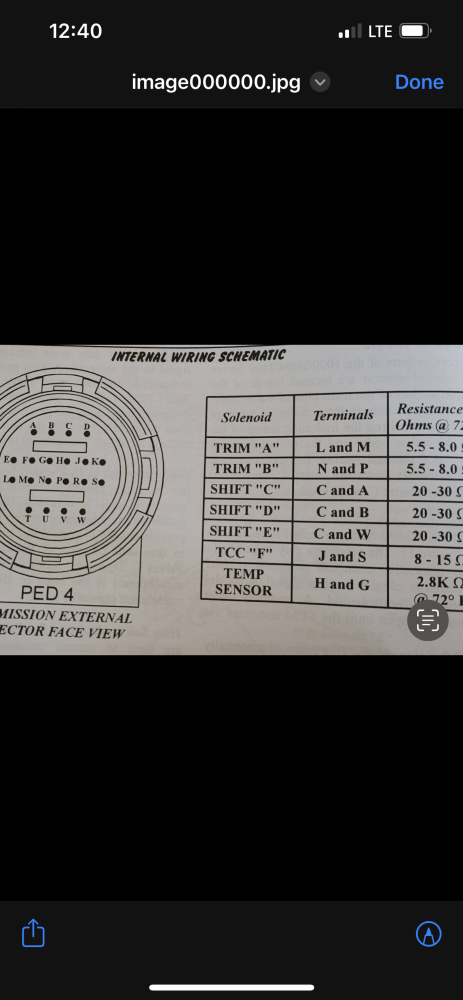
So I did a bulb test like you said and bulb light is bright on both lines going from the TCM to the the transmission side pin 22/23. 6.8

I then ohm the solenoid L/m. Going through the trans harness and it says 6.8 which says it’s within spec of the diagram I found on charm.lh.


I hate to drop this pan again. So much fluid wasted but guess that’s what I will have to do
 
Then the body harness checks out, But there is still a possibility the internal harness is bad, or its a connection issue. So testing directly at the PCS connector will test everything. Its sucks to remove the pan again, might be a good idea to pick up a new PCS and internal harness incase you need to replace them. If the pan is coming off might as well have parts on hand to fix it. You could always return them if you don't need them.

Take a good look at the TCM and transmission connector and make sure the contacts are in good shape. Its easy to bend them and cause a bad connection. especially if someone has poked them with a paper clip to test the wiring. I bough a big kit of connector terminals that way I can perform a din drag test as well as safely probe the connector without damaging anything.

The factory flow chart states 5.5 ohms at 68*f. You measured 6.8, that's out of spec.
 
One more thing, Check for a short to power and short so ground on both wires. Ohm each wire to B+ and B-. should be infinite resistance.

The 4 conditions that the TCM is looking for to set that code are a short to power, a short to ground, high resistance, or low resistance. So far you fall into the high resistance. You need to figure out if its wiring or the PCS.
 
Last edited:
It copied and pasted weird, but here is the factory flow chart for that code.

Schematic Reference:Automatic Transmission Controls Schematics

1

Did you perform the Diagnostic System Check – Vehicle?


Go to Step 2

Go to Diagnostic System Check - Vehicle in Vehicle DTC Information

2

Install the scan tool.
Start the engine.
Important: Before clearing the DTC, use the scan tool in order to record the Freeze Frame and Failure Records for reference. The Clear Info function will erase the data.

Record the DTC Freeze Frame and Failure Records.
Clear the DTC.
Using the scan tool, measure ignition voltage.
Is the voltage within the specified range?

9–18 V

Go to Step 3

Go to DTC P0562 for low voltage or DTC P0563 for high voltage

3

Turn the ignition OFF.
Disconnect the C1 connector (GRAY) at the TCM.
Install the J 39700 breakout box and the J 43799 breakout box adapter.
Turn ON the ignition, with the engine OFF.
Using a DMM, measure voltage at connector C1 terminals 2, 4, and 3 to a known good ground.
Is the voltage within the specified value?

B+

Go to Step 4

Go to Diagnostic Aids

4

Turn the ignition OFF.
Disconnect the C2 connector (RED) at the TCM.
Install the J 39700 breakout box and the J 43799 breakout box adapter.
Using a DMM, measure voltage between connector C2 terminal 22 and terminal 23.
Turn ON the ignition, with the engine OFF.
Using the scan tool, command PC solenoid A ON.
Is the voltage within the range specified when PC solenoid A is commanded ON?

7–7.5 V

Go to Step 5

Go to Step 11

5

Turn the ignition OFF.
Using a DMM measure the resistance between connector C2 terminal 22 and terminal 23.
Is the resistance within the specified value?

5.5 Ω @ 20°C (68°F)

Go to Diagnostic Aids

Go to Step 6

6

Connect the C2 connector (RED) to the TCM.
Disconnect the transmission 20-way connector.
Using a DMM, measure the resistance between terminals L and M of the transmission side 20-way connector.
Is resistance within the specified value?

5.5 Ω @ 20°C (68°F)

Go to Step 9

Go to Step 7

7

Remove the oil pan. Refer to Oil Pan Replacement.
Remove the internal wiring harness at the PC solenoid A connector.
Using the DMM, measure the resistance of the PC solenoid A.
Is the solenoid resistance within the specified value?

5.5 Ω @ 20°C (68°F)

Go to Step 8

Go to Step 10

8

Replace the internal wiring harness. Refer to Wiring Harness Replacement.

Did you complete the replacement?


Go to Step 12


9

Inspect the engine wiring harness circuit for an open or short to ground. Refer to Circuit Testing and Wiring Repairs in Wiring Systems.

Did you find and correct a condition?


Go to Step 12


10

Replace PC solenoid A. Refer to Control Valve Solenoid Replacement (Solenoid A, B)Control Valve Solenoid Replacement (Solenoid C, D, E, F, G).

Did you complete the replacement?


Go to Step 12


11

Important: In most cases, the TCM is not at fault. Investigate thoroughly before replacing the TCM.

Replace the TCM. Refer to Control Module References in Vehicle DTC Information for replacement, setup, and programming.

Did you complete the replacement?


Go to Step 12


12

Perform the following procedure in order to verify the repair:

Clear the DTC.
Drive the vehicle under normal operating conditions.
Select Specific DTC.
Enter DTC P0748.
Has the test run and passed?


System OK

Go to Step 1
 
Okay so I’m confused on how I check voltage.


I absolutely hate wiring with a passion
So bear with me


3

Turn the ignition OFF.
Disconnect the C1 connector (GRAY) at the TCM.
Install the J 39700 breakout box and the J 43799 breakout box adapter.
Turn ON the ignition, with the engine OFF.
Using a DMM, measure voltage at connector C1 terminals 2, 4, and 3 to a known good ground.
Is the voltage within the specified value?

B+


I checked resistance between 22/23. I’m 6.0 ohms at 8 degrees C

The check internal wire harness L/M. 6.8 ohms


Before I pull the pan. I would like to do the voltage check as above
 
Turn the ignition OFF.
Disconnect the C1 connector (GRAY) at the TCM.
Install the J 39700 breakout box and the J 43799 breakout box adapter.
Turn ON the ignition, with the engine OFF.
Using a DMM, measure voltage at connector C1 terminals 2, 4, and 3 to a known good ground.
Is the voltage within the specified value?

B+

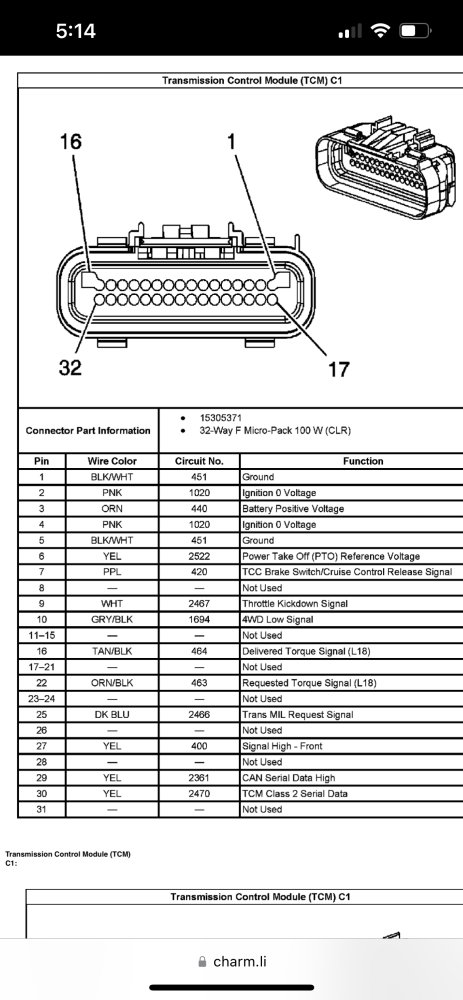
I don't have a pin out available for me to see, but at the TCM (trans control module) or computer as they call it it should have a grey connector. if you disconnect it from the TCM there should be numbers shown (very tiny) for each pin. look for #'s 2, 3, and 4. using a DMM ( digital multi-meter setting at DC voltage) probe each pin with the red lead and place the black probe on a good ground source (frame) record the voltage and re-post with the results. you might also record the voltage of the battery as well.

to my knowledge, the break-out box and adapter is not necessary but DO NOT force the meter probes into the connector causing the pins to open up. if you need to, get you a short piece of small wire like a 3 inch long piece of speaker wire stripped on both ends. one end to stick into the connector pins and the other end for the meter probe.

others can chime in that can explain it all better than I can.
 
Okay so I’m confused on how I check voltage.


I absolutely hate wiring with a passion
So bear with me


3

Turn the ignition OFF.
Disconnect the C1 connector (GRAY) at the TCM.
Install the J 39700 breakout box and the J 43799 breakout box adapter.
Turn ON the ignition, with the engine OFF.
Using a DMM, measure voltage at connector C1 terminals 2, 4, and 3 to a known good ground.
Is the voltage within the specified value?

B+


I checked resistance between 22/23. I’m 6.0 ohms at 8 degrees C

The check internal wire harness L/M. 6.8 ohms


Before I pull the pan. I would like to do the voltage check as above
I don't have a pin out available for me to see, but at the TCM (trans control module) or computer as they call it it should have a grey connector. if you disconnect it from the TCM there should be numbers shown (very tiny) for each pin. look for #'s 2, 3, and 4. using a DMM ( digital multi-meter setting at DC voltage) probe each pin with the red lead and place the black probe on a good ground source (frame) record the voltage and re-post with the results. you might also record the voltage of the battery as well.

to my knowledge, the break-out box and adapter is not necessary but DO NOT force themeter probes into the connector causing the pins to open up. if you need to, get you a short piece of small wire like a 3 inch long piece of speaker wire stripped on both ends. one end to stick into the connector pins and the other end for the meter probe.

others can chime in that can explain it all better than I can.
No voltage on 2 or 4

3 has 12.97 volts

Battery voltage 12.97 Volta on each battery
 
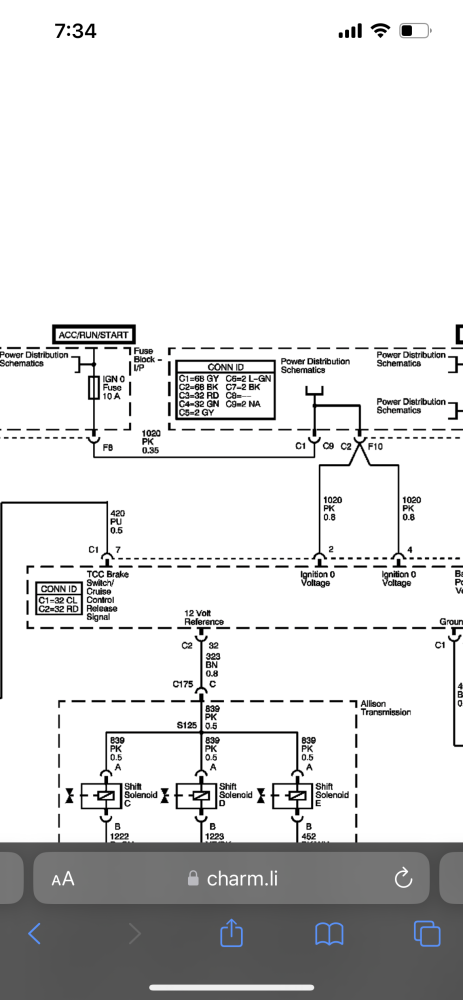
we probably need to look and see what pins 2 and 4 go to in the schematic. might be an open circuit from somewhere, bad ignition switch, fuse or relay if they are supposed to have bat + voltage.

double and triple check that you are on the right pins. I know the last time I did this kind of troubleshooting, I mistakenly was trying to probe the wrong pins. between my bad eyes and seeing pin orders. LOL some connectors only have the pins labeled on the ends where you have to look at the drawing to determine the direction and path of the numbering scheme. I learned on some the pin numbering to get it right from 1, 2, 3, 4, ect. was you have to follow the back side of the connector where the wires are coming out. nothing is actually standardized for automotive like it is for residential and industrial things.
 
Last edited:
2 and 4 are from an ignition source. if you have the book look for those circuits 440 and 451. see what paths they take going back to the switch.

it's possible the ignition switch is to blame here, but it also can be from a relay or other source triggered by the switch. look for other items that receive power from the same source in the diagram checking them for power with the key on. that would get you in the ball park if there is a broken wire somewhere in the harness.
 
has anything been done in the past by you, a previous owner or otherwise like an alarm system installed? if so, i would look at that wiring and see if there is some loose connections there. most alarms are installed and are connected to a variety of key switched power sources. then flowed though the alarm box into the truck. add-on relays or the brain box can go bad.

lots of shops that install alarms don't pay attention to which ignition source they use to get power from, they just find one and splice into it.
No aftermarket stuff on the at all
 
sound like maybe an ignition switch or a relay to blame here then. relays can still be clicking but not send any juice. and on the newer rigs the ignition switches are mostly junk plastic with tiny copper connections that wear out over time. nothing like they used to make them!

I would still get a diagram and follow it starting from the TCM back to the source to see where the power comes from. heck even the fuse can still be good but have a sour connecting on the giving end and it still receives power! GM and others are notorious bean counters for cutting costs making smaller and junky connections. anywhere they can save a penny, it's more profit for them and more cost for us.
 
get a diagram on the ignition switch and the power distro box. I assume you have power at the fuse shown there. if that fuse is powered all the time, there will be a relay in the distro box that the ignition switch triggers with the key on.
 
Back
Top