• Welcome to The Truck Stop! We see you haven't REGISTERED yet.

    Your truck knowledge is missing!
    • Registration is FREE , all we need is your birthday and email. (We don't share ANY data with ANYONE)
    • We have tons of knowledge here for your diesel truck!
    • Post your own topics and reply to existing threads to help others out!
    • NO ADS! The site is fully functional and ad free!
    CLICK HERE TO REGISTER!

    Problems registering? Click here to contact us!

    Already registered, but need a PASSWORD RESET? CLICK HERE TO RESET YOUR PASSWORD!

Opinions needed - Performed Optical Bump

Not bad.
I won’t get tired or sore from you doing your motor mounts at all! Haha
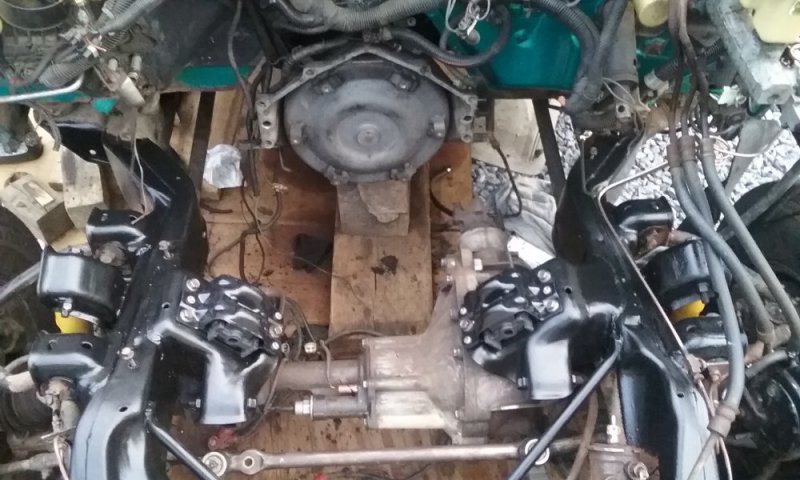
But yes do both and trans mount all together, well motor mounte with jack under engine. Then after that do the trans mount.
Since you have shroud out, easier now.

personally I like factory rubber mounts not the vibrate your teeth out ones that last longer.
 
Thanks Will. I just stuck the top shroud back on and realized I was wrong about where it was hitting the fan. It’s hitting on the passenger side and the top side. 1/4” gap on bottom and drivers side!
 
Yes, and do one side at a time to help support weight, with the jack and wood block towards the opposite edge of the pan from the mount you're replacing. Driver side is usually the bigger pain b/c of oil filter/mount. Basically, pull the MM clam shell assembly, drill out the rivets, separate the halves, replace the insert with the new polyurethane one, then either spot weld at the drilled out rivets or bolt together through the rivet holes, your preference, but consensus on here is that good welds are better than small nuts and bolts.
 
Just out of curiosity. Replacing the mounts will “pick up” the engine where it’s supposed to be at. The d-max blade is hitting the top side of the shroud now. What should I do to combat that ?
 
I’m thinking two possibilities to do just to get her on the road until I can order mounts and complete everything since I need the truck next week

the 6 blade fan looks to have the same bolt pattern as the d-max fan. Ether try switching them or try trimming the shroud with my sander on the top and side a tad

if I trim it. I’ll go for trying to get about 1/4” gap in the areas it’s hitting now. Since it’s already against the top side I fear replacing the mounts will make it where I’ll need to trim it again
 
See how much 'adjustment' play is in the shroud mounts first. Then trim. You can also carefully use a heatgun on the shroud and 'flare' the lip out more to gain extra clearance around the blade, but trimming is usually much easier and quicker.
 
Geeze Louise!! I looked up mounts at my local AAP to see if they had any in stock. $27 each and $15 for the trans. About $75 for everything. I look on Rockauto and the same exact ones Anchor 2621 are $5.62 ea and the trans mount Anchor 2817 for $4.42 !!! A whopping $17 for all three. Wow just takes a week to arrive lol
 
Well, It's almost midnight and I finally got her running! I did some "south side" engineering to get the shroud to clear the fan without trimming it. I don't like it but it will have to do until I get the mounts in and have a chance to install them. For now I had it running enough to open the t-stat and make sure coolant level was good.

I'll do some more testing tomorrow and get the controller temp adjusted.
As akdieseldrivers thread, maybe it was ak that suggezted a light run from the other fan wire, would be a nice addition so a person can see when the fan turns on, then adjust it from that temp.
 
The light is the next step.

anyone have experience in getting these clutches to break loose? I’ve held it up at 2500 rpm for several minutes and it’s still making a whirlwind in my driveway!

wanting it to start freewheeling so I can test it’s on and off ability
 
I finally got it to break free. Put a belt around one of the blades and cranked it over. Started up a couple seconds and done

since I’ve done that I’ve been able to cycle the controller once with it engaging in about 3 seconds delay time. Got it to break free on its own by goosing it to 3k Cycled the controller again and now it’s back to full fan with the power off on the controller!! Can’t get it to break free again without stopping and using the belt to hold the blade.

I guess these clutches need time to be broken in before adjusting properly maybe?
 
I was afraid of that! I’ll run it a few days and see if it will “break in”. I’ve got a little time on the return window from rock auto

the controller did kick in at 180 without me messing with it. Just need to wire in a light in the dash. I may try using the WIF light in the dash until I decide what and where I want to permanently install it. Since I no longer have the OEM FFM installed!!
 
I’m also thinking about the plastic fan blade not having as much resistance as the steel blade since it’s lighter weight but it does kick out some air!! Running at 2500 rpm with the hood open I can see the hood moving from the wind it makes lol. No more leaves in the driveway ether!
 
the WIF light is the yellow (middle) wire in the three pin connector. it requires to be grounded to light up. I'll have to add a ground trigger relay to power it from the controller, but that's not hard to do. I just need to scrounge up some more female spade connectors.

a trip to Home Depot may be in order!!

It would be nice to be able to change the wording in the cluster for the light! change it to "Fan On" or something like that ! (wishful thinking and dreaming)
 
Back
Top