• Welcome to The Truck Stop! We see you haven't REGISTERED yet.

    Your truck knowledge is missing!
    • Registration is FREE , all we need is your birthday and email. (We don't share ANY data with ANYONE)
    • We have tons of knowledge here for your diesel truck!
    • Post your own topics and reply to existing threads to help others out!
    • NO ADS! The site is fully functional and ad free!
    CLICK HERE TO REGISTER!

    Problems registering? Click here to contact us!

    Already registered, but need a PASSWORD RESET? CLICK HERE TO RESET YOUR PASSWORD!

Intake Manifold and Valve Covers

Big T

Well-Known Member
Messages
13,341
Reaction score
30,396
Location
Fullerton, CA
So I'm doing the valve covers the right way by removing the intake manifold. I have the manifold off and it's soaking in engine degreaser. I have my first view into the engine valley and it's pretty clean. I can see 506 casted into the passenger side, but where would the "<>" be located if there was one?

I've got the black Permatex. Only Permatex stuff labeled "the right stuff" was in a spray can. I need to run and get some brake cleaner.

While I'm doing this job, I'm going to do the heater hose to crossover fitting mod. I have the original fitting and it hasn't leaked yet, but I also have the parts to do the mod.

I also have a complete new set of those plastic buttons for the valve rockers.
 
OK how do you get the bottom injector line off of the injection pump? The one that goes to cylinder #7?

On the passenger side, how do you get the shield off the exhaust manifold to expose the injector lines? I pulled the top two screws, but there's got to be some more holding it in place. Do I have to remove the turbo and should I pull the fender well?
 
On the passenger side, how do you get the shield off the exhaust manifold to expose the injector lines? I pulled the top two screws, but there's got to be some more holding it in place. Do I have to remove the turbo and should I pull the fender well?
Sometimes the exh band clamp has to be removed. The shield is only a friction fit after the 2 screws are removed, you may need a pry bar/screwdriver under it to lift it upwards.
 
Alright removed the turbo and the shield came off. Got the bottom injector line off with a crows foot. Both valve covers are off. Tried to pry off a button and it broke, leaving the stem in the rocker tube. What's the proper way to get these buttons off? Pry from both sides with short screwdrivers? Grab and pull with vice grips?
 
Sometimes the exh band clamp has to be removed. The shield is only a friction fit after the 2 screws are removed, you may need a pry bar/screwdriver under it to lift it upwards.

That exhaust band clamp is a major PITA and yes it bumps up right against the shield.
 
I don't know about "proper", but I found drilling a 1/8" pilot hole 1/4" deep and using a 1lb slide hammer screwed into the pilot hole popped the other seven right out when I had a brittle one do the same thing on my 94.
 
How do I remove the broken off piece of the button?

Still not clear on the process to straighten out the valve covers. People posting here say ball peen hammer and chisel on a steel table. Not sure what the chisel is for and I don't have a steel table. I'm thinking a piece of 1/8" to 1/4"'steel that fits inside the cover and a mallet? I was able to get the covers off by prying with screwdriver in a small spot, top center. Then I inserted a putty knife and knocked it across, both directions, with a mallet.
 
You should be able to break the button, maybe channel locks and bend it, they really just snap into place, could use a drill and drill the center some... doesn't really matter get them off as best as ya can...

Hold the cover upside down on a flat piece of wood, plywood, anything flat and tap tap tap the bends out as best as ya can...
 
It Is not a bad idea to remove the rocker arm shaft to drill out the plastic button parts if you can't remove it with needle nose pliers. When it comes to any pliers- nothing cheap. Channel lock brand is great, Knipex is the best.

For the valve cover, here is the idea. Do some looking around on YouTube and there will be more how to...
https://m.youtube.com/watch?v=

Youtube link did not work, but I found this one:

 
OK used vice grips on the rest of the buttons. Half of them came out whole and the rest broke off. Used a punch to poke the remnants in and then removed the rocker arms to dump the pieces out. Used a 3/8" extension bar on the buttons and a mallet to tap them in. However, on the passenger side one slipped as I was positioning in and when I went to grap it, I fumbled and the POS went into the down pipe. Tried to suck it out with a shop vac hose inserted way down the pipe, but no go. So I have to take off the down pipe to retrieve that.

Found a lot of Permatex gasket sealant on the outer rockers of the passenger side.

What is the torqing specs for the rocker arm bolts?
 
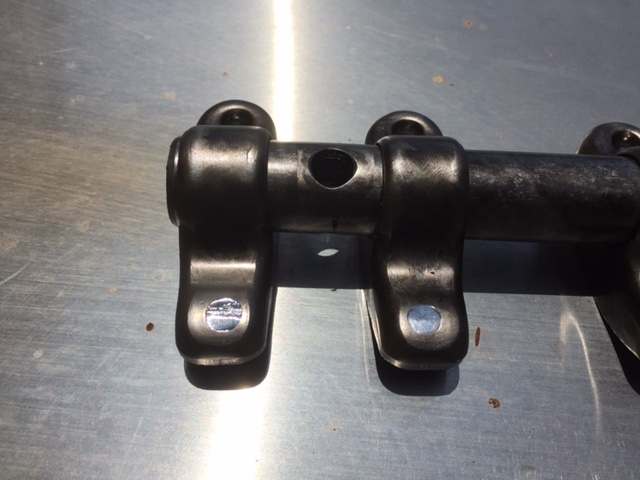
Noted this unusual wear on a rocker while I was cleaning them up. This is the #8 cylinder closest to firewall on driver's side. What's going on here?
 

Attachments

  • Valve Rocker.JPG
    Valve Rocker.JPG
    37.8 KB · Views: 20
Last edited:
What does the tip of the valve stem look like? From the side, does it look slightly flared or mushroomed out? Does the contact area appear different than the other valves? Is there excessive wear/play in the rocker to shaft compared to the other rockers? Is the shaft wear pattern consistent with the other rocker positions?
 
2 options:
Over torque on last bolt holding down rocker arm shaft.
Lack of oil.

Rocker arm 41 ft.lb torque
Valve cover 13-25 ft.lb torque
 
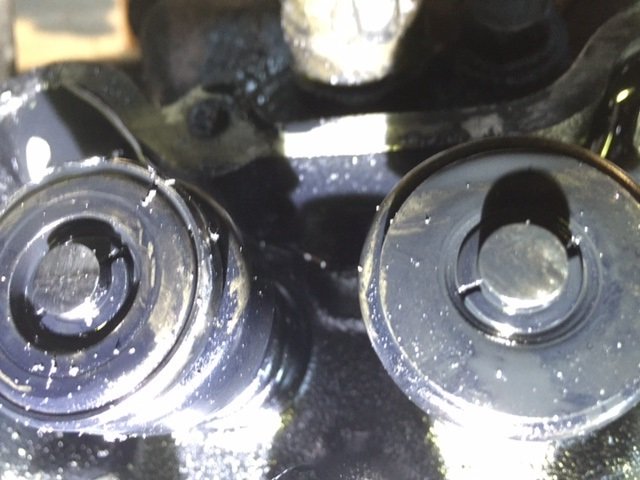
Here's a pic of the two valves on that cylinder. The pic is upside down, so the valve on the left is the one producing the wear on the rocker.
 

Attachments

  • Valve Stem I.jpg
    Valve Stem I.jpg
    50.1 KB · Views: 18
Back
Top