• Welcome to The Truck Stop! We see you haven't REGISTERED yet.

    Your truck knowledge is missing!
    • Registration is FREE , all we need is your birthday and email. (We don't share ANY data with ANYONE)
    • We have tons of knowledge here for your diesel truck!
    • Post your own topics and reply to existing threads to help others out!
    • NO ADS! The site is fully functional and ad free!
    CLICK HERE TO REGISTER!

    Problems registering? Click here to contact us!

    Already registered, but need a PASSWORD RESET? CLICK HERE TO RESET YOUR PASSWORD!

"599" project

bk95td

6.5 nut job/addict
Messages
2,548
Reaction score
29
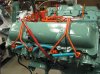
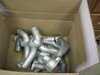
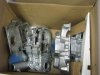
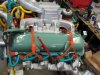
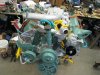
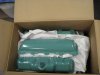
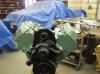
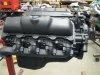
:rolleyes5:Yep, Another engine build.Before christmas I picked up 2- 6.2 or 6.5 engines that were overstock brand new rebuilts for $500 each.!-660and one 599. http://www.thetruckstop.us/forum/showthread.php?t=18716 Finally getting to finishing the 599 engine. It will be going in the 94 k2500HD in my sig unless for some reason the engine in the 94 is good and only has a cracked flexplate or something minor. I haven't tried starting it yet to hear the alleged "rod Knock"
The "599" was set-up for v-belt accessory drive and mechanical fuel injection so a few things will have to be changed to facilitate the serpintine accessory drive and DS4 electronic IP.
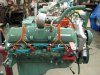
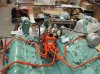
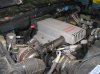
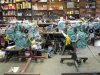
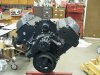
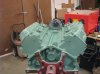
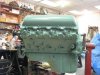
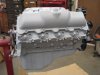
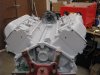
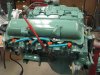
First off ,the black color had to go.I sanded the block, heads, Valve covers and oil pan. A couple coats of primer, then 3 coats of my favorite color. The water pump,timing cover and harmonic balancer are being replaced, so I didn't bother painting them.[balancer looked like crap and won't work with DS4 IP anyhow]
I had painted many spare parts with the last build so, this is going quite fast.
Before the paint was fully dry I put a brand new set of my delphi balanced injectors in. Since rebuilders don't put frost plug heaters in,:mad2: I had to put 2 frost plug heaters in.[ I like having a spare and the ability to heat it quick if need be.]:thumbsup:
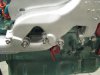
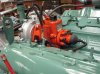
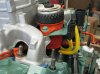
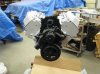
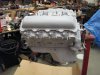
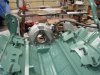
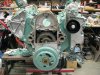
Next up was the timing cover,crankshaft timing sprocket and new harmonic balancer. Glad I took it apart. The rebuilder didn't use gaskets on the timing cover, only anarobic sealer. I prefer gaskets because I've had the anarobic sealer leak:mad2::mad2:[sucks to take all back apart because of a leak there] The crank sprocket gave a small fight coming off so I had to hook a puller into the roller chain to get it moving. It was just hard enough that it wouldn't pry off. The sprocket had to be changed because the one that was on it didn't have the reluctor for the crankshaft position sensor. The timing cover had to be changed to one with the hole for the crankshaft position sensor.
New front main seal with some grease smeared on it to keep it alive untill engine oil lubes it:thumbsup: Cover back on and new balancer installed with the new bolt that comes with it.
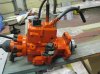
Next up is the IP. Better throw a few pics in first.
 

Attachments

  • IMG_0657_7.jpg
    IMG_0657_7.jpg
    43.5 KB · Views: 24
  • IMG_0674_8.jpg
    IMG_0674_8.jpg
    42.5 KB · Views: 14
  • IMG_0672_6.jpg
    IMG_0672_6.jpg
    40.3 KB · Views: 17
  • IMG_0671_5.jpg
    IMG_0671_5.jpg
    42.7 KB · Views: 15
  • IMG_0670_4.jpg
    IMG_0670_4.jpg
    42.2 KB · Views: 17
  • IMG_0669_3.jpg
    IMG_0669_3.jpg
    37.3 KB · Views: 15
  • IMG_0668_2.jpg
    IMG_0668_2.jpg
    39.4 KB · Views: 17
  • IMG_0667_1.jpg
    IMG_0667_1.jpg
    41.7 KB · Views: 17
  • IMG_0659_9.jpg
    IMG_0659_9.jpg
    42.9 KB · Views: 22
  • IMG_0658_8.jpg
    IMG_0658_8.jpg
    43.5 KB · Views: 20
  • IMG_0691_6.jpg
    IMG_0691_6.jpg
    45.7 KB · Views: 19
  • IMG_0690_5.jpg
    IMG_0690_5.jpg
    45.7 KB · Views: 18
  • IMG_0689_4.jpg
    IMG_0689_4.jpg
    51.8 KB · Views: 19
IP,injector lines and water pump

All ready for the IP. Have to be shure to use 12 point nuts to hold the IP to the timing cover. Hex nuts make it very miserable to tighten and loosen because there isn't a lot of room to turn the wrench. Put the IP drive gear on lining up the dot with the cam gear. I use locktight on the bolts that hold the IP drive gear on. They can easily shake loose if they aren't locktited. I put all the injector lines on before tightening them to make shure they line up. I don't have crows foot wrenches yet, so I have to take a few of the lines back off to start tightening the bottom lines. I don't tighten the nuts on the injectors yet, so I still have a little give to get the rubber seperators and clamps on. I should have gone to the stealer and bought the newer style plastic snap on seperaters. They are much easier to install and remove. Now I tighten the nuts on the injectors.
Next is the water pump. I had to get a serpentine accessory drive water pump plate. V-belt is different. I bought a new bosch HO water pump[under
$60 from rockauto] The long bolts going into the block need to be smeared with rtv to seal because they go into the water jacket.
The heat shield on the passenger side is next. Need to be shure that the tabs from the mounting bracket go through both layers of the heat shield or it could cause a rattle :eek:that would make you go crazy trying to find.Put new bosch duraterm glow plugs in. Anti-sieze the hell out of the threads.
Exhaust manifolds going on next. I use all stainless steel bolts on the exhaust. I used stainless threaded rod for the bolts that hold the glow plug heat sheilds on. I have a buddy making me more stainless steel glow plug heat shields:thumbsup: Every exhaust bolt is doused in anti-seize.
compound.I may be the one to have to take it apart someday.):h
Time for more pics
 

Attachments

  • IMG_0706_7.jpg
    IMG_0706_7.jpg
    38 KB · Views: 12
  • IMG_0702_3.jpg
    IMG_0702_3.jpg
    43.5 KB · Views: 13
  • IMG_0700_1.jpg
    IMG_0700_1.jpg
    43.5 KB · Views: 10
  • IMG_0695_10.jpg
    IMG_0695_10.jpg
    41 KB · Views: 8
  • IMG_0699_14.jpg
    IMG_0699_14.jpg
    49.3 KB · Views: 8
  • IMG_0697_12.jpg
    IMG_0697_12.jpg
    47.1 KB · Views: 9
  • IMG_0698_13.jpg
    IMG_0698_13.jpg
    50.1 KB · Views: 9
  • IMG_0696_11.jpg
    IMG_0696_11.jpg
    45.1 KB · Views: 9
  • IMG_0687_2.jpg
    IMG_0687_2.jpg
    46.3 KB · Views: 10
I'm disappionted matt. Niether you or louis said anything about this engine when it was in a picture with the optimiser. Here's a couple pics of the truck it's going in just to tease you some.:D
 

Attachments

  • IMG_0587_10.jpg
    IMG_0587_10.jpg
    44.7 KB · Views: 4
  • IMG_0585_8.jpg
    IMG_0585_8.jpg
    42.6 KB · Views: 8
  • IMG_0583_6.jpg
    IMG_0583_6.jpg
    42.7 KB · Views: 4
  • IMG_0582_5.jpg
    IMG_0582_5.jpg
    43.4 KB · Views: 6
  • IMG_0580_3.jpg
    IMG_0580_3.jpg
    45 KB · Views: 5
I noticed It when I went off about your 6.5 hotrod shop with your own personal parts store :) I saw it sitting there pretty :)
 
Please, please, please trade me your GMC center caps for my Chevrolet caps!!! I will cover shipping. :thumbsup:
.
.
.
picture.php
 
You're supposed to be able to buy just the decal for the bow tie or gmc from the stealer for $5 each. You might want to check on that. It would be cheaper than shipping two sets of center caps. Otherwise Yes I'd trade. I haven't checked into the stickers yet.
 
Nice looking job.

Just one question ???? whats with the red IP/lines ????


Missy

The IP,lines and fuel filter/manager are painted chevy orange. It makes them stand out ,not disappear as they would if painted engine color. It's also kinda my trade mark.I've painted 5 this way.:confused::eek::thumbsup::D
 
You're supposed to be able to buy just the decal for the bow tie or gmc from the stealer for $5 each. You might want to check on that. It would be cheaper than shipping two sets of center caps. Otherwise Yes I'd trade. I haven't checked into the stickers yet.

Sorry for the hijack. Part# 15634862 for GMC... $15.63... EACH! PM sent.
 
DS4 wiring, fuel supply and returns, coolant crossover and intake manifold

The wiring harness for The IP and all the sensors has to go in before the intake. I plugged in the Ip and crankshaft position sensor. The rest have to wait untill the crossover and intake are on.
The fuel return line that runs under the intake from front to back has to go in now ,before the intake is on.Can't bolt it down because it bolts to the intake bolt-studs. The injector and IP return line needs to go in now before the crossover. Connected up the IP return,Main return and injector return lines.
Coolant crossover is next. Cut a piece of 1" heater hose to fit between the water pump and the crossover. I smear some rtv on the nipple of the crossover to make it slide in the hose easier. A little rtv to keep the gaskets in place on the heads.Put the crossover in. I leave the thermostat out untill cooling system is full. I fill it through the thermostat hole to be shure that the block isn't air locked. I hate that you can't look in the radiater of the 94+ trucks:mad2:
Now's the time to run the new fuel hoses to the IP and tee valve. I used the old ones to get the length.I clamp all connections with the worm drive clamps. No crappy spring clamps.
Lower Intake time. Got the gaskets snapped in and set the lower on. I smear rtv on the highest [closest to the valve cover] bolts run into the open internal cavity and oil will weep out eventually if not sealed:eek:
Connected the fuel hoses up to the filter/manager and bolted down with the wiring connector bracket under it.
That's pretty much it for the engine untill i get the engine that's in the truck pulled out . I'll be using the GM8 turbo that's on it and a few other minor parts.
Took a couple pics of the boxes of spare painted parts. There's 4 sets of valve covers in the valve cover box.:rolleyes5:
 

Attachments

  • IMG_0714_8.jpg
    IMG_0714_8.jpg
    37.6 KB · Views: 11
  • IMG_0713_7.jpg
    IMG_0713_7.jpg
    39.5 KB · Views: 12
  • IMG_0712_6.jpg
    IMG_0712_6.jpg
    47.6 KB · Views: 19
  • IMG_0711_5.jpg
    IMG_0711_5.jpg
    41.7 KB · Views: 25
  • IMG_0709_3.jpg
    IMG_0709_3.jpg
    43.2 KB · Views: 16
  • IMG_0707_1.jpg
    IMG_0707_1.jpg
    44.6 KB · Views: 13
  • IMG_0703_4.jpg
    IMG_0703_4.jpg
    43.7 KB · Views: 20
  • IMG_0715_9.jpg
    IMG_0715_9.jpg
    35 KB · Views: 11
My sig tells the story. Got 3 trucks that need engines and maybe a 4th. I have engines for all of them and 1 spare. Doing it as a business is much different than doing it for a hobby. I don't think anyone would pay what it takes for time and materials. This engine was a cheap one to build because I practicaly stold the long block for $500. IP and manifolds came from a $150 929 parts engine with the 2 piece crankshaft.
 
Back
Top