• Welcome to The Truck Stop! We see you haven't REGISTERED yet.

    Your truck knowledge is missing!
    • Registration is FREE , all we need is your birthday and email. (We don't share ANY data with ANYONE)
    • We have tons of knowledge here for your diesel truck!
    • Post your own topics and reply to existing threads to help others out!
    • NO ADS! The site is fully functional and ad free!
    CLICK HERE TO REGISTER!

    Problems registering? Click here to contact us!

    Already registered, but need a PASSWORD RESET? CLICK HERE TO RESET YOUR PASSWORD!

What did you do with your GMT400 today...or yesterday....

It is okay to have about a 3/8ths long air bubble in the top bend of the clear hose with the engine not running.
If there has been an active stream of air passing through for some time, it has been a problem but just not reared its ugly head until now.
First thing I always check is the fuel fittings pre lift pump.

I just replaced the feeder and return lines
to the tank and the tank itself on my son’s Suburban. How do I “check” the fittings? What am I looking for?
 
Only thing I can think of is pulling them apart and sweet if the o-ring has any spots on it. Replace or in my case flip them around and try again. I’ve gotten lucky doing that a time or two
 
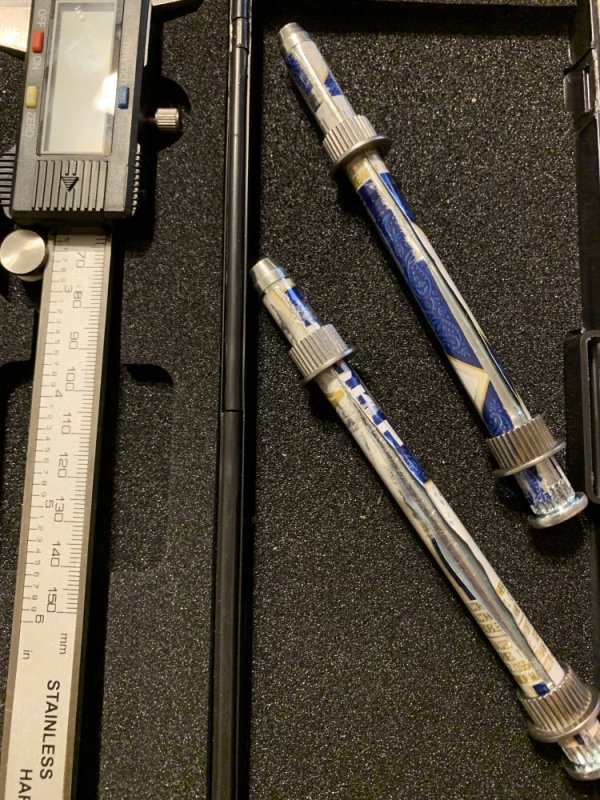
Getting ready to do the driver’s door hinge bushings. I toyed around with a beer can with the new pins and bushings. It’s a perfect fit. Just curious if this will last any length of time if I grease them well!! Got this together, bushings slid on over the homemade shims.

9F0651A2-4588-4875-8C57-DD9EF5188333.jpeg
 
To begin on the fuel- run a hot wire to the lift pump so it is on non stop. Put a drain hose on the ffm bleeder into a bucket or something and make sure you get a solid and constant flow. If you don’t- try it again at the lift pump output. If not there you have a bad lift pump or leaking point somewhere from inside the tank sock to the liftpump fitting.


The way this is really done in a pro shop is with a smoke machine- drain the lines of fuel by removing fuel cap, removing lift pump and use shop air to blow fuel back into tank from the LP inlet line. Then hook up the smoke machine at LP inlet line fitting and locate smoke.

Before smoke machines we used pressure regulator and pressurized that line and fuel tank to a couple pounds. Then spray soapy water all over the lines if rusty- if they look great then just all the connection points. DANGER!!! Pressurized fuel tank it is WAY EASY to rupture the tank. Doing it in gasoline vehicles makes it easy to cause an explosion. Totally outlawed for real safety reasons- hence the creation of smoke machines.

I have heard of people using halloween smoke machines to do this but no clue if it works or has its own dangers.

the other way people did it was with everything connected and nothing drained, pressurize the fuel tank and that pressure makes it leak fuel out. Again SUPER EASY to destroy the fuel tank.

So after experience the roughness after changing the FFM filter and driving it until all the air came out during my lunch break, I let it rest for 6 hours and it started right up with no roughness. I'm thinking the original cause had something to do with parking it pointed uphill allowing fuel to drain back into the tank.
 
So after experience the roughness after changing the FFM filter and driving it until all the air came out during my lunch break, I let it rest for 6 hours and it started right up with no roughness. I'm thinking the original cause had something to do with parking it pointed uphill allowing fuel to drain back into the tank.
We shall hope thats all it was.
On My truck, PO had installed a steel inline 3/8ths fuel filter after removing the tank sock. It now has a couple of hose clamps pre lift pump that a couple of times I have had to tighten the clamps each side of that filter.
Thats all.
 
We shall hope thats all it was.
On My truck, PO had installed a steel inline 3/8ths fuel filter after removing the tank sock. It now has a couple of hose clamps pre lift pump that a couple of times I have had to tighten the clamps each side of that filter.
Thats all.

Colby's fuel lines were pretty rusty (Utah truck) but mine are not. Colby's did have a missing o-ring and a broken o-ring where the lines attach to the sender. Sender was also corroded. Tank had rust in it. So we replaced all of those.

I do know that the last couple times I fully topped off the tank to the filler neck, it leaked fuel from the top of the tank. Just have not had the time to go in there. If I do drop it, I will probably replace the tank and decide on the lines.
 
Well got the door bushings somewhat taken care of. when I got it tore down I discovered the bushings were fine. it was the hinges where they go. bushing were all loose and spinning in the holes. I will need to get some oversize ones next time I do the job.

for now I managed to manipulate them to sit tight in the hinge by using a bolt, nut and a couple of washers squashing them a tad. greased it all up and re-hung the door. seems solid for now. no telling how long that will last, but it seems to happily close and open now lol.
 
Yeah- have to have it open somewhere. Remember the trick where you fill up a straw to the top and put your finger on it, pull the straw out of the drink and none spills out....
Because you have a perfect seal at the top. Raise your finger and it comes rushing out.
somewhere you are allowing air in that lets the fuel drain back.

In the liftpump the plunger seal stops the reverse flow of fuel even if there is a leak behind it that allows it to drain out between LP and tank. But when the seal in the LP is bad it will allow the line to drain all the way from ip to tank if you get bad enough angle.

For this reason the military adds a one way check valve before the ffm. Not a horrible idea for military applications where you rather ruin a truck than have it not start one time, but it hides problems that a private owner could use to catch problems that cost a couple hundred before it costs a couple thousand bucks. Adding the pressure gauge eliminates any draw back of the check valve.

that angle just helped it drain faster than it normally would.
 
@dbrannon79
Get some thicker than normal walled bushings with the proper ID that Your door hinge bushings would fit into them. Bore the hinges and weld in the thicker than normal walled bushings.
Insert Your door hinge pin bushings into the welded in bushings and maybe that could be a fix. 🤷‍♂️
 
Good morning fellas, I have some questions about a few things that's been bugging me on my truck lately, maybe y'all can help tell me I'm just loony and there is nothing wrong here lol, but here goes...

Some things I have been noticing on my rig that I'm not sure if it's something I need to tend to or if it's just a normal thing.

First one is my AC system.. since I have redone it, installing the variable orifice tube and high pressure fan switch it has been cooling awesomely but..... every time I turn it off and shut down the truck, I can hear what sounds like a mud dauber buzzing in the dash. I know it's the freon circulating back equalizing pressures but idk if that is an indication of an arising issue. the compressor also cycles quite frequently on a not so hot morning for a while until it has been on for a bit, once it's been on a while the compressor seems to cycle normally though it cools just fine keeping the vent temps right around 50 degrees.

Second one is my heater core, it's making gurgling noises when I accelerate from a stop. you can hear the coolant start to flow in the dash like someone is pissing in the pot at times lol. it doesn't seem to matter if the engine is cold or has been running a while. no overheating, temp has been staying around 180-190 without issue.

and third one is my rear differential. I had taken it to the shop and had the 3.73 gears installed and the posi unit put back in. when I picked up the truck though is drives fine, I had noticed that when turning and accelerating I can feel a slight vibration like the rear end was slipping slightly. I remember someone saying it was normal and would subside with a bit of time as it was the posi unit releasing while turning. well, it's been several weeks and it's still doing this. I have checked the oil and it's full, also doesn't make any howling noise. it drives smooth on the freeway and doesn't seem to have any other issue other than this which is bugging me.

I know I am just paranoid and don't want it to break on me, wanting to try and catch any arising issues before they rise up and bite me in the arse! the wife and I are planning on taking a 150 mile trip or so out to the coast on Monday after Mothers day away from the kids for our 24th anniversary just to get away for a couple of days. last thing I want on my mind is "are we gonna make it" lol
 
Might try pinching off the hoses going to the heater core. Pull the hoses from the core.
Use a garden hose and blast water through the core both ways. Use the air hose and blow air through both ways, very gently until water is blowed out, then givver the full force, blow through both ways. Repeat until water being blowed out of core is clean.
Put it back together, top up coolant and see if that helps.

Differential is fine. I remember a co. I worked for, hauling around candy/tobacco products, had a ford van with a posi of some kind.
Evertime backing up and turning, that thing would bam bam bam bam until the turn was completed. Do it going forwards too at low speeds. Over 150,000 miles on that POS and it still was doing it. Nust tje nature of the beasts.
 
I hope the heater core isn't clogging up! I had replaced it not long after I bought the truck
If it is that recent then should not be a problem with that.
Might be worth a good blow out just to confirm that it’s still clean.
Over here we use tap water to mix coolant with. Seemed to most always be a buildup of white residue out of the HC when they was blasted.
If You do this, be sure to flush the core with water before blowing out with air. Dont want a big old prestone mess all over the enjun bay. 😖😹😹😹😹
 
IMG_20220514_115132748_HDR.jpgIMG_20220514_115156455_HDR.jpg
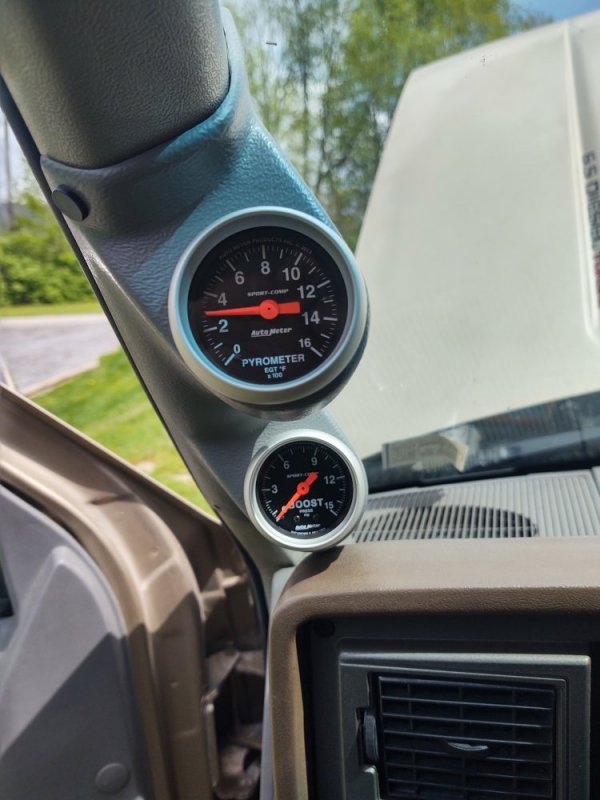
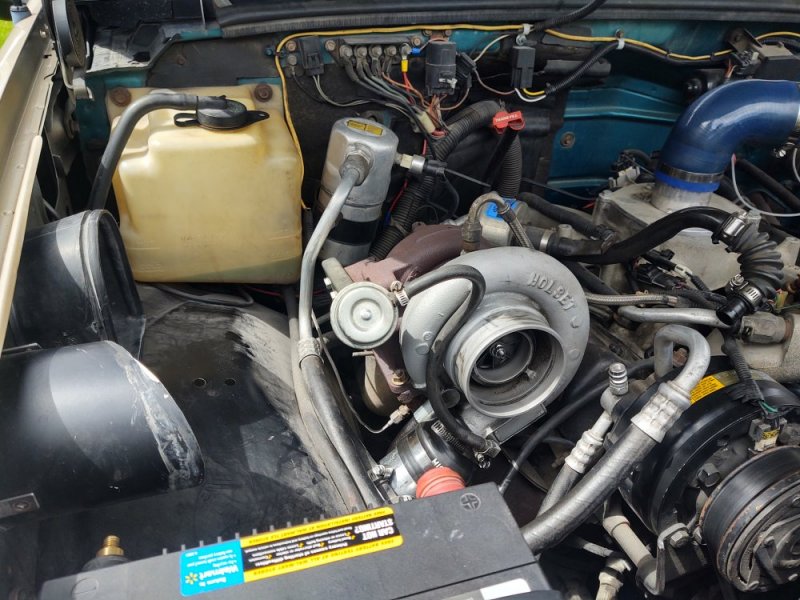
Replaced both gauges as they were having issues. Once I ran it, I realized that the boost gauge (which had lost zero for the second time)was still accurately measuring boost. This led me to discover that I am down 4psi on boost. It still runs fine, but the exhaust wasn't cleaning up like it did before. Took out the airbox and checked the compressor for wear and play- all seems good. Tightened up the wastegate a full turn, we'll see what she does! New filter on the way for the Airdog. Front brakes and windshield wipers if the weather holds!
 
View attachment 74667View attachment 74668
Replaced both gauges as they were having issues. Once I ran it, I realized that the boost gauge (which had lost zero for the second time)was still accurately measuring boost. This led me to discover that I am down 4psi on boost. It still runs fine, but the exhaust wasn't cleaning up like it did before. Took out the airbox and checked the compressor for wear and play- all seems good. Tightened up the wastegate a full turn, we'll see what she does! New filter on the way for the Airdog. Front brakes and windshield wipers if the weather holds!
I think You most likely checked it already, How is the air filter ?
 
Back
Top