• Welcome to The Truck Stop! We see you haven't REGISTERED yet.

    Your truck knowledge is missing!
    • Registration is FREE , all we need is your birthday and email. (We don't share ANY data with ANYONE)
    • We have tons of knowledge here for your diesel truck!
    • Post your own topics and reply to existing threads to help others out!
    • NO ADS! The site is fully functional and ad free!
    CLICK HERE TO REGISTER!

    Problems registering? Click here to contact us!

    Already registered, but need a PASSWORD RESET? CLICK HERE TO RESET YOUR PASSWORD!

New to diesels and tooj on a 6.5 turbo diesel project

with the intake off, you can actually remove the PMD from the IP and throw it in the glove compartment for a spare. keep it like you keep a spare tire! I can't remember what size the tiny allen wrench is but I do recall having to use a bit from a precision screwdriver set that has all kinds of bits to get it off. I would vote to pull it now while everything is apart.
 
A disagreement here.
The pmd on heatsink mounted to the firewall is not better than mounted to the injection pump.
It is still going to die an early death.

The pump mounted unit stays perfectly cold while the engine is running. When the engine gets shut of and fuel stops circulating then the heat soaks into the pmd and ruins it a little each time.

Mounted anywhere inside the engine compartment it is doing the same thing.
When the airflow stops going across the heat sink and truck is sitting- all that ambient heat from the engine gets absorbed by the sink and put into the pmd. Remember heat always disperses into cold- so that hot engine puts out its heat into the air. The hot air puts its heat into the colder aluminum fins.

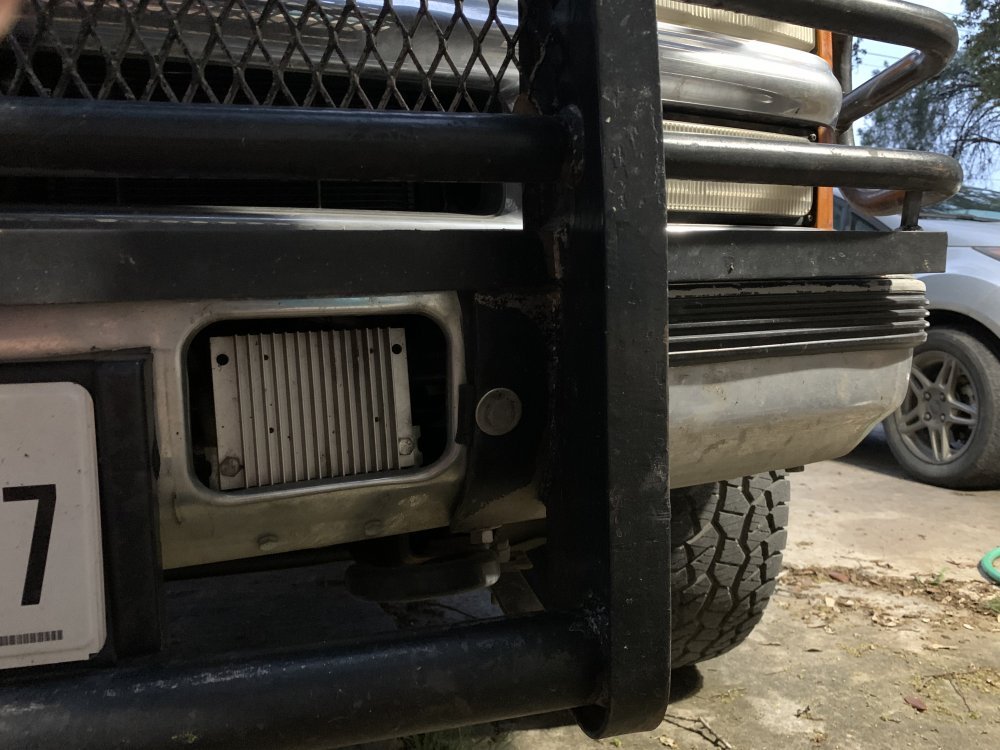
Get that heat sink & pmd out of the engine bay. Back in the 90’s we would mount them in the cab. Better choice is everyone mounting them to the front bumper on pickups& vans. (SOMEONE post a PIC for him to see please) For hummer guys on-top of the battery tray is good because they are out of the engine bay.

I agree remove the one on the pump while you can get it easy. But spend another $10 or whatever they are nowdays and buy a second heat sink. Mount the two next to each other on the bumper. Put a dummy plug in the second one to keep the connection clean. Then whenever there is a problem you just unplug from #1 and plug into #2 and keep moving.

Over on the hummer forum (they use 6.5 also) it has not been a few days since last guy posted he was driving home with the family on hiway and pmd failed killing engine. He coasted off side of road and waited for the tow truck. He just cleaned the truck and took a spare pmd out of the glovebox.

But even if he had it- what is better on the side if a hiway with your kids in the rig:
1. Unplug 2 connectors and swap them, start and drive away.
2. Unplug 1 connector. Go get the tiny allen wrench set, find the right size. Unscre the 4 screws making sure to not loose those tiny things. Put on new thermal contact pad or Artic Silver5 if you use it. Start all 4 screws without dropping one, then tighten those four. Plug in connector, put away the allen wrenches and bad pmd amd artic silver 5 tube. Start and drive away.
3. DO NOT even begin to tell me you want to be on the side of a busy hiway ESPECIALLY AT NIGHT and try unplugging the extension cable and plugging back in the factory location while half laying across the radiator or fender and feeling around that 200°f engine because it is better somehow.

Any hummer owners that like fancy bling, buy the battery hold down dual pmd heat sink from Mod Mafia. Otherwise do like all the pickup/ van owners SHOULD DO and mount the spare pmd on its own sink.

Remember you can get lifetime warranty pmd from Leroy Diesel. Drive daily on the new lifetime warranty one, use old known good as the spare. When the new one dies, move the plug over and get home safe. Then remove the bad unit and ship it to Leroy for the replacement while you can still drive your truck. When the new one arrives, put it back into use and cap off the old spare again.
 
with the intake off, you can actually remove the PMD from the IP and throw it in the glove compartment for a spare. keep it like you keep a spare tire! I can't remember what size the tiny allen wrench is but I do recall having to use a bit from a precision screwdriver set that has all kinds of bits to get it off. I would vote to pull it now while everything is apart.
I would pull it but pump is under warranty unless I remove it so I want to get everything running right before I pull it I ordered that pump from O'Reilly and only told them 94 6.5 chevy turbo diesel truck runs so it's got to be the right pump I'm sure didn't know they made 2
 
I would pull it but pump is under warranty unless I remove it so I want to get everything running right before I pull it I ordered that pump from O'Reilly and only told them 94 6.5 chevy turbo diesel truck runs so it's got to be the right pump I'm sure didn't know they made 2
Yes- wise move. Don’t tell them you are not using the pmd that came with it or they might scream exclusion.
 
OK awesome thanks for the information I planned on rebuilding the harness for the relocation set up the one I got for the truck looked pretty rigged up truck came with a couple pmd's so IL check what resistant is

Will's explanation is better than mine. he' been around these rigs a lot longer than I have :) I have learned most everything I know from him and others here in this forum. With the exception of the things I learned the hard way!!!


I wouldn't bother trying to measure it. they are marked with a # 1 - 9. the resistance measurement doesn't correlate to the markings on them, or at least won't be that value. it's a PIA to remove them with a set of pics but the one on the heatsink is missing, I would get the # off the one in the IP mounted one and just order one for the heatsink mounted one.

BTW since you replaced your IP already, if you still have the old one. pull the PMD off of it and get the # off the that resistor. plus keep that PMD for a spare. and DON'T try to test it without it mounted to a heatsink. it will fry it instantly as you turn the key on.
 
I mounted the heat sinks in the snorkel holes as Well described.

But after having to get down there in inclement weather to swap the extension harness. And getting my butt chewed for messing up good clothes, I started running 2 extension harnesses.

Not much more money, and much easier for old fat guys to swap.


Only buy Made in the USA extension harnesses. Anything else is asking for trouble.

I've also heard of just the resistors going bad.
 
I can imagine what it looks like I'm just relocating mine for now and will get another soon as I can afford turns out the bulb was bad I replaced and it came on as should thanks that adapter piece to do relearn will be here tomorrow maybe I can make it work with a scanner since I plan on wiring it to the obd1 to obd2 adapter if this isn't possible I'm taking it to my work pomp's tire and IL use there scanner it's a real one so any advice is appreciated I'm positive I'd be pulling my hair out on this thing still without this page even before I signed up I was on it almost daily and I thank everyone for the wisdom it's been a struggle for sure
 
the OBD1 to OBD2 adaptors don't work. or at least I have never seen them work on older vehicles.

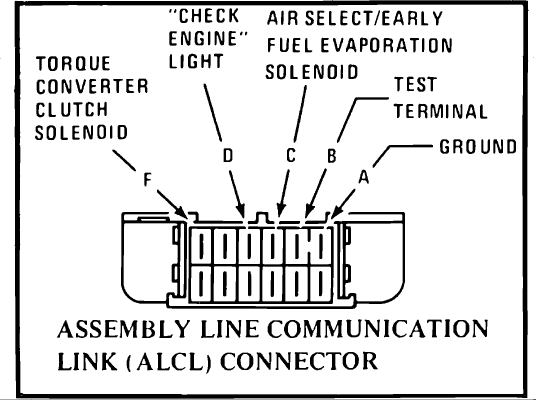
now that the light is working, try the paper clip method and see what you get. here is a short version of the instructions.

1679531914449.png

Jump terminals A to B.

When terminals "A" and "B" have been connected, the ignition switch must be then turned to the "ON" position with the engine not operating. The MIL (Service Engine Soon) should flash DTC 12 three times consecutively. This would be the following flash sequence: "flash, pause, flash-flash, long pause, flash, pause, flash-flash, long pause, flash, pause, flash-flash." DTC 12 indicates that the control module diagnostic system is operating properly. DTC 12 will be the first code to flash, if there are other codes present, ths MIL will begin flashing those codes. Once the MIL has gone though all codes present it will repeat the process. Write down all codes and report back to us :)
 
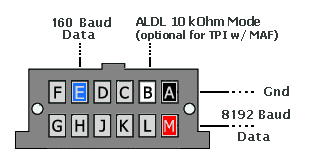
on the USB adapter I linked from amazon, following the linked thread in DP to put it together, you only need they two wires connected to terminals A and B for the laptop to communicate. Iirc (if I recall correctly) the post I linked from DP shows to get an actual data link connector which you don't need. only two wires are needed.
 
ok I confirmed it... the paper clip test is by shorting pins A and B on the connector under the dash. it does take about 30-45 seconds after turning the key to the run position for the codes to begin to flash. wile waiting for the codes to flash the light will be on solid as well as the service throttle light. then the engine light will begin to flash slowly. it's really easy to account the flash pause flash flash of the codes.

keep in mind that codes run up as high as 99, so that might take a wile to watch 9 flashes pause and another 9 flashes when each code gets repeated lol but it does work.

Now. for the adapter I linked in amazon... it will connect to pins A and M for it to work.
 
I have thought of cutting holes in My bumper for more air flow, except for now, i have a stick of box steel mounted back there and there is a receiver hitch attached to it. 😹😹
I didn't think about those full boxed bumpers. honestly you could mount the PMD up under the truck on the opposite side the exhaust runs. it should get plenty of air flow under there too. with the idea that you'd mount two side by side and running two extension harnesses up there to the engine, just have one tied off somewhere if easy access so you could just swap connectors there.

making it even more accessible, a third extension coming from the IP to a remote location like near the master cylinder or (for highway safety reasons) near the air filter on the passenger side, then the two going down to the PMD's under the truck. 🤔
of course you'd need that harness extension from the IP to the other extensions to be a double male plug for that to work!
 
on the USB adapter I linked from amazon, following the linked thread in DP to put it together, you only need they two wires connected to terminals A and B for the laptop to communicate. Iirc (if I recall correctly) the post I linked from DP shows to get an actual data link connector which you don't need. only two wires are needed.
OK part should be here today I was just thinking that since I already bought the obd1 to obd2 adapter I could Souder the USB port u linked with a couple wires to the obd2 side that way It would be permanent and I could plug in as needed
 
I didn't think about those full boxed bumpers. honestly you could mount the PMD up under the truck on the opposite side the exhaust runs. it should get plenty of air flow under there too. with the idea that you'd mount two side by side and running two extension harnesses up there to the engine, just have one tied off somewhere if easy access so you could just swap connectors there.

making it even more accessible, a third extension coming from the IP to a remote location like near the master cylinder or (for highway safety reasons) near the air filter on the passenger side, then the two going down to the PMD's under the truck. 🤔
of course you'd need that harness extension from the IP to the other extensions to be a double male plug for that to work!
I have thought about running the second harness.
The current PMD is a Dorman and seems to be functioning just fine.
The backup unit, in the jockey box, it is a Stanadyne grey box.
I see that Leroy Diesel now makes an extension harness for the Stanadyne grey box unit and thought that would be a good addition to compliment the supplies I have on hand.
Then if the Dorman fails switch over to the greybox harness, when the new lifetime warranty Dorman unit arrives mount and plug it to the harness and have it ready if that Stanadyne unit fails.
 
Back
Top