• Welcome to The Truck Stop! We see you haven't REGISTERED yet.

    Your truck knowledge is missing!
    • Registration is FREE , all we need is your birthday and email. (We don't share ANY data with ANYONE)
    • We have tons of knowledge here for your diesel truck!
    • Post your own topics and reply to existing threads to help others out!
    • NO ADS! The site is fully functional and ad free!
    CLICK HERE TO REGISTER!

    Problems registering? Click here to contact us!

    Already registered, but need a PASSWORD RESET? CLICK HERE TO RESET YOUR PASSWORD!

CV Axle Seperation

Well, I’m the one who’s got his finger on the the ID-10-T Mode Engaged” button.
More ignorant really but, feeling stooopid.

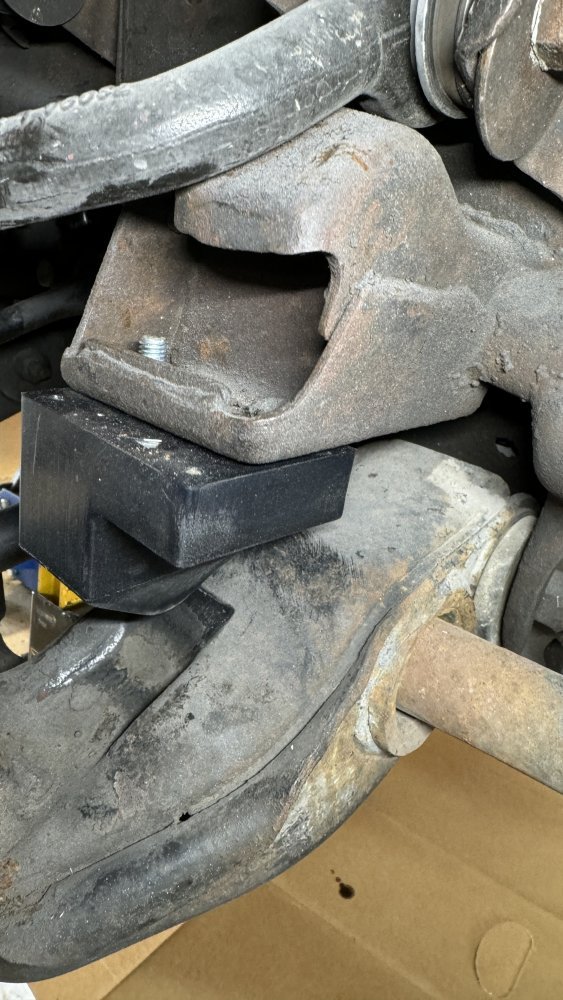
I’m checking out the differential and now know what a “Differential Lowering Bracket” looks like vs. OEM lower diff. Mount.

It looks like this:
View attachment 88863
And now you know the reason for the leaking output seal. Are you going to restore bracket to OEM?
 
And now you know the reason for the leaking output seal. Are you going to restore bracket to OEM?
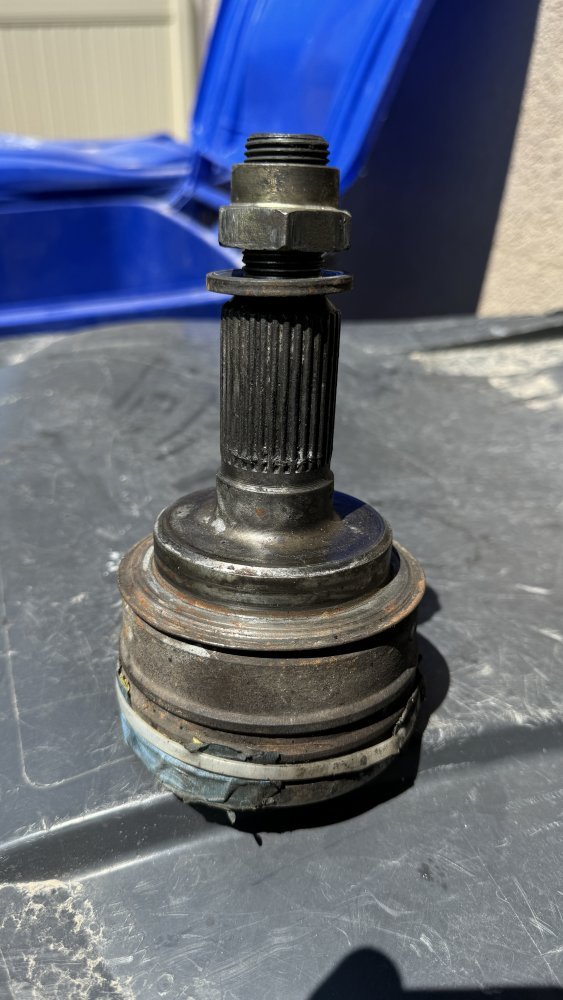
The output shaft seal is leaking from the latest impacts of the tripot coming apart. Prior to that, the truck was house trained, garage and driveway friendly. Even after the hit, without a half-shaft spinning because I had the ‘hub-stub’ only in place, the seal wasn’t leaking.


IMG_9530.jpeg

Can’t restore the lower differential mount as the OEM mount was cut off for this one to go on. Smacking My Head against a wall trying to figure out just what to do next. Grandkids were wondering why my forehead was bleeding. Maggie has taken them out for a treat to give me some space.

So, yeah, the front will need to come up a little to the point the half-shafts are level when the truck is on the ground. Getting out the front Bilstein 5100 front shocks. What the hell, I may just put the $%^&* lift back in and buy tie rods, pitman arms and idler arms by the gross for future needs. Half-Shafts never came apart when the lift was turned all the way up. Only after I dropped it a bit to save on the the afore mentioned tie rods….

Woke up at 1:45 this morning so, no serious decisions today or, maybe, even tomorrow.
 
Is it dangerous to cut and weld brackets to the frames? Does this weaken the frame?
Just has to be welded properly.
There are places on the frame rails you should not mess with, but even then there is always a way to do it safely.

The problems start when people that don’t really know how to weld properly or don’t understand what has to be done structurally.
Sometimes it is cheaper to get a new part.

Holding the diff- not insanely structural. If he was racing it off road or putting 1000 pounds of torque to it from a crazy engine, or something like that- then it would get more critical.

Manufactures make it plenty strong- but they cut corners for profit also.

That bracket that is shown cut in half and the longer piece with the bushings on either end - those will be easier to simply replace with some junkyard parts.
Just want new bushings going into the old part.
 
Wow Paul, when you jump in the goop you go deep 😯
"Go Big or Go Home" Get stuck at home when the parts bill gets too big.

Looking at recycle yards for a new diff. Might as well, this one lasted, oh, a month? Actually, several years and would have lasted longer but, we now all know why it hasn't and 'this is why we can't have nice things.'
 
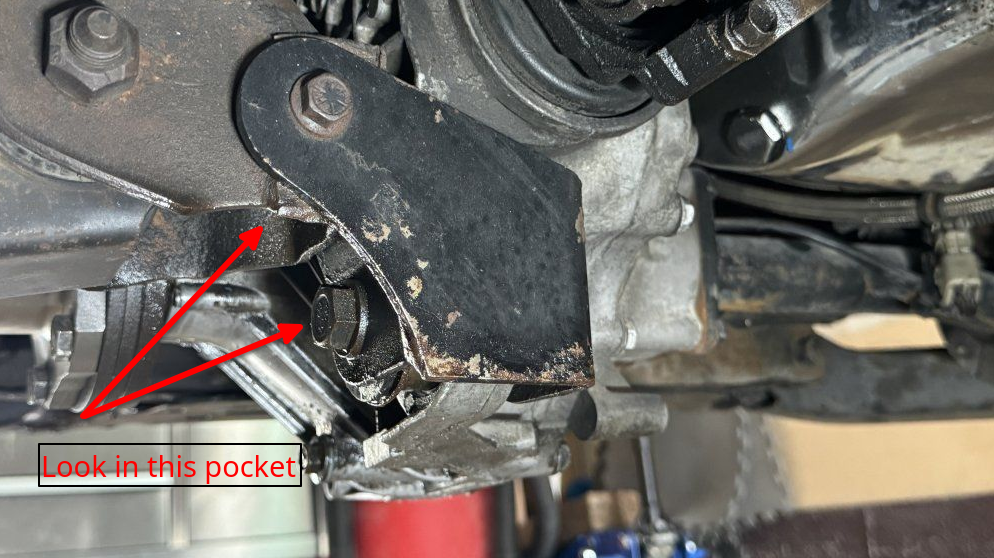
Looking at this one bracket and how it's on the frame, look up into that pocket. you will most likely see a bolt hole up in the pocket. there was a fold over piece of steel that would have cradled that mount. when I did the front diff on that burb it was a real PIA to get the diff in because you had to go over that mount and come back down into it. Look at the other mount points as well and see if there are other brackets or spacers too.

you might, I mean might be able to remove all the lowering brackets and still mount the diff if that folded under and over part of the bracket is the only thing that was cut off. it wouldn't take much to fab up a piece of steel that would again cradle that area and use the same bolt through the frame. a sort of U shape piece of steel. once you have it in place and bolted in using the bolt hole up in that pocket, then weld it into place.

I'm no expert but I think that mount point doesn't carry much stress to begin with and only keeps the diff from rocking. if this is the case you should be find without the steel part that wrapped around to the other side of this bushing.

1721780641535.png
 
If you can post pics of the front mount point on the diff and the top mounts so we can see what all else was modified. Hoping this was the only frame mount that was cut off.
 
I don't think omitting that hefty bottom bracket, OEM or otherwise, is anything but a recipe for a new differential. That's a hunk of steel in there originally and the drop bracket isn't a light weight item either.
1721787435983.png

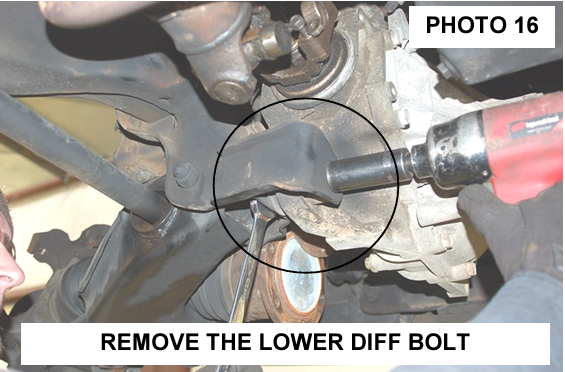
Here's some shots of the four brackets that comprise the differential drop in the kit and are still on my truck.

These pictures are from the installation manual which makes them show up better.

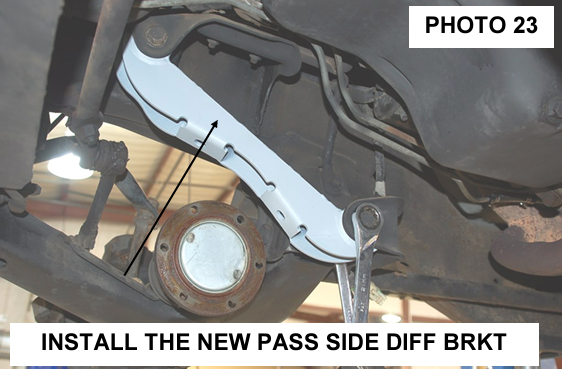
Passengers side support bracket. This can be unbolted and an OEM part sourced from a salvage yard bolted back in place.
1721786191810.png

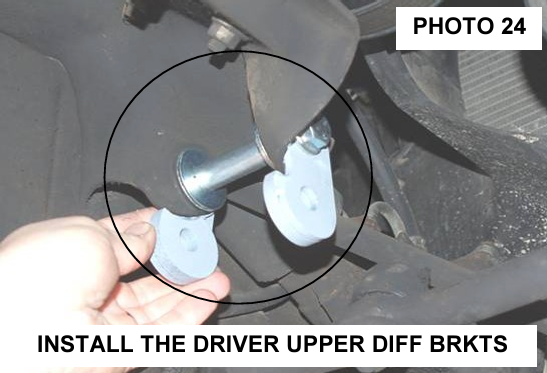
Top Support consist of two 'figure 8' type pieces. These can be simply be removed.
1721786220993.png

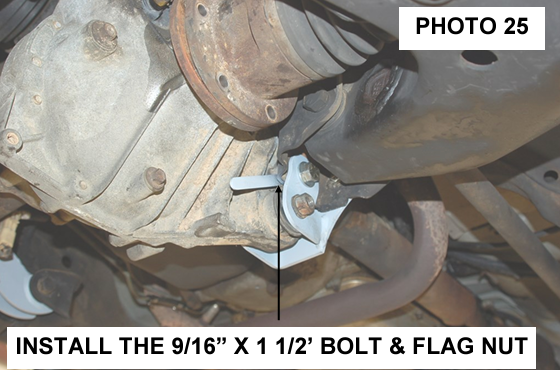
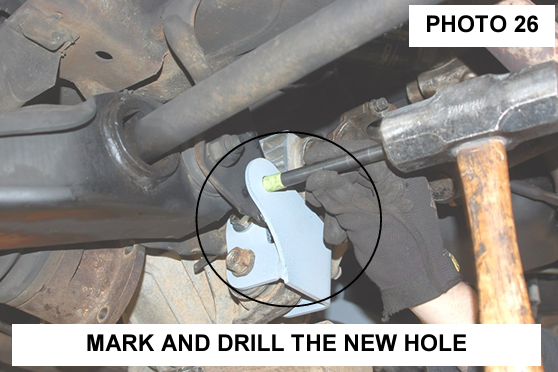
Bottom Bracket front and rear.
1721786103526.png
1721785876697.png
I wonder if it might be possible to modify this piece that is circled, weld it up and punch a hole in it to go into the 'new hole' and bolt it back on to provide the support vs. cutting off a piece at the strip yard and welding it on. My son is a journeyman pipe fitter and could do the welding either way.
 
I always liked your lift. I'd go back with it. To minimize the strain on rod ends probably should have a dropped pitman and idler arm
I liked it too and I’ve missed it.

Yesterday I tried turning up the torsion bars and swapping in the 5100 series shocks. Of course, I discovered a couple of issues.

Torsion Bars. With the front end off the ground, the upper control arms are almost in contact with the frame mount that limits suspension travel. This is the same feature the bump stops are bolted to underneath. This is before adjusting the torsion bars. Adjusting the torsion bars to add lift while the wheels are off the ground causes the upper control arms to actually rest on this feature. With the truck on the ground, no contact but, turning up the keys is thwarted by the weight of the truck. Now I understand why the Rough Country’s control arms are needed as they are shaped to clear this obstacle.

IMG_9563.jpeg


Shocks. I know they went in to BigT’s suburban without issue but…
Here’s a side by side of the uncompressed 5100 and ‘OEM 4600’ off my truck. I’ve compressed the other 5100 to install it.
IMG_9564.jpeg

The compressed 5100 had about 2” of travel left to do any dampening once the truck is lowered. Keep in mind, with the truck set to stock ride height, the 4600 is 1/4 too SHORT to install. A slight push upwards on the lower control arm with a jack is needed to get the bolts through. Which I needed to do since the 5100 is too thick to fit clear the gap in the upper control arm. However, with the same jack pushing up on the lower control arm, there’s enough of a geometry change to give the needed clearance. I’ll just have to bottom out the 5100 to fit it in there meaning, no shock dampening once the truck is on the ground.

So, slight dilemma. Turn up the torsion bars and blow out the 4600 series shocks from over extension and perform an isometric stress on the upper control arms since they are pressed against the frame thingy (horn) while adding lift.
Shove the 5100’s in somehow and let them act as real ‘shocks’ to the body as they are near bottomed out.
Leave the truck ride height as is with the lower control arms resting on the bump stops and the 4600 shocks doing something…

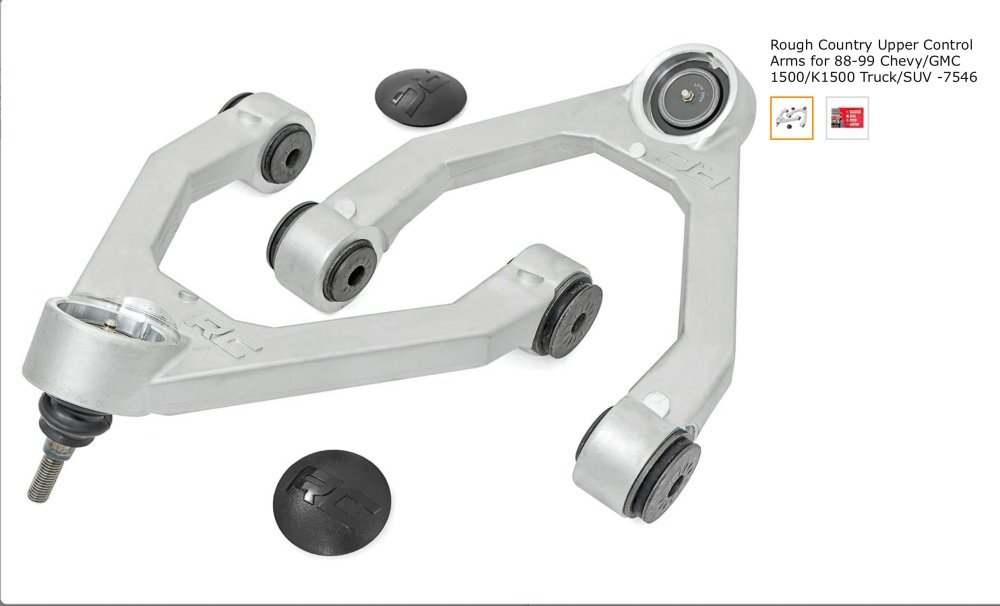
In looking at the current Rough Country offering, the upper control arms different from what I got in 2007. These are forged to allow the clearance over the bump stop frame mount and not just a couple of steel tubes welded to a ball joint mount like the old units.
IMG_0213.jpeg

So, with these I can turn up the torsion bars to get the CV axel angles back to “normal”; get clearance over the frame horn/bump stop mount; fit the 5100 series shocks to have dampening; not have the truck resting on the bump stops as it is now AND get the lifted look I like. Reminding myself it was after lowering the lift to save $$ on tie rod ends and idler arm wear that I started having the half-shaft issues. Let me think…

Control arms are on order.
Today, I’m trying to source replacement front differential from a recycle yard since this one is still dripping despite the ‘stop leak’ remedies. In fact, it’s started leaking on the passenger side now.
 
I liked it too and I’ve missed it.

Yesterday I tried turning up the torsion bars and swapping in the 5100 series shocks. Of course, I discovered a couple of issues.

Torsion Bars. With the front end off the ground, the upper control arms are almost in contact with the frame mount that limits suspension travel. This is the same feature the bump stops are bolted to underneath. This is before adjusting the torsion bars. Adjusting the torsion bars to add lift while the wheels are off the ground causes the upper control arms to actually rest on this feature. With the truck on the ground, no contact but, turning up the keys is thwarted by the weight of the truck. Now I understand why the Rough Country’s control arms are needed as they are shaped to clear this obstacle.

View attachment 88891


Shocks. I know they went in to BigT’s suburban without issue but…
Here’s a side by side of the uncompressed 5100 and ‘OEM 4600’ off my truck. I’ve compressed the other 5100 to install it.
View attachment 88893

The compressed 5100 had about 2” of travel left to do any dampening once the truck is lowered. Keep in mind, with the truck set to stock ride height, the 4600 is 1/4 too SHORT to install. A slight push upwards on the lower control arm with a jack is needed to get the bolts through. Which I needed to do since the 5100 is too thick to fit clear the gap in the upper control arm. However, with the same jack pushing up on the lower control arm, there’s enough of a geometry change to give the needed clearance. I’ll just have to bottom out the 5100 to fit it in there meaning, no shock dampening once the truck is on the ground.

So, slight dilemma. Turn up the torsion bars and blow out the 4600 series shocks from over extension and perform an isometric stress on the upper control arms since they are pressed against the frame thingy (horn) while adding lift.
Shove the 5100’s in somehow and let them act as real ‘shocks’ to the body as they are near bottomed out.
Leave the truck ride height as is with the lower control arms resting on the bump stops and the 4600 shocks doing something…

In looking at the current Rough Country offering, the upper control arms different from what I got in 2007. These are forged to allow the clearance over the bump stop frame mount and not just a couple of steel tubes welded to a ball joint mount like the old units.
View attachment 88894

So, with these I can turn up the torsion bars to get the CV axel angles back to “normal”; get clearance over the frame horn/bump stop mount; fit the 5100 series shocks to have dampening; not have the truck resting on the bump stops as it is now AND get the lifted look I like. Reminding myself it was after lowering the lift to save $$ on tie rod ends and idler arm wear that I started having the half-shaft issues. Let me think…

Control arms are on order.
Today, I’m trying to source replacement front differential from a recycle yard since this one is still dripping despite the ‘stop leak’ remedies. In fact, it’s started leaking on the passenger side now.
I’m lost as to how such a simple system got so f’d up. How can a factory designed UCA end up resting on a bump stop mount? How can you not restore this back to stock configuration?
 
I’m lost as to how such a simple system got so f’d up. How can a factory designed UCA end up resting on a bump stop mount? How can you not restore this back to stock configuration?
Because his differential is moved. That changes the angle of everything.

This is one glimpse into why people want straight axle rigs for offroading.

A single or double A arm with coil spring is a good system, until you start jacking around with it. You have multiple parts that need altering to move the height.
 
I’m lost as to how such a simple system got so f’d up. How can a factory designed UCA end up resting on a bump stop mount? How can you not restore this back to stock configuration?
The lowered differential and the oversized bump stops are two separate issues.

The aftermarket bump stop that 'fits your truck' looks to be about 3x the size of actual OEM. That's how it can be made to rest on the lower control arm. Makes for a lousy, noisy ride too. Technically, there's enough material on the bump stop that I could cut about a 1/2" or more of material, retaining the "V" shape and they might be fine. Or, source a pair of them from a Self Help Pick-a-Part yard.

The differential is lowered and one of the main mounts that cradles the pumpkin has been cut to accommodate the aftermarket bracket. Restoring the OEM config is rather simple except for having to cut a lower mount off a wrecked truck and weld it back in correctly.

I topped off the differential with the remaining 4oz of T-205 stop leak and drove the truck about 5 hours going south to grab a replacement differential from a strip yard in Aurora UT. Wouldn't you know it, now that I'm home the diff hasn't pissed a drop. I've seen this before after a drive and when things cool down it starts to weep diff oil. Morning may tell a different differential story. The up side is the spousal unit came along and directed us to a nice little German Cafe' in Spring City.

Cleaned up the rust on the passenger axel tube and will treat it while swapping out the front end and installing the lift blocks tomorrow. Maybe swap the differentials too but, I'm not that energetic.
We’ll get it done because Optimizer install is around the corner.

I got all the parts for the tractor to install the backhoe. Need to install the PTO hydraulics kit, but that does not look hard. Most of the frame mounts are installed. Hope to pick up the backhoe Saturday afternoon.
 
We’ll get it done? Not seeing a mouse in my pocket. :)
/s
Yesterday, while swimming in our pool, I found a live, but waterlogged mouse in the skimmer. I fished him out with a skimming net and flung him out over the split cedar fencing where he quickly disappeared. This confirms why we have multiple cats making the rounds on our property. No mice indoors for a couple years now.
 
Got the new differential cleaned up, de-rusted and applied a couple coats of POR-15 to keep things under control. Shot some gloss black caliper paint over the POR-15 to keep it in place.
Got the 2" blocks and 5100 series Bilstein's installed on the back. With its tail up in the air the truck looks like a cat in heat. Parts for the front portion of the lift arrived today so perhaps tomorrow things will get leveled out.
 
Back
Top