• Welcome to The Truck Stop! We see you haven't REGISTERED yet.

    Your truck knowledge is missing!
    • Registration is FREE , all we need is your birthday and email. (We don't share ANY data with ANYONE)
    • We have tons of knowledge here for your diesel truck!
    • Post your own topics and reply to existing threads to help others out!
    • NO ADS! The site is fully functional and ad free!
    CLICK HERE TO REGISTER!

    Problems registering? Click here to contact us!

    Already registered, but need a PASSWORD RESET? CLICK HERE TO RESET YOUR PASSWORD!

Changing 1994 6.5 For 1990 6.2

When I do my engines I don't bother doing head work - I couldn't afford it anyway at the time credit or otherwise. Valves and guides were ok in the stuff I used except when it ate the worm clamp. Then I tossed those heads and slugs. Again check them over and decide if you need to spend money on them.

These engines are select fit with D and C being different size pistons. I didn't exactly bother with it on replacement slugs for my 6.2. They are all "D" size.

I wouldn't do more than inspect the rod bearings and cam bearings. Leave the main bolts alone if you can. Yes, drop a towel at the bottom of the cylinder when you deglaze and clean it. Cracks have relived the stress so the theory is if you remove and re-torque the main caps you have new stress on the cracks or crack area. I have ~30K on a cracked block that I should have thrown away in my 1993. YMMV.

The pushrods on my project engine don't have dimples. Supposed to have a different color on the rocker end as I recall.
 
need to check the guides in the 6.5 heads before you claim them as good. Grab ahold of the spring end and yank it back and forth as in towards the cam and then away from it. With the springs on it you shouldn't really have any play. Better would be to remove the spring and then wiggle it the same way. Definitely make sure the short block is in as good of condition as you can afford. Sounds like the 6.5 isn't a very good candidate for rebuilding

Good info ak. Unless the cylinders are bored to get back to a clean, smooth surface I agree with you about the 6.5, and that is definitely out of my pocketbook ability at this time. I will do what you suggest with the valves. I don't have any tools for removing the springs, so I will have to go as far as I can without removing the springs. It will be Tuesday before I will be able to do so though. I borrowed a friends pickup and took our old travel trailer up to River Bend Campground this past Tuesday (45 miles up the South Santiam River) so that my wife could be with her extended family this week, for family reunion, while I went back home. I have no choice but to go up there for the weekend. I will enjoy myself, but the motor definitely will be at the top of my thoughts.

When I do my engines I don't bother doing head work - I couldn't afford it anyway at the time credit or otherwise. Valves and guides were ok in the stuff I used except when it ate the worm clamp. Then I tossed those heads and slugs. Again check them over and decide if you need to spend money on them.

These engines are select fit with D and C being different size pistons. I didn't exactly bother with it on replacement slugs for my 6.2. They are all "D" size.

I wouldn't do more than inspect the rod bearings and cam bearings. Leave the main bolts alone if you can. Yes, drop a towel at the bottom of the cylinder when you deglaze and clean it. Cracks have relived the stress so the theory is if you remove and re-torque the main caps you have new stress on the cracks or crack area. I have ~30K on a cracked block that I should have thrown away in my 1993. YMMV.

The pushrods on my project engine don't have dimples. Supposed to have a different color on the rocker end as I recall.

Thank you WW for that info, especially about the "C and D" stamps. I remember from other threads about you not removing the main cap bolts. My intentions up to this point have been to pull the rod caps to see what the bearing condition was, and use that condition to help me decide about the mains. After what you said here, 30K miles with no problems, really reinforces what you did. I will make notes about which cylinder has the "D" piston so it can be returned to the correct cylinder. I intended to clean both sets of rods today, but between how long it took to clean the timing chain housing, and the call for me to bring something my wife needed and wasn't in the trailer, I ended up having to make an unplanned trip up to the campground late this afternoon. But, I do intend to clean the pushrods and see what they look like in a clean condition.

I don't have a cylinder hone. What type is recommended? I don't know if local auto parts stores rent them or not, but I do need to know what to look for. When it comes to honing I'm wondering about turning the block upside down on the stand to do the honing. I would think this would give me a big advantage for cleanliness around the main bearings. What do others think?

Come next Tuesday I will have a big list of what needs to be done. Thanks to all who have helped!!

Don
 
if all your looking to do is deglaze a ball hone is best IMO. I'd use a rag like WW suggested and do it upright as it would be so much easier
 
I used WD-40 and a Lisle 23500 Stone-Type Glaze Breaker. You will use up the stone set doing this. Rag/towel on the bottom of the hole, cleaned with water and soap. Then oiled the he!! out of everything to rinse any further debris off including the crank throws and mains. Oil change was at 100 miles.Don't forget the ring compressor and ring spreader. I just have to find mine now...

23500.jpg
 
I really appreciate your answers, and I'm carefully listening and weighing the options.

I'm getting ready to leave the house now, but I have a question first. I'm going to need rings and bearings, what brands will give the best results and life? If you were to ask me advice about cabinets/woodworking I could easily give advice, but I'm out of my element here. How about gapless rings? I'm not sure that I can afford them, but my philosophy has always been that if at all possible spend for quality.

Don
 
I will donate as well as others for you to get gapless rings. Measure the pistons and cylinder to make sure you are standard and not oversize. 2 decimal places are all that's needed to know.

Bearings are needed why? (Just double checking with you.) Only engine that needed bearings for me was this one:

100_2981.JPG

The 1992 project doesn't need bearings.
 
Im holding back a set of ring for you minus the 2nd. I had to break a set to send to a customer. These are std 6.5 bore. If we can get member/s to donate the 2nd you'll be set. (that is if you can use them).
 
Bearings are needed why? (Just double checking with you.) Only engine that needed bearings for me was this one:

View attachment 45849

The 1992 project doesn't need bearings.

WW, I'm not a mechanic, but in my opinion bearings provide a softer, non galling, wear surface for the crank journals to mate to. However, the very small oil film between the bearing and the journal is the most important item as it provides the "slipperyness", like ball bearings, that is needed to give long life to the bearings.

Leroy, thank you for holding those rings for me. However, the 6.5 block will require boring to be able to use it. The 6.2 block is in much better condition and would be more cost effective to use.

I've been working on cleaning parts. The timing cover took a long time (I'm being picky) as it had thick, black paint on it, which I couldn't get completely off without using a paint remover. Did the factory paint the aluminum cover, or leave it natural? I'm guessing it was natural. There was the same black paint on portions of the heads that would have been accessible for being painted by somebody other than at the factory. In my mind this is evidence that the motor has been "prettied up" by somebody to make it easier to sell. They are probably also the ones who went way overboard on the RTV.

AK, I did what I could to check play in the assembled valves. I could not detect any play. I looked down the exhaust tubes in the heads and there was a small amount of oil on the valve stem, maybe new seal time? On the intake side there was oil all over the tube, apparently from the turbo, as the whole intake tube from the turbo had a small amount of oil coating the surface (turbo rebuild time?).

I then had a wild idea. I turned the heads so the valve heads were facing up and level. There's not much of a cavity around the valves, but I filled each space with the diesel oil from my parts cleaner until each valve head was covered. I then waited for an hour to see if there was any liquid loss. I am very happy to say that there was no loss for either head.

I have not removed the pistons from the 6.2 yet. There is carbon build up between the top of the cylinder bore and where the top ring stops. I know this will add some difficulty removing the piston, but will this be enough to cause damage to the piston during removal? Is there an easy way to remove this carbon prior to piston removal?

I do have a question about the cam bearings. I know the final answer might depend on the condition of the rod bearings when I take the pistons out. I have read that worn cam bearings can be the biggest culprit in low engine oil pressure. Would it be a good idea to plan to change them no matter what as part of this renewal?

Also, I need to test the block heater. I do have a digital multi-meter, and I know I use that to do the checking. I need to know what resistance I should see. The 6.2 has what looks like a good block heater. The heater in the 6.5 is toast, the external part the cord attaches to is eaten away. The power cord on the 6.5 is missing the end that attaches to the block heater. The 6.2 has that part, but the other half of that cord has been cut away. I may be able to splice them together and do it in a way that will be water resistant.

Don
 
Definitely do valve stem seals. which will require spring removal. If the engine had any blowby that's where the oil in the intake came from most likely.
You could use a wire wheel to remove carbon buildup but generally the only thing it might hurt is the rings themselves.

See if you can slide the cam back far enough to get a partial look at the front bearing usually it's the worst. If you pull the cam be extremely careful not to damage the bearings as it's pretty easy to do. If the block is vertical your not fighting gravity.

As far as the block heater goes it should read the same as a dead short. You could always plug it in to test, just don't leave it on very long unless it's submerged. Gets hot pretty quick.
 
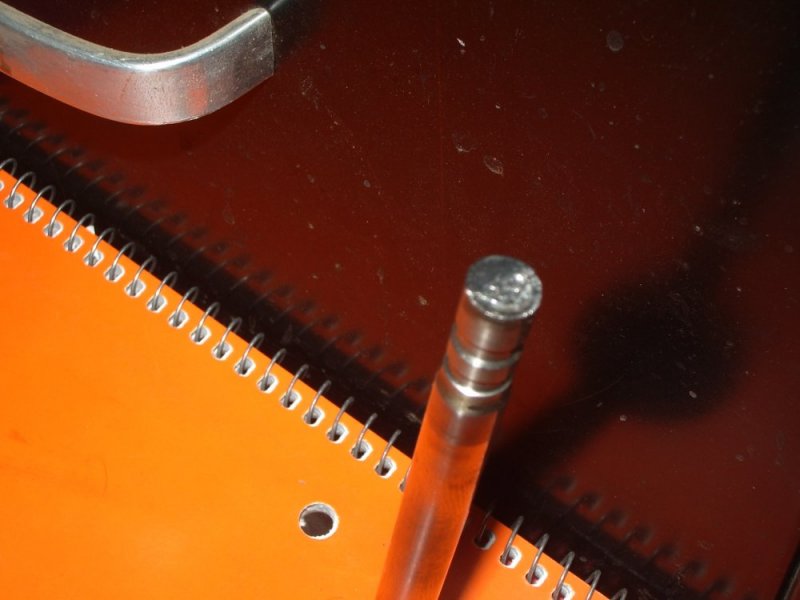
I was changing out valve seals and I think I found a "smoking gun". So far I haven't found anything else I could call bad, until I started replacing valve guide seals on the passenger side head. Then I noticed the end of the stem for #6 exhaust valve. When I first started hearing the "collapsed lifter" sound IMGP1460.JPG I had a hard time pinning down exactly where it was coming from, but it did sound to me like it was somewhere around #6 cylinder (next to the turbo). Here's a pic of the end of the stem. My little camera doesn't like to take close-ups, so the pic is a bit fuzzy, but you can make out what I'm talking about. I could easily see how the end of the stem is worn off at an angle, in addition to the pitted surface.

It would cost me at least $250 to have an auto machine shop completely go over the heads, and I don't have that money to spend. I would not normally do this, but can I take an exhaust valve out of the 6.2 head, lap it in, and use it (I would definitely do the liquid test after fitting the valve)? They both are very close in size. So far with the measuring I've done with my digital calipers the 6.2 valve is 5.1070" long, the 6.5 valve is 5.0970" long, about .010" difference. According to Rockauto a stock Sealed Power valve is 5.1120" in length. The head and stem diameters are the same, and the 6.2 valve fits in the 6.5 guide and seat.

Also, there are two different types of seals listed, an O-ring (stock), and a Viton positive seal (goes on the valve guide and the valve stem slides in it). My 6.5 heads had the O-ring only, and the machinists book at my local Carquest shop called for the positive seal on only the exhaust valves. The machinist said he would use just the O-ring since that is what was already in there (the original ones were very hard and brittle). Also, would the positive seal possibly restrict too much the amount of oil that is allowed into the valve guide? This is what the machinist was concerned about.

I have not been able to find for rent an inside caliper for measuring the cylinders. Using my digital calipers the bore appears to be the stock 3.875". I was hoping to not have to take the block off the stand until it was ready to install in the pickup, but I guess I'm going to have to somehow wrestle it into the back of my Astro and pay the machinist to mic it for me.

Where do you get the gapless rings? I was trying to compare prices, but my local Carquest doesn't have them.

Advice is needed as these questions are something I've never run into before.

Don
 
Last edited:
Never seen the valve tips like that before my 1992 project. Ordered new valves and rockers as I had 2 bad exhaust valve tips. Leroy diesel for the parts and or Rock Auto. Gapless rings Leroy sells and frankly no one can touch his prices on them. Positive seal valve stems are for high mile engines. Yes they cut down on valve guide oil. I don't care about adding 1 quart or more per 1000 miles so I would stick with the o-rings. A 350 that smokes blue on startup gets the upgraded valve stem seals.

If the cylinder appears to be stock by your measurements - it's close enough for a budget 'patch' job.
 
Thanks WW. I was really hoping somebody with way more experience than I have would chime in and say that what I was thinking about would work in a pinch. It definitely is not what I would like to do, but what I am having to do. I just need to pull the pistons now and make my final list of needs.

For that valve stem tip, it appears to me that the hard facing on the stem was maybe too thin and it started chipping off/wearing.

Don
 
Wore through more likely. Again the rocker for that valve needs to be changed as well. I would check the pushrod carefully for bent, wear, and length. Possible that lifter collapsed all factors leading to pounding the valve tip from excessive clearance.

As you had a angle wear on the valve I suggest the valve rotor needs to be swapped out for that valve as well.

Roll the pushrods on a very flat surface like a piece of glass to check for straightness

WW and ak, both of you have got some good ideas. Will do tomorrow.

Don
 
O.K., another update and more questions.

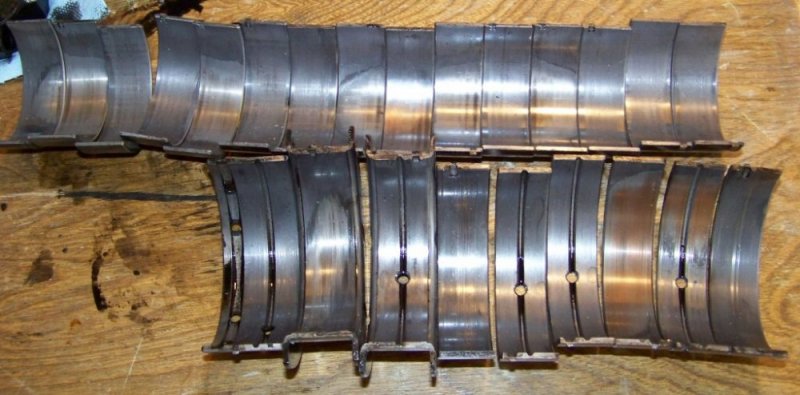
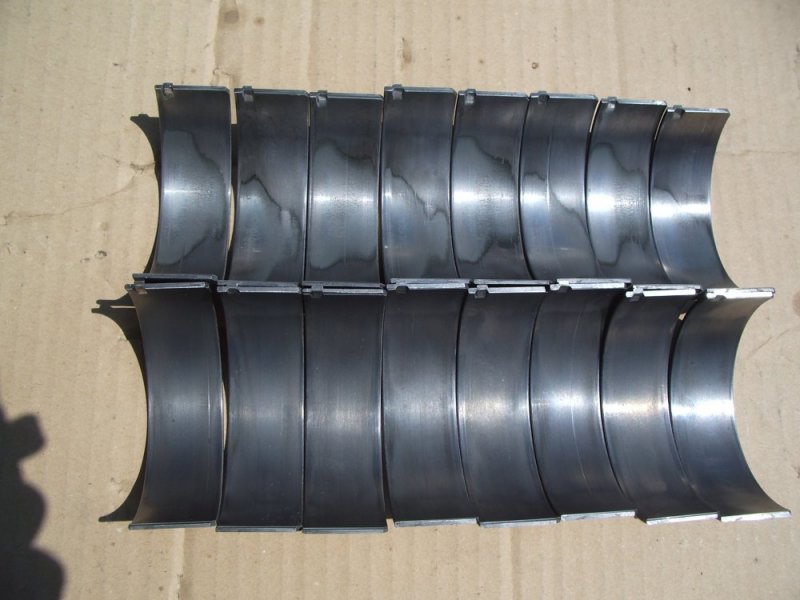
I pulled the pistons in the 6.2 yesterday and did some honing. Today I cleaned the 6.2 pistons and rods. I also laid out the 6.2 rod bearings and got a pic of them. Rod bearings #1,3,5,&7 had these numbers stamped into the back side. Top row- GM4, second row- 18007471, third row- 94M (space) 932. Rod bearings #2,4,6,&8 had these numbers stamped into the back side. Top row-GM4, second row- 18007471, third row- 96A (space) 932. The only difference was in the 94M and 96A stampings. I'm assuming these are standard bearings since they do not have anything that I see that make me think they are oversize.

Here's a pic of the rod bearings. The top row of bearings was in the rod, and the bottom row was in the cap. They are in sequence #1-8 left to right. There isn't any of the lower copper layer showing, but enough wear that I'm thinking I need to pull the mains. Number 6 bearing does have a small groove in it, but I can hardly feel it. The crank journals look very good to me, except for a small mark that I could hardly feel, which matches the mark for #6 bearing. This all matches up with an oiler passage, so apparently something was in there and left that small mark. Opinions? Information?

Since I don't have any micrometers I used my digital calipers, though I don't feel they are as accurate as a micrometer. I looked on the web for info and what I found is that the piston skirt is larger diameter than the piston head, so I measured across the skirt just below the piston pin as it was still a full circle there. All the pistons were in the 3.97 to 3.9710 range, so I'm assuming they are standard size. I tried measuring the top of each cylinder, but I don't feel that with the wear in the cylinder I got a very accurate measurement.

On the top of each piston were these letter stamps. The single letter stamped in (the first item I list) was directly opposite the chamber in the piston top. The second set of letters (in the parentheses) was always towards the outer edge of the top and to the left, about halfway between the first stamped letter and the chamber in the piston top. Piston #1- C (GR), #2- C (GR), #3- D (GR), #4- C (GR), #5- C (OR), #6- C (OR), #7- C (GR), #8- C (OR). I don't know if these have any real meaning for what I'm doing or not. Any info or ideas?

I checked the pushrods for straightness (rolling them on a piece of glass), and they all looked good. I do have a question though. I've asked before about which end of the pushrod goes up. WW said that they were supposed to have one end with some kind of color to it. I found a dimple on the side of one end, and they initially seemed to be opposite of an end that seemed to have a slight amount of color. But, then I found several the seemed to have the color on the same end as the dimple. Now I don't know what to think, except that each rod definitely does have a dimple. Does anybody know which end is supposed to be down into the lifter?

Oh, by the way. I quickly looked over the pistons out of the 6.5 and found something else that was definitely a big part of my problems. #6 piston pin was loose in the piston. Not very much, but enough that I could just barely see the pin wiggle up and down in the piston. This is the same cylinder with the badly worn/chipped valve stem.

Slowly making progress, until either the heat or my back says it's time to stop for a while. I know it's not as hot as where you are WW, but for me 101 (todays temp on our front porch) is HOT!

Don
IMGP1462.JPG
 
my vote is to leave the mains alone. those rod bearings look pretty normal to me. everything I've read is the copper color goes up on the pushrods. can't help on the stamp marks
 
my vote is to leave the mains alone. those rod bearings look pretty normal to me. everything I've read is the copper color goes up on the pushrods. can't help on the stamp marks

I agree color is the hardened side and goes in the rocker. Look on the bright side - you will know pretty quick if it is installed wrong. Now if they were installed wrong replace all of them and the rockers to be sure. On a budget just replace the ones that were installed upside down. That is BOTH Rocker and pushrod as extreme wear occurred! Ignore the dimple.

Again these engines were "select fit" at the factory so different pistons and bearing shells were used at the factory to get the tightest tolerances possible. This is why you see C and D on the pistons - they are different sizes. After wear as long as they go in the same holes it doesn't matter. You will need to check the ring end gaps in the cylinders. All 24 of them and I hate split rail oil control making 32 rings added to gapless rings making 40 rings to file fit. :blackeye:

The rod bearings are like $30 at Rock auto for a set. I wouldn't touch the mains. Check the cam bearings if you are really worried.
 
Back
Top