• Welcome to The Truck Stop! We see you haven't REGISTERED yet.

    Your truck knowledge is missing!
    • Registration is FREE , all we need is your birthday and email. (We don't share ANY data with ANYONE)
    • We have tons of knowledge here for your diesel truck!
    • Post your own topics and reply to existing threads to help others out!
    • NO ADS! The site is fully functional and ad free!
    CLICK HERE TO REGISTER!

    Problems registering? Click here to contact us!

    Already registered, but need a PASSWORD RESET? CLICK HERE TO RESET YOUR PASSWORD!

What did you do with your GMT400 today...or yesterday....

I give on the bottle jack conversion. After about $60.00 and a lot of goofing, it just aint going to work with the smarts that I have.
I orderd one a them chinkaneez testers from Amazon.
Guess I’ll see if it will fit the 6.5 injectors after it arrives.
I did howsomeever got the rocker girdles installed.
And thats about all frum me for this day.
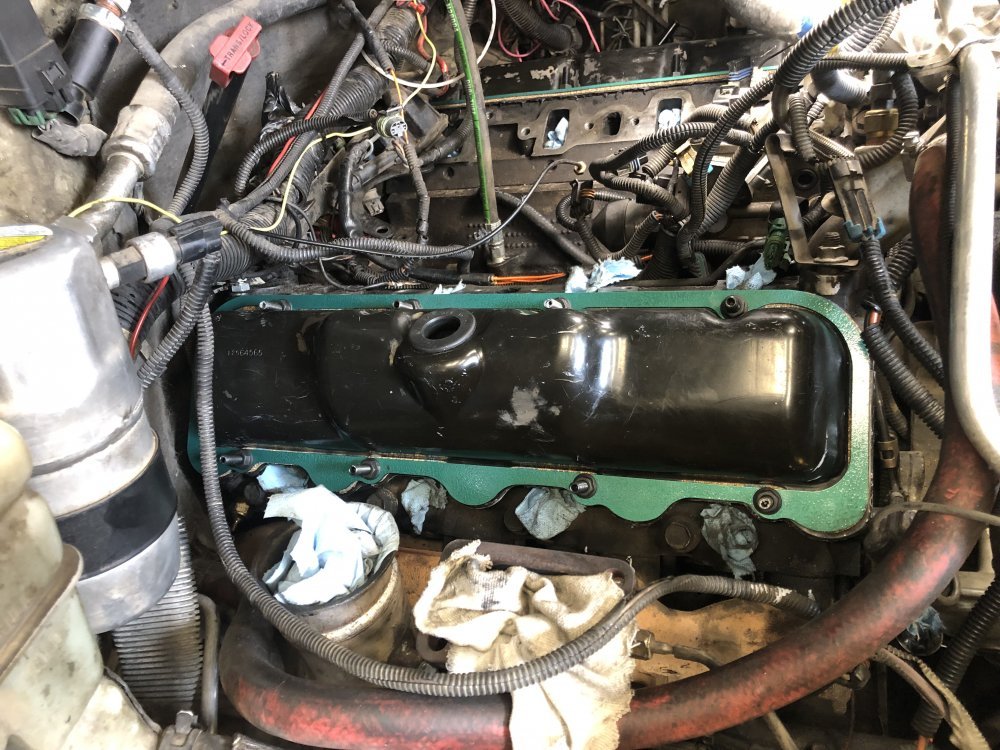
That was the best paint that I had. Leftover from the park benches. 🤷‍♂️😹😹😹
E631C855-C911-4D17-8FC6-4BEC494EA8FB.jpeg
 
See if your local auto parts store rents out a smoke machine. Put smoke into the cer hole and test away. Keep pressure at 7-8 psi maximum.
If you pull the dipstick you can create flow through the engine. Also removing the oil fill cap. Get the smoke all through there then plug it up and watch for the smokin gun!

The color chosen proves you are ready for the new environmental laws= you now have an updated green engine!
Wonder if a haloween fog machine would work... just be ready to do an oil change after testing.
 
See if your local auto parts store rents out a smoke machine. Put smoke into the cer hole and test away. Keep pressure at 7-8 psi maximum.
If you pull the dipstick you can create flow through the engine. Also removing the oil fill cap. Get the smoke all through there then plug it up and watch for the smokin gun!

The color chosen proves you are ready for the new environmental laws= you now have an updated green engine!
That I shall do. If the parts stores (1) that has tools dont have a smoke muscheen, maybe the mechanic I have to work on the wifeys toyodah might have one he would allow me to use.
And, how difficult is it to pull the oil pump drive adapter while I have the intake removed and nothing in the way except the wire harness.
Does it have a plastic retainer on the shaft that if I pull the adapter I might loose the shaft down into the enjun and not be able to retrieve it without a total tear down ?
Thinking that with 260,000+ miles it might be worth it to pull that adapter and replace the O Ring on it.
I imagine it has an O Ring.
Too confusing to keep straight everything with your truck alone on this thread for me.
I said smoke machine plugged into the cdr hole in the passenger cover so you can verify the gasket won’t leak before putting everything else back together.

Talking about the oil pump drive - I can’t remember what thats about.
Yup, on the smoke machine.
The oil pump drive functions perfectly fine.
I just like to maintain anything that might give Me a problem in a week, month, year or maybe even two years from now.
I dont know about how long that the gasket, O Ring or seal is good for that is under that camshaft to oil pump drive adapter is good for.
I have had to go through quite a bit of wrenching to replace the O Ring on the oil pump drive adapter on my 1987 Buick with a 2.8 V6 under the hood.
I would rather do that maintenance on this 6.5 now while it is accessible with the intake manifold removed.
But, if there is a danger of dropping a connector shaft while removing that drive adaptor I would like to know in advance.
Get to know what I might have to be dealing with before I het there kind of a thing.
 
Went on the hunt.
It appears that this oil pump drive adaptor has a gasket under it, not an O Ring like on that Buick.
I will not mess with it as it appears that it is not leaking.
Thank You @Will L. for suggesting finding a smoke machine to check the engine for any further leaks before I move on.
 
Oh, ok. I would leave that the heck alone.

There is a plastic connector that joins the shaft of the pump to the shaft of the drive up top. That many miles and years- probably not going to undo it without having to replace it- and that means dropping oil pan.
 
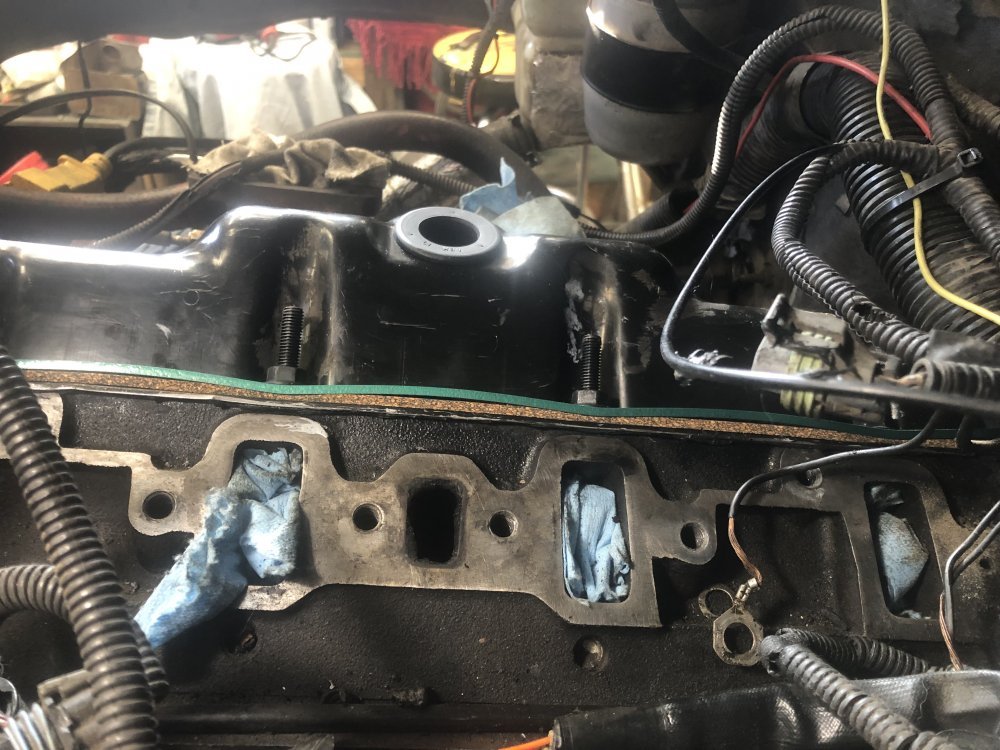
Book calls for 16 ft lbs torque on the rocker covers.
Thinking I might have to pull this girdle and flip it over then retorque but not quite so tight.
See what it does at maybe 12 ft lbs torque. 🤷‍♂️
Or could sand off the paint and the nail scale, down to shiny steel then heat the girdle until it turns to straw yellow, then it will be tool steel hard and might not bend so easily. 🤷‍♂️

832D2FD4-F5BF-4532-84EF-5050A368C77D.jpeg
 
That's 16 ftlbs? what gauge steel is the girdle made of? from the pic it looks to be at least 3/16" or 1/8" thick. I would think it would take a lot more to do that.

I hadn't paid a whole lot of attention to the girdle's design until your first pic, but remembering of the old 350 chevy chrome rocker covers that came with those wide single bolt girdles, each one was bent downward slightly at each end to help have a wide area pressed with the bolt was tightened. I wonder if the shape it has bent into now would work better to seal the large area if flipped upside down.
 
forgive me for the lack of knowlage, but the process to harden steel to make it more rigid from bending. Is that done by heating up almost to a glow and then quenching in cold water or is it heating up and then cooling down extremely slowly?
 
forgive me for the lack of knowlage, but the process to harden steel to make it more rigid from bending. Is that done by heating up almost to a glow and then quenching in cold water or is it heating up and then cooling down extremely slowly?
What we were taught in one welding class was that,
Remove the nail scale then use a torch, thinner steels a bernzomatic will work just fine.
Get the object down to bare steel then heat it with the torch until the steel starts to turn yellow and do not go beyond that color.
Allow the object to cool in normal air, no wind, no blow, no breeze.
When it is cooled it is ready to go.
 
And I just remembered something.
These girdles seems to fit but only one way.
So when I remove it I will flatten it then snug it back down but not to the place that it bends the girdle.
The covers should not leak with the right stuff being slightly squished while it was still wet.
 
This is Using 10mm bolt that is much more coarse thread so this won’t have as big a difference as the fine thread you are dealing with.
But at 20 pounds of torque a bolt applies
2238 pounds clamping force. But the stud applies
2455 pounds clamping force.

Thats nearly 10% more clamp force. With the fine threads- i bet it is more like 25% more force.

When I made my intake studs to mount the center mount turbo intake to my truck style heads- I didn’t get 75% of the torque before squishing out the intake manifold gasket and ruining it. Lucky I stoped when I did or it would have cracked the aluminum.
Oh my on both the previous posts.
Leroy says something about tightening them down to a reasonable amount, or some such.
I guess that with what the book says for torque spec, then what You post, it must be way way way too much over kill.
Good that I did not do this to the left side cover studs/nuts.
The left side is a mighty mean bear to get the rocker cover on, and the girdle even more so.
If I would carve the insulation from the firewall it might be a bunch more kind.
Now I will remove and straighten the girdle and this time use the 1/4” drive screw driver handle to pull them down.
 
Removed and straightened the girdle back to flat. Having a new set of rocker cover gaskets I laid on a new one of those too. Original one was squished some where the nuts screwed down.
Thread chaser through the GP bores, cleaned them up. Small wire brush and cleaned the threads of the GPz, then before applying non seize to the threads, decided I’m already so deep in debt on this that whats another $80.00.
Going to go get a set of new GPz. These have about 20,000 miles on them and they still look like new but why take a chance.
Thats about all so phart today. 😹😹😹
 
😹😹😹

Called NAPA. My bill is at only $31.00.
Told the counter man, WOW, I got room to play. Send me over a set of them AC Delco 60G glowing plugs for My 6.5 diesel truck. 😹😹😹
AAAAND TO TOP THAT OFF. Today and tomorrow is NAPAs big tool sale days for the year. Parts man invited Me to come in about noon for sloppy joes and a soft drink. If its coca cola product I’ll pass on the soft drink. 😹😹😹
 
Removed and straightened the girdle back to flat. Having a new set of rocker cover gaskets I laid on a new one of those too. Original one was squished some where the nuts screwed down.
Thread chaser through the GP bores, cleaned them up. Small wire brush and cleaned the threads of the GPz, then before applying non seize to the threads, decided I’m already so deep in debt on this that whats another $80.00.
Going to go get a set of new GPz. These have about 20,000 miles on them and they still look like new but why take a chance.
Thats about all so phart today. 😹😹😹

I'd skip the new glow plugs if the current batch looks good and is operating properly.

New glow plugs may not last any Longer than what you have.

I do usually keep a set of Ac Delco 60G glow plugs on hand.

It can save me 2 hours if I just need one. Apparently I do that with lots of stuff.
I seem to have lots of spare stuff sitting around.
 
Back
Top