• Welcome to The Truck Stop! We see you haven't REGISTERED yet.

    Your truck knowledge is missing!
    • Registration is FREE , all we need is your birthday and email. (We don't share ANY data with ANYONE)
    • We have tons of knowledge here for your diesel truck!
    • Post your own topics and reply to existing threads to help others out!
    • NO ADS! The site is fully functional and ad free!
    CLICK HERE TO REGISTER!

    Problems registering? Click here to contact us!

    Already registered, but need a PASSWORD RESET? CLICK HERE TO RESET YOUR PASSWORD!

`Smokey Starts getting worse with the colder weather

Have been either sick, on the road or in a complete ‘screw it’ mood for the whole month. Decided to address the issues of the smoky start by replacing the glow plug wires with the new set from ZombieSolutions and to test the glow plugs themselves starting on the passenger side to get that nightmare out of the way.
1st starts on cold mornings always has a FOPPING noise coming from the passenger side of the motor. This is the suspected ‘cold hole’ so, that’s also why I’m focusing on that side. We’ll see. Won’t know until tomorrow morning how successful the effort is since the noise and smoke is only present after an overnight cold soak.
Made a ‘1st start’ video to capture the ‘fop fop fop’ noise that goes away quickly (w/in 2-3 seconds). It was only about 32* when I shot it. You hear the Fuel Pump Running and the Glow Plug Controller’s very audible CLACK engagement then engine start is at the 18 Second mark. Fop noise clears up right away though the smoke, not captured, takes about a minute to clear up.
So, here ya go. Enjoy and speculate as desired.
 
That fopping sound almost sounds like something knocking against plastic. makes me wonder if an intake or exhaust valve is not seating properly and compression is being pushed back into the air cleaner for a moment till it seals up. this might also explain the momentary smoke from the tail pipe too.
 
That fopping sound almost sounds like something knocking against plastic. makes me wonder if an intake or exhaust valve is not seating properly and compression is being pushed back into the air cleaner for a moment till it seals up. this might also explain the momentary smoke from the tail pipe too.
I appreciate the observation but, I’m going to disagree on all the above.
Nothing is banging on anything else externally. These heads replaced the old units that did have valve issue and the issue existed before the exchange. I’ll check on a restart for anything pushing out the air cleaner before putting it back together to be sure but….
 
Have been either sick, on the road or in a complete ‘screw it’ mood for the whole month. Decided to address the issues of the smoky start by replacing the glow plug wires with the new set from ZombieSolutions and to test the glow plugs themselves starting on the passenger side to get that nightmare out of the way.
1st starts on cold mornings always has a FOPPING noise coming from the passenger side of the motor. This is the suspected ‘cold hole’ so, that’s also why I’m focusing on that side. We’ll see. Won’t know until tomorrow morning how successful the effort is since the noise and smoke is only present after an overnight cold soak.
Made a ‘1st start’ video to capture the ‘fop fop fop’ noise that goes away quickly (w/in 2-3 seconds). It was only about 32* when I shot it. You hear the Fuel Pump Running and the Glow Plug Controller’s very audible CLACK engagement then engine start is at the 18 Second mark. Fop noise clears up right away though the smoke, not captured, takes about a minute to clear up.
So, here ya go. Enjoy and speculate as desired.
Whoa! I don’t know what to say. I’ve heard a lot, but nothing like that.
 
Good progress but by no means done. Monday
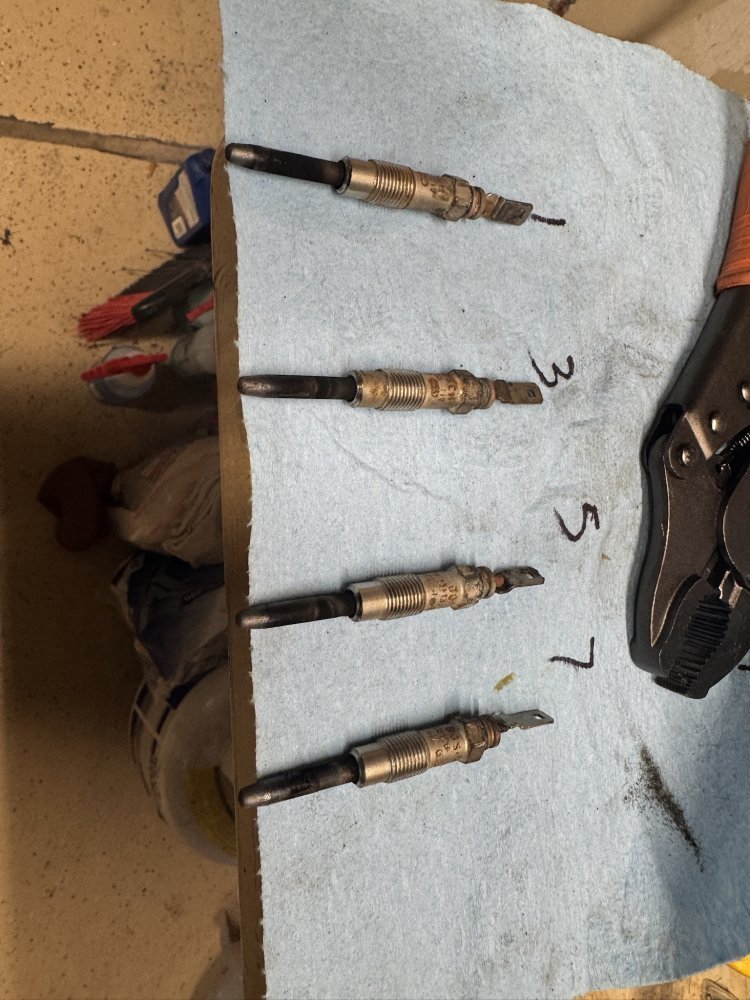
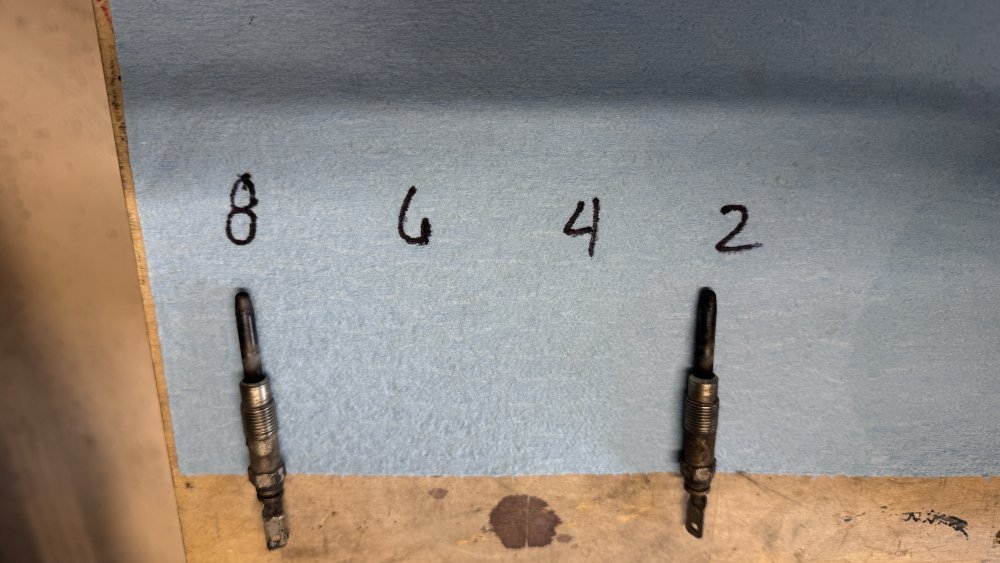
Removed the passenger side wheel and inner fender. Removed the #2, 4 and 8 glow plugs. No swelling, shortening, etc.
This is what 8 and 2 looked like before putting 12v to them.
IMG_0431.jpeg

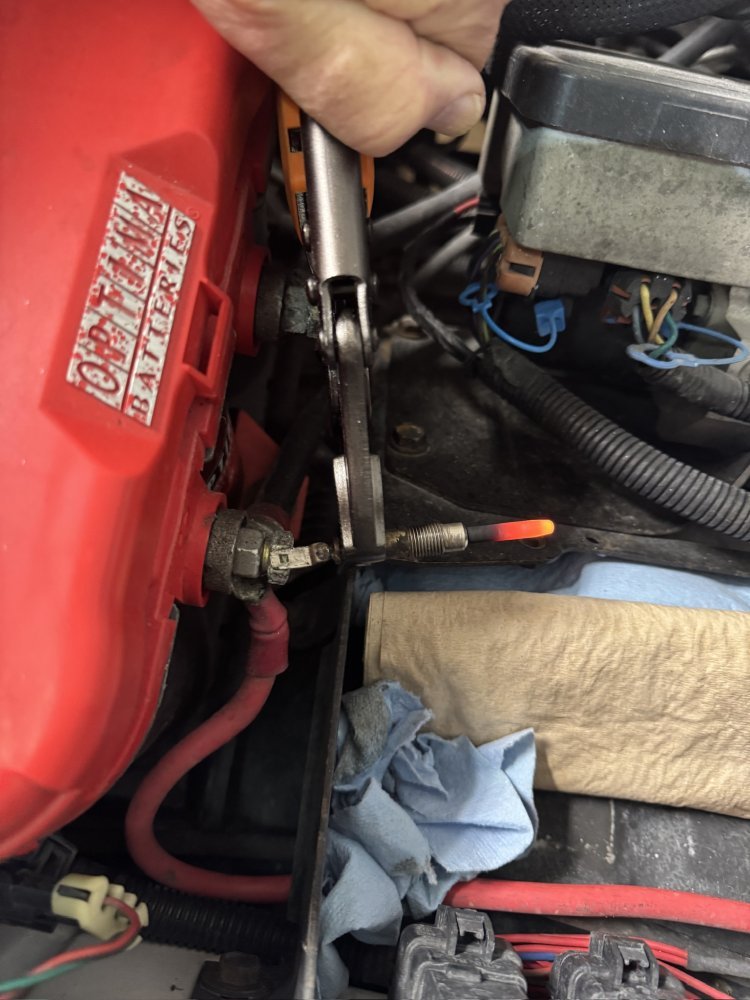
Put battery power to them individually using vice grips on the hex and bridging across the battery placing the vice grips handle on the negative terminal and resting the glow plug spade to the positive side. Heated up rather quickly.

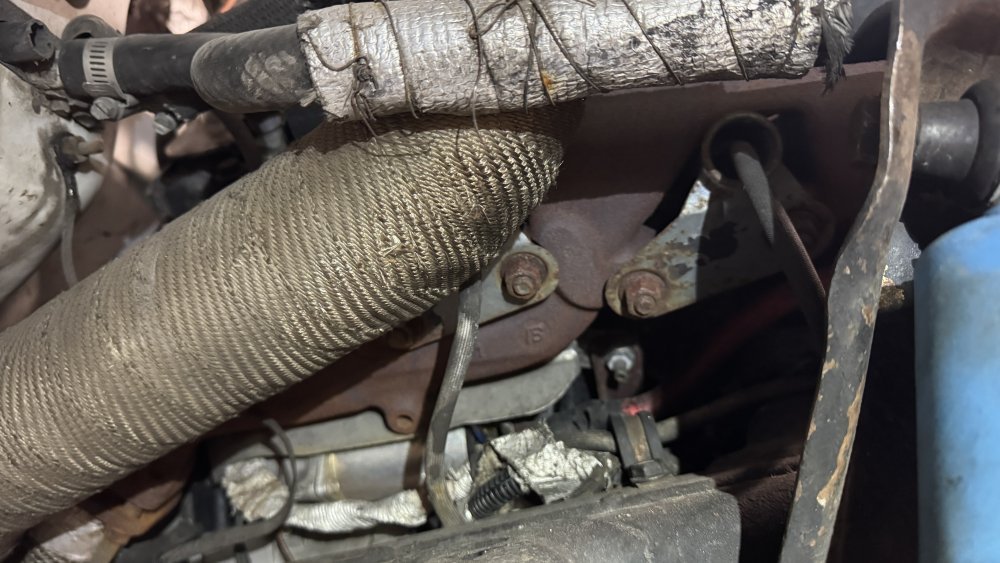
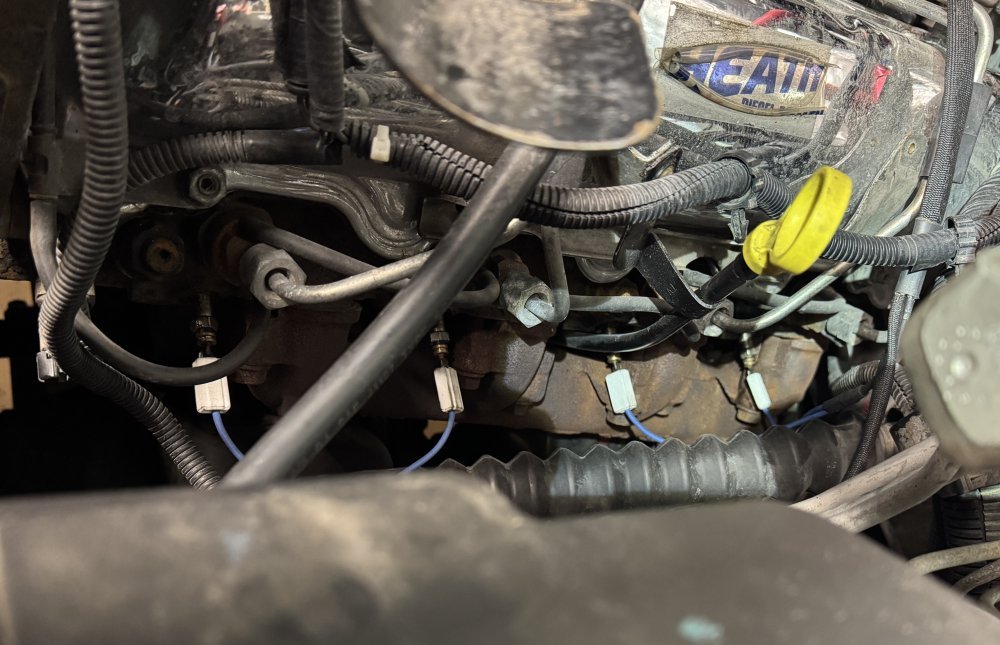
I had to pull the down pipe out of the way to get the heat shield off #6 and it’s still creating enough clearance issues to prohibit my caring about getting the GP out today.
IMG_0432.jpeg
FWIW, The #6 terminal slid right off the GP spade which is sorta clean but, until I get it out Monday, I won’t know its condition.

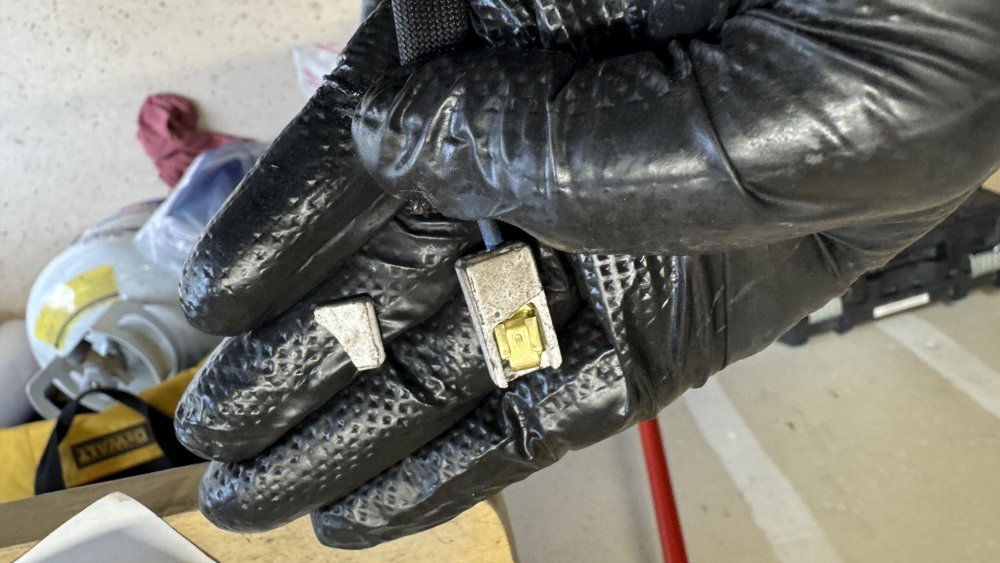
Observations. The glow plug wires are shot. Terminals are loose and slipped right off the GP spades with little or no resistance. I did a test fit of the new GP Harness and it was very difficult removing the one connection I made. Split the Ceramic piece but, there’s extras and this one was #8 so there’s no worries about heat on that one.
IMG_0438.jpeg

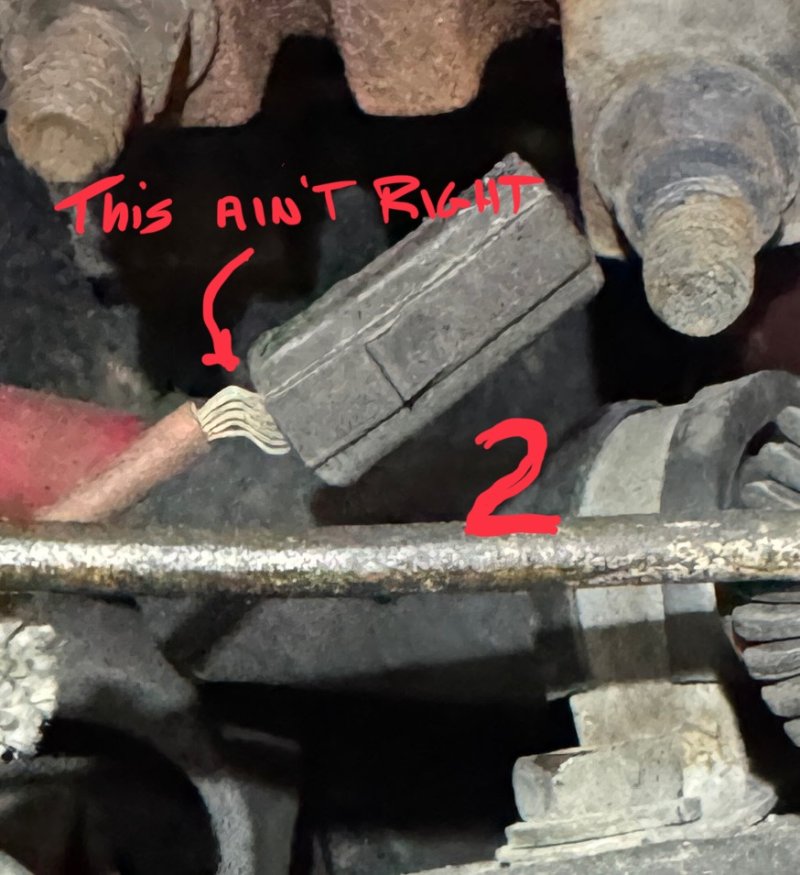
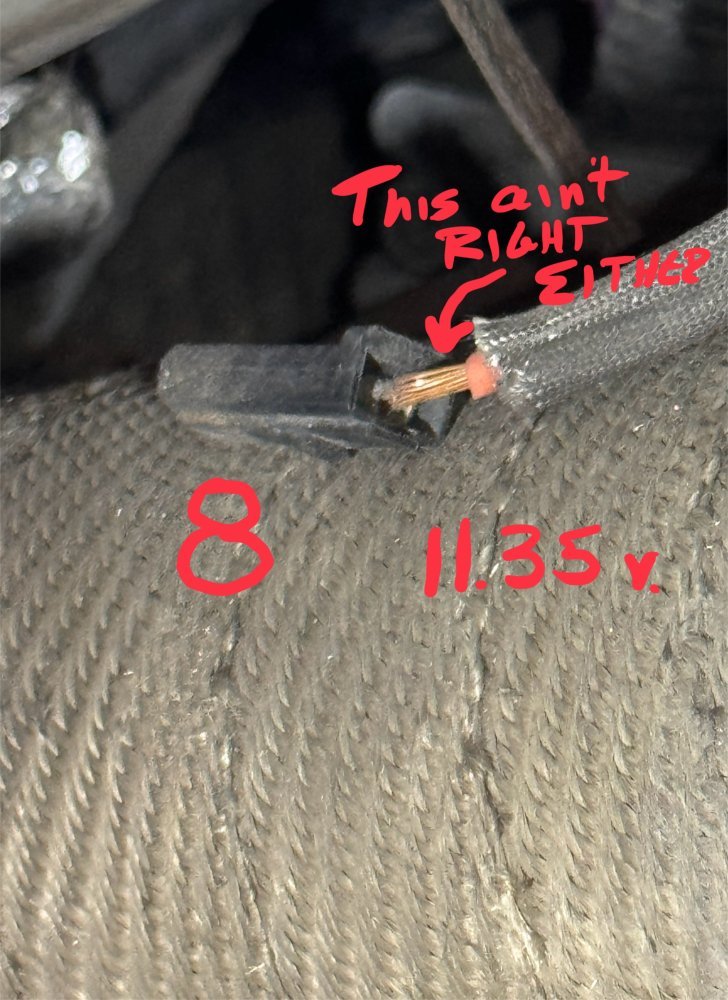
Another reason to condemn the current harness is the condition of the terminals.
Wires exposed/pulled out of #2 and #8.
IMG_0433.jpeg

IMG_0435.jpeg


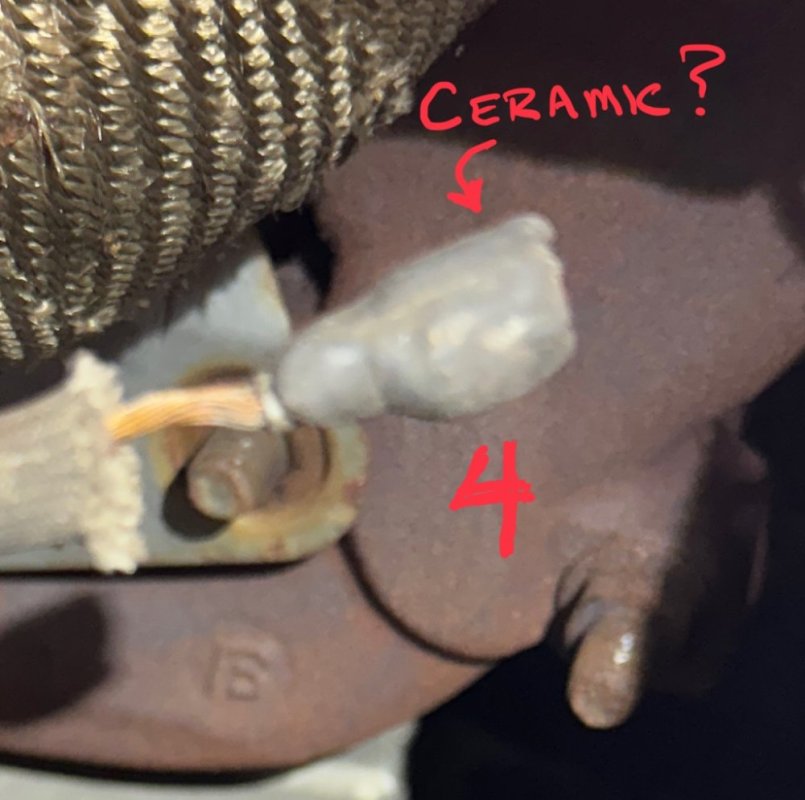
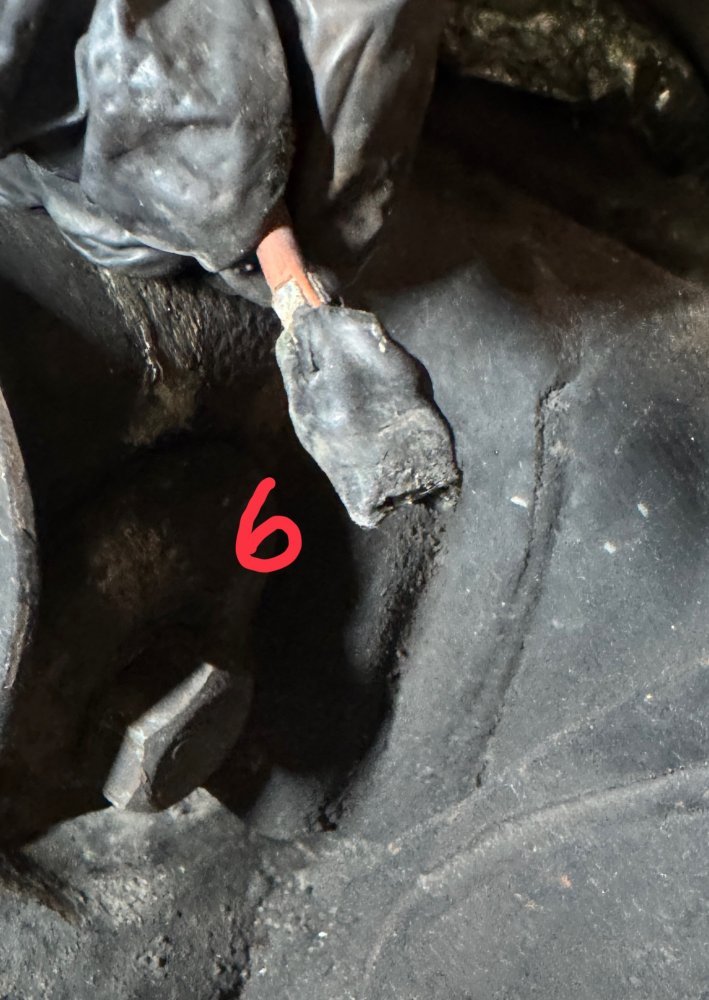
“Ceramic” protections on #4 and #6 are melted.IMG_0434.jpeg
IMG_0436.jpeg

With power applied, all showed 11.35ish VDC but, w/o a firm/tight connection, the power during the glow plug cycle pretty much goes nowhere and stays in the terminal which would explain the condition of 4 and 6 terminals.

Tomorrow or Monday, pull the down pipe to finish #6 then I’ll pull the old harness out which I ran under the starter heat shield so there’s more work there.
 
Good progress but by no means done. Monday
Removed the passenger side wheel and inner fender. Removed the #2, 4 and 8 glow plugs. No swelling, shortening, etc.
This is what 8 and 2 looked like before putting 12v to them.
View attachment 91417

Put battery power to them individually using vice grips on the hex and bridging across the battery placing the vice grips handle on the negative terminal and resting the glow plug spade to the positive side. Heated up rather quickly.

I had to pull the down pipe out of the way to get the heat shield off #6 and it’s still creating enough clearance issues to prohibit my caring about getting the GP out today.
View attachment 91416
FWIW, The #6 terminal slid right off the GP spade which is sorta clean but, until I get it out Monday, I won’t know its condition.

Observations. The glow plug wires are shot. Terminals are loose and slipped right off the GP spades with little or no resistance. I did a test fit of the new GP Harness and it was very difficult removing the one connection I made. Split the Ceramic piece but, there’s extras and this one was #8 so there’s no worries about heat on that one.
View attachment 91411

Another reason to condemn the current harness is the condition of the terminals.
Wires exposed/pulled out of #2 and #8.
View attachment 91415

View attachment 91413


“Ceramic” protections on #4 and #6 are melted.View attachment 91414
View attachment 91412

With power applied, all showed 11.35ish VDC but, w/o a firm/tight connection, the power during the glow plug cycle pretty much goes nowhere and stays in the terminal which would explain the condition of 4 and 6 terminals.

Tomorrow or Monday, pull the down pipe to finish #6 then I’ll pull the old harness out which I ran under the starter heat shield so there’s more work there.
Beyond all this work, I’m voting injectors.
 
I think Doug was close but missing a little bit.
That sounded to me like a lifter leaked down. Start up and one valve isn’t working all the way. Oil pressure builds fast and tops off the lifter. Then all is happy.

This is where an accusump eliminates the possibility. Flip the switch and have prestart oil pressure- then start. If no noise, thats it.
 
I always remove the GP heat shield on 4 and 6 and that makes the removal of the harness much easier, when going back together, thread the harness through the heat shield, shove the connector onto the GP then place the heat shield into position and nut it down.
I purchased the new exhaust manifold bolt kit from QuadStar Tuning. Went to the hardware store and got the IIRC, 6mm allen head screws and ground the heads down thinner and welded those to the new bolts.
I did not want to have to pull the exhaust manifold bolts every time I wanted to inspect GPz. Just the nutz.
The heat shield removal and harness threading technique is an old, tried and proven technique. Thanks for adding it to the thread. It’ll help others and now I don’t have to write it up later.
I looked up the QS Exhaust Manifold Bolt kit (why isn’t it listed under ‘exhaust?’) and it looks like a nice set up but, yeah, can’t use the heat shields w/o modification. OEM is M-10 so working them over the ground down M-6 Allen heads is a good technique. Wondering, if ARP forges them “triangled” like OEM vs. just round? I’m not going to go out and buy them, just curious.
 
You could just buy mechanical lock nuts that have the triangle stamping on normal studs.

Hummers are non turbo and db2 up through 1995 (mine). They have a TCM (Transmission Control module) The TCM is same basic unit but “stripped down” to only deal with TPS on db2 just like any gassers use, and ESS (Engine Speed Sensor) for rpm which came from the oil pump drive on non turbo and for hmmwvs that later add the centermount turbo but still db2 the ESS became a 2 wire CPS inplace of the 3 wire CPS that ds4 rigs have. Idk what year they started adding turbo to hmmwv.

Then 96 they went to the van engine and added the centermount turbo and ds4 with all the related ds4 parts. ECM same as the pickups. But the heat shields still don’t always work apparently- maybe the van manifold is better at blocking heat but still a pain to work around.

Anyways- the 96 and newer hummers have the heat sheilding for glow plug wires similar to the truck ones. Idk if they interchange van/hummer to truck or not. but the non turbo hummer/hmmwv had ZERO protection for the glow plug wires.
I have only heard of two or three guys ever changing their glow wires on hummers, and those are guys with the turbo van engines. The header design on the na engines never have a problem. Mine ran over 70,000 miles as n/a. Then I added the van manifolds and turbo to mine for the next 70,000 not using the heat shields and figured whenever the original wires get smoked I will buy a set from our local wire pro and add the slip on wire protectors onto them. That opinion changed.

I absolutely HATE sheet metal shields. They are hard to work around, cut yourself, and don’t do an amazing job- they barely get the job done for warranty purposes.
For $60 - buy the loom/sleeve stuff and are better protected from damage- both your body and the wires. It’s super easy to install & work around once installed.

I figure it this way: $60 has to save to pay for itself.
I have had many cuts I would rather pay $20 than have to work with. Trying to reach past heat shields, would rather pay a “toll” than fight it sometimes.

I have decided to install it on my current build and never need to buy a replacement set of wires. That saves a good chunk of that $60, right?

I never tracked it, but would guess 35% of 6.5 pickups had glow wire damage from heat by 300,000 miles in the fleets. The heat shields don’t solve the problem anywhere near as good as sleeves. It just all adds up to me to sleeve instead.
 
The day started off pretty nice.
1735616571179.jpeg

Pulled #6 GP and it looked fine. Gave it 12v for a few seconds and, like all the others, lit up just fine.
IMG_0441.JPG

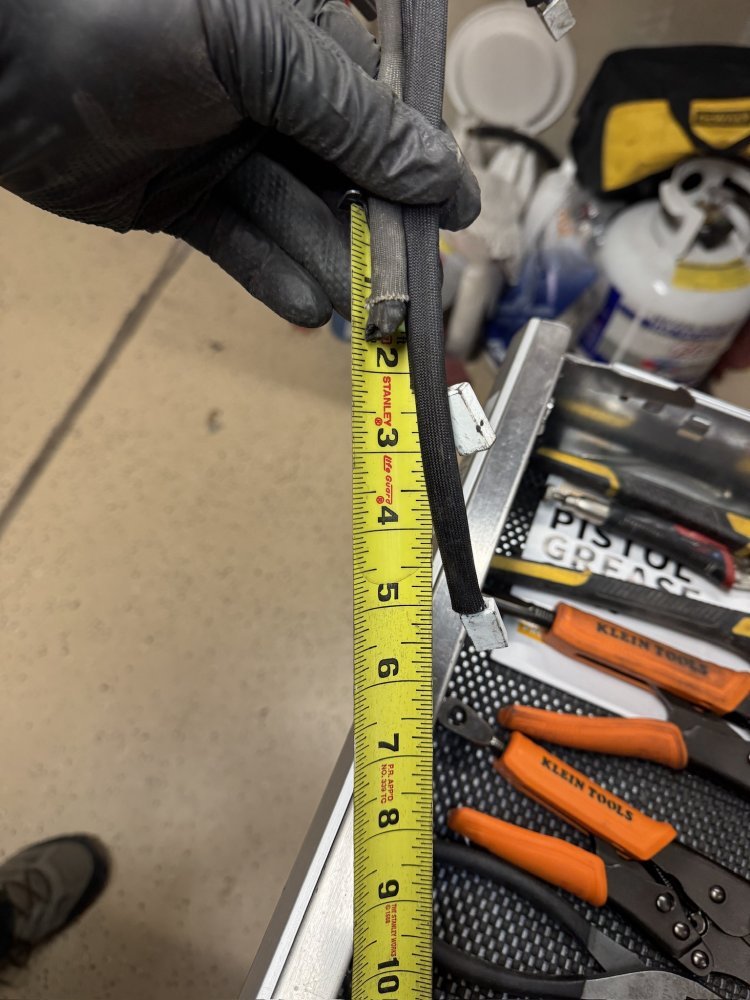
Removed the old harness and will keep it around for a little testing. Thinking 12v to the harness, inserting a GP into one connector at a time and ground out to see if the harness is actually bad. Observation, the new PS harness is actually 4.5" longer than the old one.
IMG_0443.JPG

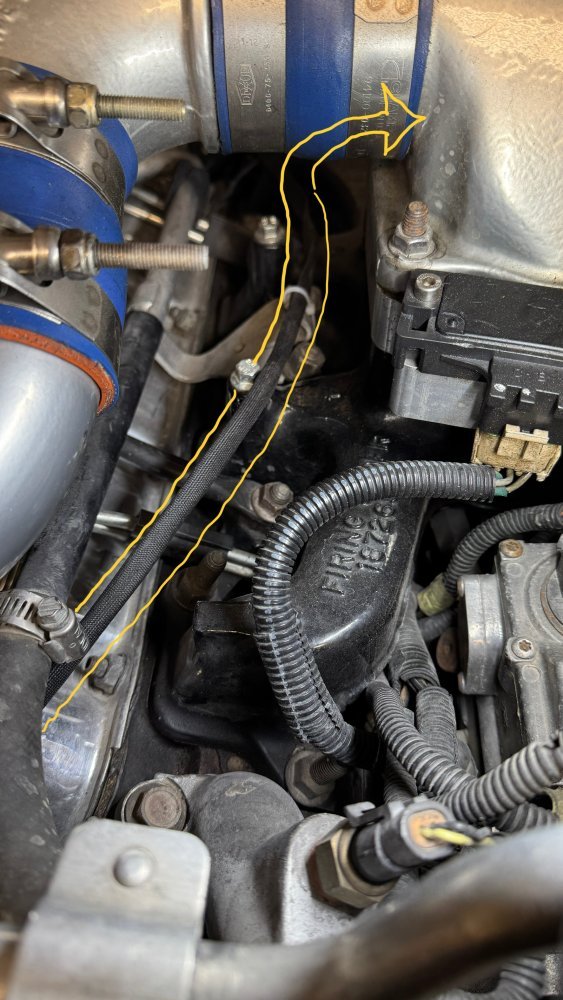
Ran the new passenger side harness going up the front of the engine, over the right side of the lower intake and back to the GP Controller. #8 just drops down the back side of the motor while 6,4 & 2 are fed off the longer lead. Darn ceramic terminal protectors fought all the way. Split 4 and 6 and #2 fell off. I used one of the replacement units there and just made do with the split parts for 4, 6 & 8.

Got things buttoned up on the passenger side except reinstalling the inner fender and tire. Wanted to finish up the driver's side if possible. Time got eaten up running errands and going to the Dr and I'm still not 100%.

But, I did get the driver's side done. Had to repair the ECM lead connector. The supplied wire is 16 gauge and the OEM wire (orange) is 10 ga. Butt splice connectors are 14-16ga. In working and pulling etc. I managed to pull the wire out of one side of the weather pack. Glad I bought tools for just such an emergency last summer. Still, PITA.
Inspected and tested the Glow Plugs and all worked. Heated up like #6 and the rest of the passenger side did so there's no issue with the GPs. Will double check both PS and DS harness. New harness went in a lot easier and didn't crack or split any of the ceramic terminal protections. FWIW, the driver's side harness is shorter than the old one.

Did a quick test to see if the circuit worked and got a nice long glow cycle. Start up was quick, no fopping noise and minimal smoke that went away real quick wasn't acrid which was nice since the wind shifted and was blowing into the garage, tailgate first. Worried I might get really smoked out but, proved not the case. Garage was 45* so not as cold so I'll button up things in the morning, take it for a 20-30 minute run and park it for the day in the shade. Then, later in the evening I'll give it a start and see if I've wasted a lot of time on GPs or not.
 

Attachments

  • IMG_0445.JPG
    IMG_0445.JPG
    140.1 KB · Views: 2
Wasatch Range has been getting some good snow.
Just a little. We’re behind on the “water year” but, more snow starting tomorrow in the forecast and lasting through the weekend. Me, I’m loading up the truck and heading to Kingman AZ to help a friend pour concrete for his new work shop floor. Temps are up towards the 60’s and forecasted to stay that way through the visit.


I got Humpty Dumpty back together this morning. The first start at about 40° was almost no smoke and no odd sounds. So, yeah, it seems the GP harness/connections were very much toast. Now that I’m getting full heat on the plugs during the glow cycle it starts even quicker and it wasn’t like it was slow to start before. Just hit the starter and with hardly a crank it’s running.

More happy snaps.
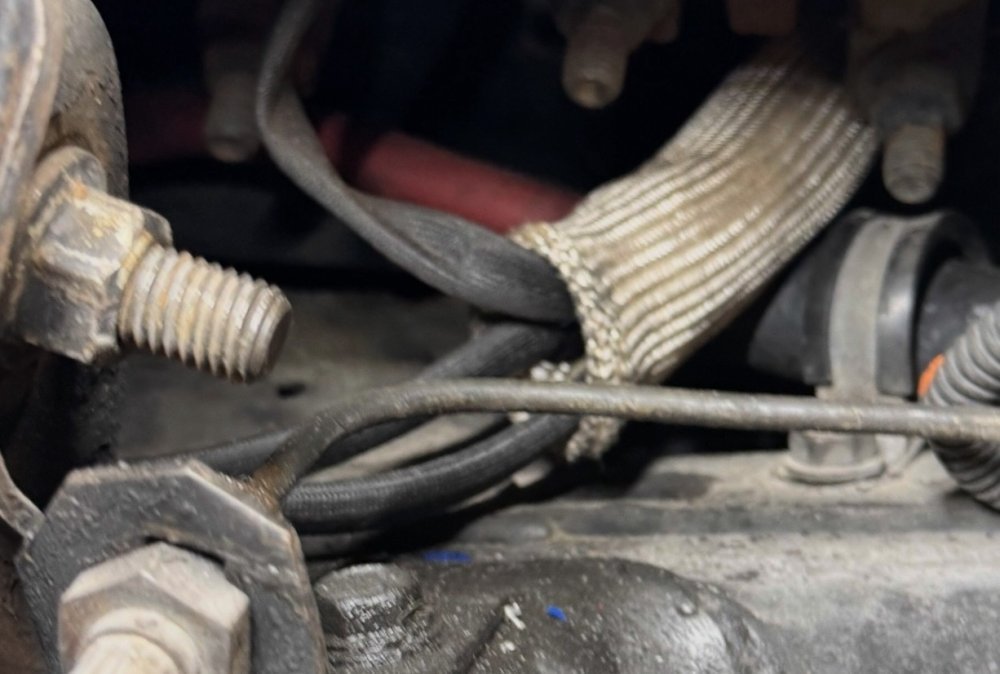
Passenger side: Spark plug heat shield tube for protection coming up the front side of the motor around the exhaust manifold.
IMG_0448.jpeg

Passenger side continuing up over the lower intake and back to the GP Controller.
IMG_0447.jpeg

Driver’s Side harness and connections (w/o breaking/cracking ceramic protections) all in. Yes, I’ve secured the harness so it wasn’t at risk from the steering column.
IMG_0446.jpeg


Oh yeah: HAPPY NEW YEAR’S everyone.
 
Just a little. We’re behind on the “water year” but, more snow starting tomorrow in the forecast and lasting through the weekend. Me, I’m loading up the truck and heading to Kingman AZ to help a friend pour concrete for his new work shop floor. Temps are up towards the 60’s and forecasted to stay that way through the visit.


I got Humpty Dumpty back together this morning. The first start at about 40° was almost no smoke and no odd sounds. So, yeah, it seems the GP harness/connections were very much toast. Now that I’m getting full heat on the plugs during the glow cycle it starts even quicker and it wasn’t like it was slow to start before. Just hit the starter and with hardly a crank it’s running.

More happy snaps.
Passenger side: Spark plug heat shield tube for protection coming up the front side of the motor around the exhaust manifold.
View attachment 91472

Passenger side continuing up over the lower intake and back to the GP Controller.
View attachment 91473

Driver’s Side harness and connections (w/o breaking/cracking ceramic protections) all in. Yes, I’ve secured the harness so it wasn’t at risk from the steering column.
View attachment 91474


Oh yeah: HAPPY NEW YEAR’S everyone.
Wait, you do concrete work?
 
I've been seeing some videos pop up lately of doing 'dry pour' with Ready Mix type stuff. Not sure about that.
I've helped with some small projects but, nothing that needed any real quality type work. I'm just helping Chris (owner of the VW powered streamliner and Karmen Gia salt flat cars I crewed for last summer) who's got the real experience and some of his family who are coming in to help out.
 
Back
Top