• Welcome to The Truck Stop! We see you haven't REGISTERED yet.

    Your truck knowledge is missing!
    • Registration is FREE , all we need is your birthday and email. (We don't share ANY data with ANYONE)
    • We have tons of knowledge here for your diesel truck!
    • Post your own topics and reply to existing threads to help others out!
    • NO ADS! The site is fully functional and ad free!
    CLICK HERE TO REGISTER!

    Problems registering? Click here to contact us!

    Already registered, but need a PASSWORD RESET? CLICK HERE TO RESET YOUR PASSWORD!

My K2500

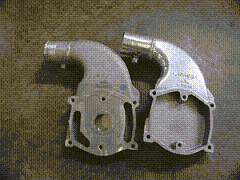
Will I need to replace the intake do y'all think jb weld will hold??

You need to replace it.

JB weld would be pointless in that location.

With a turbo charged engine, you'll be loosing boost if the intake gasket is not "clamped" properly.

You may be able to have it welded if you find a good welder, but aluminum has a tendancy to warp and require machining in a small area with a sealing surface like that.

You could probably buy one off a junker for less than it would cost to repair it.

:(
 
Well damn, ok tks GW..

How are yall getting to the engine side turbo bolts? I can get a socket on it; It either wants to strip or jump off every time I put some pressure on it...
 
finally back to work on this..

Got everything loose/ off except for #7 line pump side, and the 3 drive gear bolts.. A writeup I saw over on TDP said to use a 18mm socket to turn the crank to get access to the bolts, but I not seeing a bolt/ nut to turn.. (belt pulley is looks bolted to the balancer) What am I missing here??
 
I don't see anywhere to put a socket to turn the crank...

015-1.jpg
 
You have to remove the belt pulley by removing those 4 bolts, the large nut is behind the pulley.
 
If all your trying to do is turn the engine over just use 1 of the 4 bolts on the pulley. Just do it slowly so you can let the compression bleed off or you'll brake the bolt.
 
If all your trying to do is turn the engine over just use 1 of the 4 bolts on the pulley. Just do it slowly so you can let the compression bleed off or you'll brake the bolt.

Worked like a charm, Thanks..

Next ??

Can I safely remove the wiring harness, that runs under the intake without hurting anything; Or do I still need it for some reason???

009-1.jpg


008-1.jpg
 
And, can I remove the ECU with no ill effects???

What are you calling the ECU, so we know what it is you are trying to remove, ECU on gassers is PCM on the Diesel truck behind glove box you mean that ?

Fuel filter mgr easily relocated, you'll just need to fab a mount of some sort where you re-locate it to, and extend the harness wires for heater & WIF sensor, and longer hose, if relocating the FFM then an opportune time to do the FTB modification. http://www.thetruckstop.us/forum/showthread.php?572
 
Correct, I meant the PCM..

So other than its a pita, any reason not remove it??

I'd love to be able to do the FTB but no coin for it right now...
 
Back to work on this, got the pump mounted and the line replaced; But when I was changing out the solenoid "tophat" I wound up snapping one of the bolts off.

005-2.jpg


I have a ez out but have to wait till next week on a bit, so I got "creative" after doing some reading on kennedy's site kennedydiesel.com/airboxmods. ; this is where I'm at..

006-1.jpg


007-2.jpg


Just have to play connect the dots now..
 
Last edited by a moderator:
Back to work on this, got the pump mounted and the line replaced; But when I was changing out the solenoid "tophat" I wound up snapping one of the bolts off.

005-2.jpg


I have a ez out but have to wait till next week on a bit, so I got "creative" after doing some reading on kennedy's site kennedydiesel.com/airboxmods ; this is where I'm at..

006-1.jpg


007-2.jpg


Just have to play connect the dots now..

You can use a dremel with carbide cutter to cut that out, or air motor but that makes a lot of little shavings.

What I did with mine when I did it, I got some metal cutting jig saw blades and put in saw then set it for full length stroke, measured the extended length vs depth of the intake upper, then cut off/snapped off the excess blade tip so it would not bottom out when making my cut, the saw makes it less messy IMO than shavings from a carbide cuttter.
 
I think thats what I"m going to do is get a jig saw blade to cut it out..

What the intake "should like after..

intakemods.gif


The LD intake extension casting (used on '94+ trucks with "S" vin code as 8th digit) has a severely restricted airflow area due to the excess webbing left in the casting. This webbing (rough cast material) can be removed so that all that remains is the machined flat center ring which is necessary to seal the EGR passages. The alternative would be to swap both the upper and lower intake castings with those from a HD "F" engine. Owners of 1998 and later "S" engines with MAF sensor and EGR should be aware that the computer does not like the removal/disconnecting of the EGR system, and requires a "brain transplant" to a HD program.

Why would my F vin truck have the "S vin" upper on it, factory or possibly replaced at sometime??

Do yo have any pics of yours Doc?
 
Last edited:
The 94 k3500srw I just got going had the same retarded upper. You got the lower from it.
 
I got a bit yesterday, but my luck holding true looks like I my be up shit creak without a paddle; Short of a drill press which I don't have I'm nor sure what to do now to get this out..

005-2-1.jpg


004-2.jpg


005-2.jpg
 
Back
Top