• Welcome to The Truck Stop! We see you haven't REGISTERED yet.

    Your truck knowledge is missing!
    • Registration is FREE , all we need is your birthday and email. (We don't share ANY data with ANYONE)
    • We have tons of knowledge here for your diesel truck!
    • Post your own topics and reply to existing threads to help others out!
    • NO ADS! The site is fully functional and ad free!
    CLICK HERE TO REGISTER!

    Problems registering? Click here to contact us!

    Already registered, but need a PASSWORD RESET? CLICK HERE TO RESET YOUR PASSWORD!

Hard Shifting NV4500, less than 2 years on clutch

The only thing you haven't tried is the adjustable rod to the master.. there is a reason I suggested getting it, I have used it on several different trucks and after some adjustment to lengthen it the clutches work great..

I don't know for sure but I think the master isn't traveling far enough, my petal doesn't have any "free" play, and there is no pressure on the bearing , a hyd system is different than other systems as far as free play..

I'd bet money a simple thing like the adjustable rod will fix it.... And again that's cheaper than a shop removing everything and charging you and finding nothing wrong...

Your clutch isn't traveling far enough, get a longer push rod and make it travel more... I think I posted pics of my rod here, I'll look for it...
 
You could remove your master rod, cut it, add 1 - 1 1/4" to make it longer, that will move your petal up or further away from the master, simple way to gain more master travel that will carry to the slave making it move further.

That will ONLY move your petal, not apply pressure to the system so no worries about the bearing ridding on the plate...
 
Yeah, if the clutch pedal pivot hole is worn egg-shaped/oval or the pedal pivot pin worn flat/grooved that would definitely cause master cylinder travel issues when you press down on the clutch pedal. I don't recall any pedal "free play" in the couple of stick shift GM400s I've driven, there was "resistance" as I put my foot on the pedal to clutch to shift. There could also be slop in the actuating rod to pedal joint contributing to the lack of sufficient master cylinder travel and thus slave cylinder actuation of the fork/throw out bearing.

The extended threads of the TO bearing are NOT the problem, there is nothing inside the clutch/pressure plate assembly for them to hang up on. Same with the extended length pilot bushing, if it was properly installed the extra length is INSIDE the crank flange and only gives more support surface to the nose of the input shaft inserted into the crank flange snout. I would be seriously looking at the clutch pedal pivot and actuating linkage for slop/play. The mathematics of leverage will tell you that a little bit of slop at the pivot translates to quite a bit of slop at the other end of the pedal shaft "lever". And the pivot point and actuator point are often highly neglected areas for routine lubrication and servicing because "out of sight, out of mind".
 
Ok so here's an update...

I blocked the clutch pedal on a 1993 K3500 with the same clutch system. The pedal is much firmer than my truck. Crawling under and looking through the inspection hole, the slave rod has the fork pushed way past the inspection hole, whereas on my truck you can see the fork and rod in the center of the hole.

So the slave isn't extending enough, meaning the master may not be traveling far enough as per @Twisted Steel Performance's hypothesis.

I'm going to try making my own adjustable rod. I cut the rod off where it changes from 1/4" to 3/8" thickness and used a die to cut an inch and a half of fine thread on the 1/4" section. Thinking I'll pick up ~5 fine thread 1/4" bolts, weld them all together to each other and to the end of the 3/8" section of rod that attaches to the pedal, then thread in the other end to set the length.

My only question is, why do I all of a sudden need a longer rod? The pedal isn't bent out of original shape, and where the pedal is attached under the dash doesn't seem excessively worn. @Rockabillyrat what was the clutch pedal like that you had to last repair on a GMT400, and what did the repair entail?

Here's to hoping this is the fix, although I'm befuddled as to why this issue could develop out of nowhere in the first place
 
Just a guessing thought. would you happen to have the old original master or slave with the rods? I'm just guessing here but could the new ones have come with the wrong length rod? I have heard of this kind of thing happening with the hydro-boost rod for the MC on brakes.

on other mass produced parts noadays others are seeing where manufactures and rebuilders (a1 cardone being one of the worst) are supplying parts houses and other suppliers with a "one size fits all" part for several applications. for some specific vehicles, our 6.5's being one of trucks that those parts don't fit quite right. would it be possible you might be in the same boat here?
 
Ok so here's an update...

I blocked the clutch pedal on a 1993 K3500 with the same clutch system. The pedal is much firmer than my truck. Crawling under and looking through the inspection hole, the slave rod has the fork pushed way past the inspection hole, whereas on my truck you can see the fork and rod in the center of the hole.

So the slave isn't extending enough, meaning the master may not be traveling far enough as per @Twisted Steel Performance's hypothesis.

I'm going to try making my own adjustable rod. I cut the rod off where it changes from 1/4" to 3/8" thickness and used a die to cut an inch and a half of fine thread on the 1/4" section. Thinking I'll pick up ~5 fine thread 1/4" bolts, weld them all together to each other and to the end of the 3/8" section of rod that attaches to the pedal, then thread in the other end to set the length.

My only question is, why do I all of a sudden need a longer rod? The pedal isn't bent out of original shape, and where the pedal is attached under the dash doesn't seem excessively worn. @Rockabillyrat what was the clutch pedal like that you had to last repair on a GMT400, and what did the repair entail?

Here's to hoping this is the fix, although I'm befuddled as to why this issue could develop out of nowhere in the first place

The one I had at the shop was worn out where the rod attaches to the pedal as well as the pivot bushing in the top of the assembly. it was really easy to figure out, the pedal was flopping all around making noise and it had a ton of free play. The truck had almost 500k on it. The 6.5 was long gone and had ben swapped out for a VE 12v.
 
@dbrannon79 the original master from early 2018 was what I cut up last night. It was working fine as far as I could tell up until everything started being difficult. I hear ya on the one size fits all not really working for most anything, but I don't think it's the case here.

@Twisted Steel Performance I'm fairly positive I installed the bearing correctly in the fork, I followed the instructions with the bearing and know for a fact I didn't force the bearing between the tangs and fork as pictured in the incorrect assembly picture.

@Rockabillyrat thanks for sharing, my pedal is nothing like that in terms of flopping around. However the pedal does not travel far enough to hit the clutch engagement sensor and the bottom of pedal travel. When I bought the truck in 2016 a previous owner had just put a jumper wire in the plug. Never gave it much thought as everything has worked fine up to this point, but perhaps there's something to it now.
 
We posted at the same time.... if you disconnect the pushrod will the petal go all the way to the floor as it should, does it hit the rubber bump stop on the petal assembly ?

The pedal hits the bumper stop with the pushrod in place. It doesn't hit the sensor above it that activates power to the starter.

Going to the hardware store now to see what I can come up with. I think another test would be to disconnect the pushrod from the pedal and try to depress it by hand, see if it goes further than pedal travel allows and actually releases the clutch
 
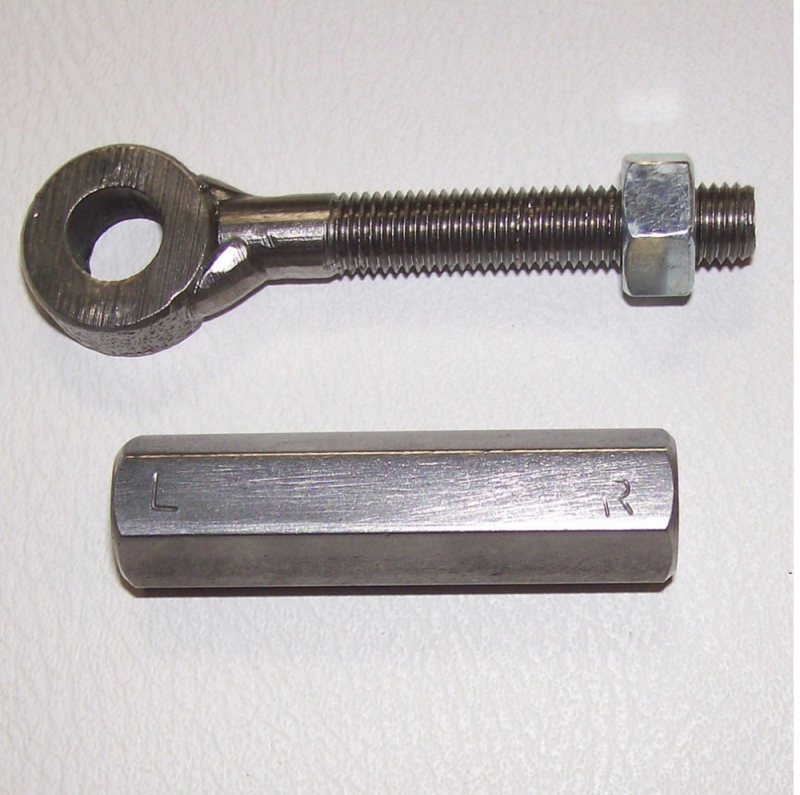
Needs to be left hand all thread or bolt on one side and L/R nut. If both are right and a regular coupler nut is used it won't extend or contract turning the nut like an adjustment. Could still work just has to be sorta unassembled to work by position on assembly.

I think the clutch not traveling to defeat clutch safety switch is telling.

My master is slightly different it has a plastic plunger and flexes slightly more with age.
 
Per my GMT400 Chassis service manual, the clutch pedal should ride at the same height as the brake pedal with no pressure applied, with no looseness or "freeplay" either vertically or horizontally in the pedal assembly. For shits and giggles, have you stuck your head up under the dash to check the pedal lever/hanger assembly for wear and slop at the wear points where the lever pivots and the MC actuating rod attaches? An ⅛" of wear in the pivot point turns into about 2½" of "soft" pedal feel travel before beginning to actually activate the MC. Remember High School Geometry and Trigonometry, 15° of angle over the ⅛" "legs" of an Isosceles triangle doesn't give you a very large length of a base at all. But, if you extend those legs out to 12" long, that base (the arc of the swing of the lever) becomes much longer - as does the "slop" in the pedal. Lets face it, the post and hole in the lever with a nylon bushing to pivot on was a bean-counter's solution to make it last through the warranty period - not an engineering solution of a sealed, greased ball bearing for the pedal lever to rotate on the pivot post on.

It would suck if you've been going through all this headache with the clutch not releasing simply due to a worn clutch/brake hanger assembly allowing too much freeplay slop to fully actuate the MC (and hence the SC) to move the clutch fork far enough to fully release the clutch.
 
The "adjustment" isn't really needed, cut and add 1 1/2" to the length of the rod, install, check, if it needs a little more of less adjust the length... it should release before the petal bottoms out by a little, too much travel isn't good either.. And who cares where the petal sits as long as it works...
 
Gotta hit the road for the rest of the day so won't be messing with this more until tomorrow. But:

Successful findings at the hardware store. An adjustable 5/16" turnbuckle eyehook fits the plastic bushing/ retainer on the pedal end of the rod perfectly. I got a 5" grade 8 bolt that will thread into the other end of the turnbuckle. The end of the rod that goes into the MC is more like 1/4" diameter so I'll turn it down to size with a grinder and drill.

Will post pictures as soon as it's mocked up.

Fabricating a longer/adjustable actuating rod for the MC would just be cheating the wear in the system's moving parts.

I agree, the adjustable/ longer rod is compensating for a larger issue. However in my research 88-94 pedal assemblies are different, some say 88-95 are the same, and 96+ are a different mounting bracket configuration. Looks like '95 is a bastard year yet again for clutch pedal parts, and of course the parts are discontinued. Fabbing up a custom rod seems way easier that working under the dash unhooking and replacing the pedal assembly.

here's a link to the different clutch pedal info

 
Be sure that You can jam nut the adjustable rod so that it can not back off.
I was going to suggest to make an extension nut with a piece of about a 5-16ths or 3/8ths tube, then weld a nut in each end. Thread in a sawed off bolt to one end and weld it so it can not screw inwards, then the round end with the bushing, jam nut it so it cant screw either direction.
The end with the bushing, flats can be ground onto it for a wrench and a pliers can hold the tube, or turn it to adjust the bushed end.
 
I hope that this adjustable rod fixes your issue.

If not I can give you my experience with clutch bleeding that I have recently used to solve an issue like this. Maybe it has been shared already and I missed reading it.

I was in the same situation with a friend and his car that we just changed the clutch on. New slave cylinder and line as well. Could not get a good pedal even after a bench bleed with the slave cylinder. The slave was a different style than what you have because this was on a 2018 Mustang.

After doing some research we found that using a vacuum pump on the top of the master cylinder would pull air out of the slave. We used one of those small hand vacuum pumps and a rubber stopper plug from a hardware store with a hole drilled in it. A few pumps with the vacuum pump and the bubbles started coming up right away. Pump the clutch a few times and repeated the process and it was over in less than 10 minutes.
 
Back
Top