• Welcome to The Truck Stop! We see you haven't REGISTERED yet.

    Your truck knowledge is missing!
    • Registration is FREE , all we need is your birthday and email. (We don't share ANY data with ANYONE)
    • We have tons of knowledge here for your diesel truck!
    • Post your own topics and reply to existing threads to help others out!
    • NO ADS! The site is fully functional and ad free!
    CLICK HERE TO REGISTER!

    Problems registering? Click here to contact us!

    Already registered, but need a PASSWORD RESET? CLICK HERE TO RESET YOUR PASSWORD!

Emmott's Initiation

Populated by knowledgeable grown ups. At least mostly...;-)

Yeah, I refuse to grow up! :p


. . . balancing is definitely in the checklist. Got a spare flywheel in case he can't balance with a fluidampr.

Must balance *without* the fludampr and then install it after the crank is balanced. Reasoning is that the fluidampr will mask the imbalances. So, balance with a regular damper and then install the dynamic. And as Will mentioned, that is if the crank needs balancing anyway.
 
You should balance ANY crank. It isn't just the crank, the pistons, rods, etc all gets balanced in the process. Not exactly "free" hp, but very affordable and it extends the engine life, ESPECIALLY in this engine. And make sure to write on the balancer and flywheel "no weight changes on this part" besides telling the machinists. that way you can run fluidampr if you choose or change flywheel if needed and everything else stays balanced. It is a common practice for them to take off or add weight there. doing crankshaft weight changes is longer and a tad more pricey but worth it.

@ak diesel driver Yes, he found a builder that does it for big bucks. Idk who it is, but I know he has over 20k into that pump alone.
 
I would do the roller rockers to ditch the plastic rocker pins, but will just do a bolt method instead to get rid of the stupid plastic rocker retainers. Can you expand on the ones you are doing/ did please?
I'll post a DIY topic, but I bought 1/4" stainless steel pop rivets, they're fat and just barely fit in the hole of the pipe the rockers slide onto. The hole and the rivet are exactly 1/4". I measured the plastic button, the inside dimensions of the rocker, and special ordered some thick iron washers from Fastenal. I have enough for two sets so I could make another set if someone wanted. They were a metric washer, about 1mm wider than the nylon buttons, about the same height, and just over 1/4" inner hole diameter. I compared the sliding movement that the nylon button would allow (how much the rocker can go left or right), and the sliding movement the SS rivet/iron washer would allow. The SS rivet allowed about 1mm less movement of the rocker in either direction. If one wanted they could drill a hole into the nylon and use nylon ad a washer instead of a steel (or brass, there are people who stacked brass washers), but I don't want to risk the nylon breaking on me since the wall thickness would be 1/4" and could crack and break off.
I have the rivets and washers but I haven't done the assembly yet. Just a test fit to confirm it will work. There is a burr inside the hole where the retainer clip would go from when the factory would have drilled the hole. I want to file the burs out first before popping rivets in so the burs don't rub into the expanded wall of the rivet. I won't fully pop the rivets because I want some slack for the washer to rotate freely and minimize rubbing against the rocker. I made sure the washeres were a softer metal than the rocker so the washer wears and the rocker shouldn't. I would check after a few thousand miles to confirm after the install.
I've been tied up researching and pricing a complete p400 rotating assembly into my engine (including machining the pistons CR down), and seeking quotes for machining a beadplate.
@Will L., how is your build coming along, I can pull up the fastenall # tomorrow if you are waiting on me
 
Last edited:
Awesome, love to see how you are doing it! The rivet thing scares me by sound of it, but by rights should be stronger than the plastic nonsense for sure. I am currently planning on the through bolt method.

I am not in a panic. I am struggling to get time in my shop.

Still hunting numbers on main stud torques wanting to learn clamp force of the bolts at spec torque vs studs. i need to start a thread going over that next day or two...
 
Welcome...
I noticed you mentioned Grande Prarie... Are you by chance in the great province of Alberta? And whereabouts?
I'm a Canadian forced to endure the Texas heat (I'm about 70 miles east of Dallas). I grew up in B.C. (all over) and spent a couple years after high school and before I moved to the US in Lethbridge.
Before we met him my step-dad owned and ran a quarter section farm near Grande Prairie. Incidentally there is a Grande Prarie in Texas too...

Good luck with your "little" beastie. Mine still has issues killing her pmd. Fixing that soon with a new wire harness and a pmd from Leroy Diesel down here in Houston.
 
Yup, AAA grade Alberta beef right here. Born and raised.
Recently moved to GP from Edmonton. Fitting how Texas has a Grande Prairie, isn't Texas 'Murica's 'Berta!?
Good luck with your build as well! The PMD heatsync makes a world of difference, I found the more expensive FSD's hold up a lot better. I had to throw ice on my el-cheapo pmd to get home one time, always kept a good spare after that.
 
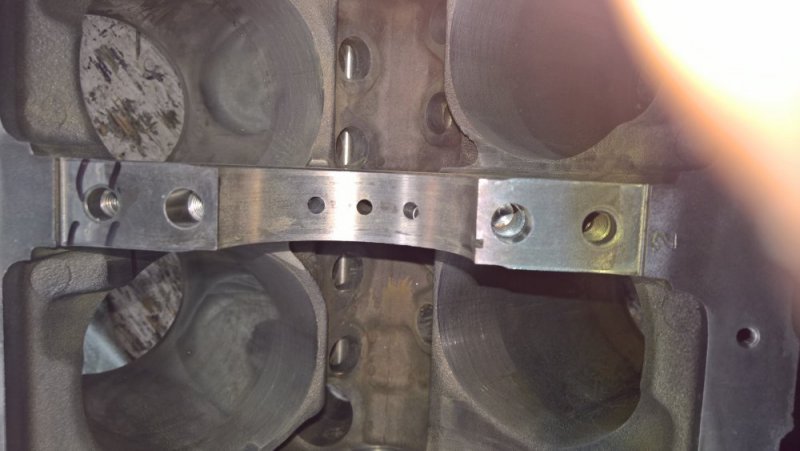
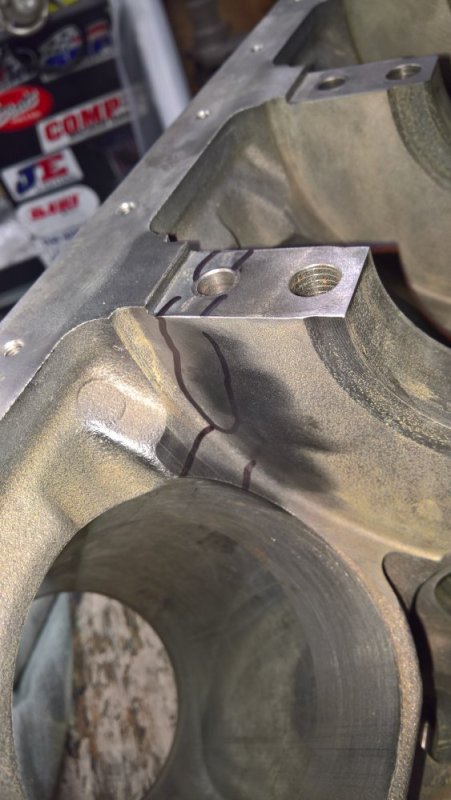
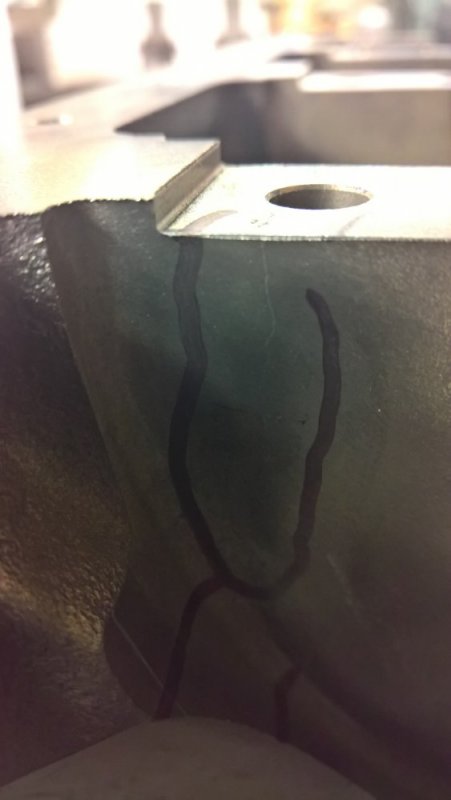
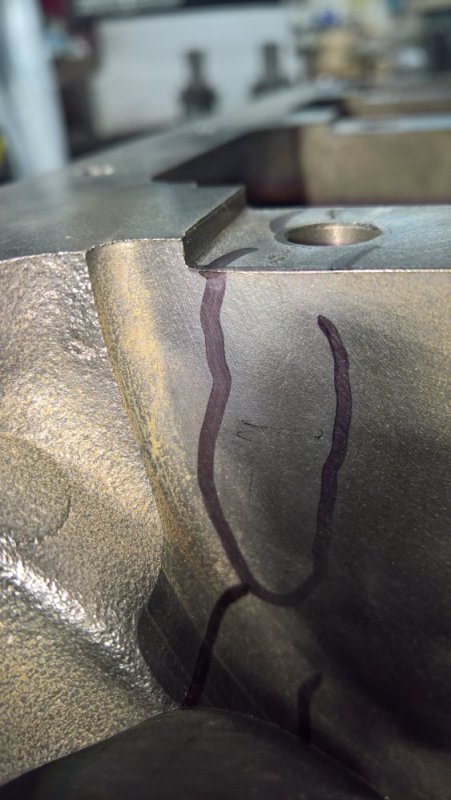
Got a call from the machinist. Cracked #2 web, crack goes to the end of the bolt hole. That was on an optimizer 6500 with DSG girdle.

581165811758114
58115

Options I see are:
  • Get all main studs and 5-web girdle, reuse the same block
  • Run as-is with the 3-web DSG girdle and bolts I already have
  • New bare block - any recommendations for Canadian supplier?
I asked the machinist to price a new bare block for me.
I'll also get a quote for the 5-piece web girdle: https://www.thetruckstop.us/forum/t...ments-with-pics.27629/#lg=post-328922&slide=0
 
Last edited:
A lateral girdle is only going to help cap walk. You need a full girdle for help on horizontal strength added. A 20 hole halo girdle would at least transfer A LITTLE of the stress to the other points for horizontal help.

If your going to do custom made girdle, I would say stud it all and halo all 20 together.

Did you balance the rotating assy? How was balancer and how many miles on it?

The issue I have with main studs is this:
Back in the early 90’s I did a wacky big block that had no studs available. So I figured out some To work and maxed out the stud capabilities as my torque. After destroying that block, I sent a block down to Cali ARP and had them do the testing. $7500 back then not counting materials. Turns out the torque was so high it did damage.
There are “kits” available now, but all the torque spec is effectively guess work. When I spoke to the folks at arp (several of them involved) they will not suggest even a starting point and have never load tested a 6.2/6.5.
I am stuck currently on determining proper torque.
I wont be able to touch my engine for another month or two due to life issues. So I cant release my findings until I get it done...

Studs ALWAYS win in adding strength but to little is obviously bad. Too much will strip threads out of a block or cause main web cracking.

Simple load cell testing would tell us the minimum to match factory. I am not after studs to stop cap walk- its a 4 bolt for crying out loud with interference side fit!

Tapping out the threads in block so thu are all equal then full use of bottom threads is how they can help.

If I were to run your block- I would at minimum lock and stitch, but more likely v groove and muggy weld.
 
I've ran a fluidampr since I bought the used rebuilt optimizer ~5 years ago. The seller said it had ~40K Km (25K miles) on the rebuild. It was in a parts truck and running great. I did not do a teardown / balance / rebuild, it went straight into my daily driver and lasted ~80K Km before a rocker retainer broke. I don't recall signs of wear on the stock balancer. If I proceed with the rebuild I will definately balance, my machinist has a stock balancer.

Assuming the used P400 I recently bought is good, I don't plan on building a max HP optimizer anymore. I'm hoping to continue using the optimizer in my current DD while working on the P400 and my future DD.
If all the non-halo (lateral) girdles do is stop cap walk then my 3-web DSG girdle would probably be as useful as a custom 5-web lateral girdle as far as the cracked web under cap #2 is concerned. I'd rather spend cash towards performance on the p400 so for me the cost to custom machine a girdle is off the table.

I wonder if over torque of the stud is the root cause of my web crack. I look forward to your load-test findings!

I'll get a quote for v-groove and muggy weld, if it's half the cost of a new bare block I will repair my current block and get the mains tapped down so deeper studs can be used. Is there a maximum depth that the inner / outer main holes can be drilled and tapped to? Need a number to tell my machinist if I go that route.
 
Last edited:
There are a ton of 6.5s with cracked main webs and never saw studs or girdles. Doubt the root cause was studs being over torqued. Out of balance is primary. Over torqued bolt or studs will amplify it.
 
Can you v-groove and muggy weld the length of the crack then install one loc-n-stitch pin at the end of where the crack was? I think doing that may further reduce the chance of the crack continuing since the end of the original fracture point is now a "dead end".

Also, how deep can you tap all of the main bolt holes? Can you tap all the way until there is light at the end (and use thread sealant on the stud) so you have the max possible fastening depth into the block?
 
Welding is stronger than locknstich, so I wouldn’t. The groove and weld would go beyond the crack area, even off the edge of the face and then it is machined where needed.

I tap to the bottom of existing seat, and obviously need to keep stud threads up high enough for the top. I can’t remember right now if arp says 2 or 3 threads should stick out the nut.
 
I tap to the bottom of existing seat, and obviously need to keep stud threads up high enough for the top. I can’t remember right now if arp says 2 or 3 threads should stick out the nut.
Sorry I don't know what you mean by seat, do you mean the end of the existing main bolt hole? Can (should) you drill the holes for the main bolts / studs deeper than the stock? Say if I wanted to use a main stud 3" longer than the stock bolt (with 3" of extra thread too) and insert it 3" deeper into the block than the stock bolt would go.
If you drilled & threaded the main bolt holes all the way into the water jacket you could measure the depth then get a very long stud to match so there is as much meat as possible holding the stud in. This would distribute the pull force from the stud across a much larger area of steel probably making the stud the weak point.
 
Last edited:
Yes, the bottom of existing hole.
7 threads hold the load, In some extreme cases up to 10 but never more.

Removing more metal by drilling deeper can weaken the webs also.
More stud or bolt length doesn’t help by more fastener material, they never fail if new. Taking full advantage of the holes that are already there helps. So fully tap what is there with a bottoming tap.
 
My friend who does pipeline NDT knows a top notch weld shop in Nisku Alberta that serves the oil and gas and mining industry. The owner has done a fair amount of cast iron welding before and can do my block himself. He drills out the ends of the cracks to stop propagation and then welds with the block preheated. Then repeats the drill and weld process working his way to the center of the crack.

This is one of his "average" weld jobs, not a block but his work is the best my NDT friend has ever seen.
71579882_2383807621901172_1314919927185932288_n.jpg
 
Update!

Precision Automotive in Grande Prairie wants me to not weld repair the crack because heat cycling the engine hardens the steel and it wears out bits on their machining equipment. They said I should tell them to go ahead and complete the machining without repairing the crack and run the engine until the crack goes up the cylinder wall. Pushed them to give me a quote to repair the weld or let me take the block and return it to them after the crack is repaired. The machinist said they won't do any work until I tell them to proceed with the block as-is or find a new block for them to work on. I started to tell him to at least balance the rotating assembly but he turned his back mid sentence and walked off into the shop saying let us know what you want us to do. I took the hint and left.

I called The Block Shop in Edmonton and Robert said they have worked on many blocks that were heated and welded before. As long as the block is cooled slowly the warping is minimal and they are willing to do the machining after.

I'll call Precision in GP on Friday and tell them I want my parts returned. They are welcome to keep the rotating assembly if they want to balance it. They have a great local reputation no shortage of work, so I can understand why they would turn down. The block has been with them since July 5th and I'm hoping to get my truck going before winter hits.

Sidenote, I bought splayed main caps on ebay for a 6.5, I'm thinking of putting them in this engine after it is repaired so the welded crack does not undergo the same stresses as before. I will get main studs all around and throw my 3 bolt girdle back on. Probably as good as I can do for this block without doing custom girdles.
 
Last edited:
*Correction they had the block since July 23'rd. They got the heads early July. Either way it's starting to drag out
 
Make sure you specify the balancing weight need to NOT be altered on the flywheel or balancer. Tell them to do it all on the crankshaft.

Otherwise if you ever have to replace balancer or flywheel, it will then be out of balance.
 
Back
Top