• Welcome to The Truck Stop! We see you haven't REGISTERED yet.

    Your truck knowledge is missing!
    • Registration is FREE , all we need is your birthday and email. (We don't share ANY data with ANYONE)
    • We have tons of knowledge here for your diesel truck!
    • Post your own topics and reply to existing threads to help others out!
    • NO ADS! The site is fully functional and ad free!
    CLICK HERE TO REGISTER!

    Problems registering? Click here to contact us!

    Already registered, but need a PASSWORD RESET? CLICK HERE TO RESET YOUR PASSWORD!

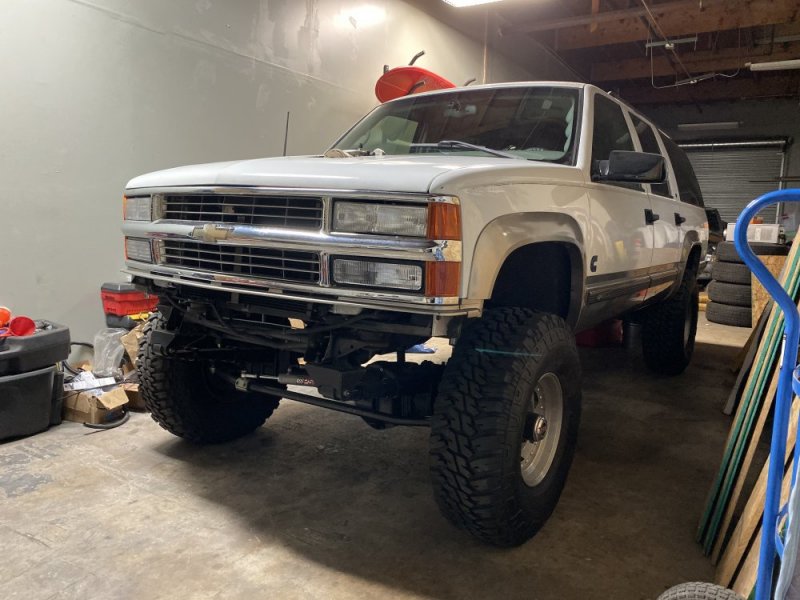
99 Suburban 6.5 to 5.9 Cummins Swap

Got the trans and transfer case installed(that was a pain in the ass), Trans crossmember moved, torsion crossmember back in, driveshaft doesn’t need to be shortened because lift allowed for there to be proper distance between tail housing and axle yoke (pleasant surprise).

I tried to connect my gear selector cable to the trans and it is now too long? the distance between the C bracket that holds the plastic retainer is in the same place, but the cable itself is about an 1” too long. Any ideas?
 
Lol figured it out. Rookie mistake. Had the lever on backwards. Trans is all rigged up now.

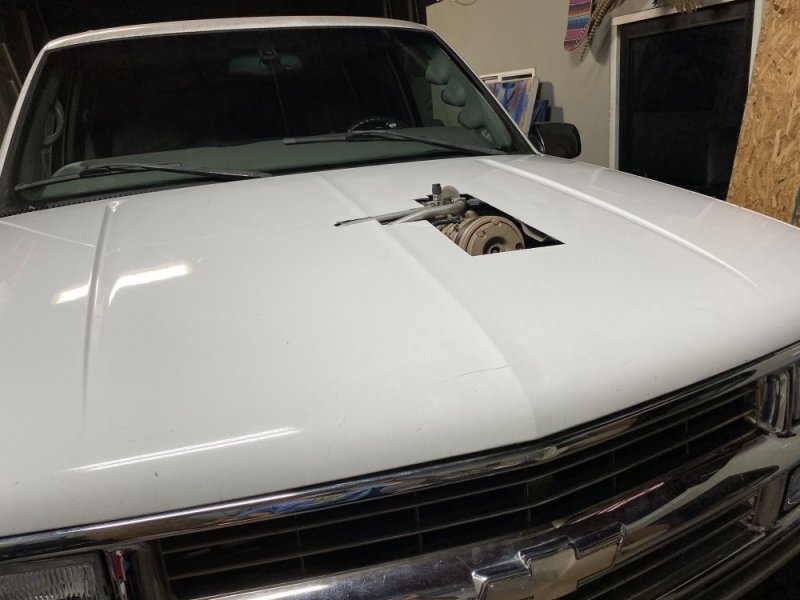
I am philosophically opposed to body lifts, so I cut my hood. Some people have blowers, I have an Air Conditioner. Miscalculated on the front horizontal cut, went about 3” too far forward.
CB9B157D-8A51-4986-BF27-0E720A9F015F.jpegEA96FC5B-8609-4C87-A5E3-15CBC2B38FAD.jpeg

Still don’t know what I’ll do to finish it. I generally don’t like cowl induction hoods on trucks, so I may have a bulge grafted on akin to a 1st gen Eclipse or if I’m willing to really get fancy, do a NBS HD hood conversion.

60AA53A5-CB22-4C84-8986-F8C141DC7934.jpeg
 
OEM driverside battery tray location locates battery where it interferes with the outlet rad hose inlet of the radiator. I tried putting spacers under the rad, but creates interference with the hood. Any easy solutions? I know Leroy Diesel removed his overflow tank and placed a battery back there. Thoughts?
 
OEM driverside battery tray location locates battery where it interferes with the outlet rad hose inlet of the radiator. I tried putting spacers under the rad, but creates interference with the hood. Any easy solutions? I know Leroy Diesel removed his overflow tank and placed a battery back there. Thoughts?
Simple fix, is to remove the tray and smack the inner wheelwell at the rear of the battery tray and cut the lip off the drivers side of the tray itself this way the battery slide over tto the drivers side will clear the radiator hose etc. However; the bolt at top attaching the tray to the inner fender can be ground down about halfway for more clearance too. Once this is all done you will need to fabricate a space to slide into the inner side of the tray and battery so battery will not slide into radiator hose or neck.....
 
Got the truck started last night, but only because I manually jumped the fuel solenoid relay. Sounds rad and I'm sure you all know how great it feels when it starts for the first time. That said, I'm wondering where I should run the other 2 wires on my solenoid harness from Larry B's.

RED to battery
BLK to engine
WHT currently to small terminal on starter with his diode in-line
BLU to ???, I'm thinking IGN-E in the underhood fuseblock with a fusetap?

The WHT to the starter is supposed to trigger the solenoid, and the BLU is supposed to "hold". The WHT didn't trigger the solenoid to open at all, despite what the instructions included with the harness said.

Thoughts?
 
Ok, so I got the wiring figured out. It now starts, runs, and stops with the turn of the key.

For all of the amateurs like me, the relay harness from Larry B's goes as follows when installing in a GMT400.

RED to battery with fusible link
BLK to engine ground
BLU to IGN-E in the underhood fuseblock. I used a fuse tap. 2 10A fuses.
WHT goes to starter. This is where my problems arose. So I also purchased the diode from Larry B's. The hoop connector of the diode goes to the starter post. The WHT from the relay harness goes to the stud of the diode, and the
PPL goes to the stud of the diode as well. What was happening was the electrical signal wasn't being sent to the relay because the diode is directional.

That said, she should be road worthy this weekend. I'll report back with a moving vehicle.
 
Update:
-Exhaust done, 4” mandrel bends from turbo back, coupled to existing 4” diamond eye kit with v band clamp
-Tranny cooler mounted and lines run, though I still need to wire the fan
-upper rad hose done, auto parts store closed too soon for me to finish piecing together the lower. Headed to shop now.
-all the lights and stuff work as far as I can tell.
-I have a GM CS130 alternator mounted, I thought I had the wiring correct for the tach, but apparently not. I understand the tachometer is run from the alt. On my 1999 6.5, there was a WHT and a BRN going to the alternator plug on the CS130D. I understand the differences in tach signals between a v8/i6/pulley size etc. Different pulleys can be had, that doesn’t worry me. Thoughts?
 
What did you do for headlight clearance around the intercooler? I trimmed the adjuster on the driver side light, but now there is nothing to keep it from moving horizontally. Probably should have researched it more before breaking out the body saw. I can JB Weld something in to fix it in place I guess if you don't have a better solution.
 
To get the factory headlights to work without going to the “work truck” front clip, you have to actually modify the upper side tanks of the 2nd gen intercooler. I don’t have any pics of mine unfortunately, but there is another guy that did it, his name is crummins and he did a swap with a 1996 suburban.
 
Ahhhhhh I know what you mean, I had that thought real quick before I cut the adjuster. I think I can make it work, just need to figure out how to fix the light from moving.
 
Ahhhhhh I know what you mean, I had that thought real quick before I cut the adjuster. I think I can make it work, just need to figure out how to fix the light from moving.
I think new adjuster screws and the plastic clips can be purchased, maybe even from a parts store. Unless the mod went deeper to the root of the matter. LOL
I do have a set of stock headlamp assemblies that cam off My 2000 3500 truck, at least I think I still have them if You are in need.
I changed Mine to the quad glass lamp system from an 88 pigup truck.
 
I'll get a pic of the carnage and post it on my thread. I basically hacked off the inward portion of the adjuster bracket with the horizontal adjuster and the adjuster attachment point on the headlight housing. It fits with the intercooler, but will flop around if I dont attach it somewhere.
 
Basically, what you do is mark the corners of the end tanks to provide enough clearance, cut the corners off on those lines, take the cut off corners and turn them "inside out", then heliarc them back into place so that you now have recesses that allow clearance for the headlight assemblies. The trick is to mark the cuts (symetrically) so that when you turn each piece inside out, they line back up reasonably precise to their cutouts so that you don't have large gaps to try and fill back in when you heliarc weld them back in. Then laying down a good, air tight bead to hold pressure in the CAC.
 
Damn, did you watch the end of the Daytona 500 Monday night, speaking of duct tape? That was one wicked wreck on the last lap.

I didn't see the end, but that was all I saw when I tried to see who won. Glad he got out of the hospital under his own power today.

I have a pretty good aluminum fabricator I could take the IC to for mods, but I will try the modifying the adjuster brackets first.
 
Back
Top