• Welcome to The Truck Stop! We see you haven't REGISTERED yet.

    Your truck knowledge is missing!
    • Registration is FREE , all we need is your birthday and email. (We don't share ANY data with ANYONE)
    • We have tons of knowledge here for your diesel truck!
    • Post your own topics and reply to existing threads to help others out!
    • NO ADS! The site is fully functional and ad free!
    CLICK HERE TO REGISTER!

    Problems registering? Click here to contact us!

    Already registered, but need a PASSWORD RESET? CLICK HERE TO RESET YOUR PASSWORD!

Reviving The Bus Engine

Cylinders and timing set

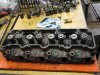
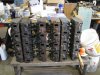
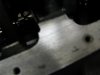
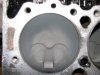
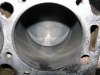
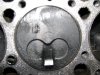
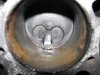
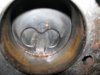
Since I have to dig for different heads I moved to the cylinders. At first glance they look ok except for #4 and #6. Those 2 have a slight amount of rust near the tops of the bore. The rest had a very slight amount of carbon above where the top ring stops at the top of the bore.
The carbon cleaned off with some lacquer thinner. The light rust cleaned up with a fine wire brush that looks like a tooth brush. All good to go.:thumbsup:
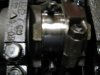
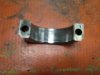
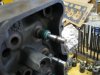
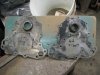
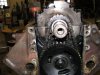
Before I had the timing cover off, I was turning the engine over by hand and thought the timing chain seemed tight yet.[most don't get loose untill 200,000 miles] After I removed the timing cover I found out differently. There was slightly over 1/2" slack in the chain:eek:. Spec is 1/2" allowable slop. Ordered a new Cloyes timing set from Rockauto. I've heard that you only need the chain because the sprockets don't wear. For less than $15 for the sprockets I won't take the chance. The Cloyes sets are much tighter when new than a Melling set was. The one melling set that I used had 1/4" slop when new[half shot out of the box:mad2:]
Caught up to where I'm at today. Timing set showed up yesterday afternoon.
The cylinder pics are in order 1-8
 

Attachments

  • IMG_0443_13.JPG
    IMG_0443_13.JPG
    48.4 KB · Views: 4
  • IMG_0450_20.JPG
    IMG_0450_20.JPG
    32 KB · Views: 3
  • IMG_0449_19.JPG
    IMG_0449_19.JPG
    32 KB · Views: 4
  • IMG_0448_18.JPG
    IMG_0448_18.JPG
    43.7 KB · Views: 4
  • IMG_0447_17.JPG
    IMG_0447_17.JPG
    40.7 KB · Views: 4
  • IMG_0446_16.JPG
    IMG_0446_16.JPG
    49 KB · Views: 4
  • IMG_0445_15.JPG
    IMG_0445_15.JPG
    41.1 KB · Views: 4
  • IMG_0444_14.JPG
    IMG_0444_14.JPG
    47.9 KB · Views: 4
  • IMG_0457_5.JPG
    IMG_0457_5.JPG
    52.7 KB · Views: 6
I wonder if timing chain slop/wear is related to oil soot levels/soot dispersent additive pkg/oil change interval, as is axle wear on the hydraulic lifter rollers? If so, good additional reason to keep current on oil change intervals.
 
Have you looked closely at the main webs? I have a 92 599 6.5 block with 3 cracks :(
Yes, I checked the mains very closely. Even got out the magnfying glass just to be positive I wasn't building a expensive turd. Checked the cylinders too.:thumbsup: The "P" chassie busses had bigger cooling systems than the pickups and this is a 6.2 so it has thicker cylinder walls. No cracks on the heads either. Just sucks that one had to warp.
 
I wonder if timing chain slop/wear is related to oil soot levels/soot dispersent additive pkg/oil change interval, as is axle wear on the hydraulic lifter rollers? If so, good additional reason to keep current on oil change intervals.
The insides were very clean on this engine. No sludge anywhere. Inside of the valve covers was clean unstained steel. The breather filter material in the passenger side valve cover didn't hardly have any black stuff come out in the parts washer. Curious to see how tight the bearings are yet. The timing chain could have been a sloppy one from the factory like the melling chain I bought.
 
That is possible but it really looked like it had never been out of the bus. I saw it before it was pulled.
 
What are ya gonna put this in?
For now it's going to be a back-up engine for the 93 if it fails the compression test.:sad: Otherwise I have a 77 GMC 1 ton dually that is a possibility.It would be pretty cool under the hood of my 87 monte carlo ss.:D I do have a 2wd 4l80E and a complete wiring harness out of a 93 6.5 truck.:thumbsup: I have engines for the other blown up trucks in my sig. Just need to put them in.:rolleyes5:
 
The good news and the bad news

THe good news is that after spending a week cleaning and checking heads I came up with a useable pair after cleaning and checking 4 sets:mad2:. So I was going to swap pre chambers off some of the cracked heads because they were bigger. Nope. All of them cracked when I removed them from the donor head:mad2: Ok ,I guess the smaller pre-cups will do just fine. Disassembled both heads and washed them in the parts washer. Installed new positive control oil seals pn the exhaust valves[green] and the o-ring oil seals on all the valve stems. Springs and locks back on. Ready to install on the block when ready.:thumbsup:
So it's time to peek at the bearings. I took one rod bearing cap off and it looked great. Went to the tool box to get the package of plasti-gauge to check clearance. Nope, None there:mad2:. Ok ,well it looked great so move on to the timing chain and gears. Well maybe I should clean the oil pan gasket surface up some while it's upside down. I got a small drill to drill the rtv out of the oil pan bolt holes and then started scraping the gasket surface with a razor blade. :eek: I had looked the block over around the main bearing s for any sign of a crack. I don't know how I could have missed this. There is a crack down the whole length on the passenger side:mad2::mad2::mad2::mad2: It's out in the gasket surface, not in the web so much. That pretty much ends the revival of this bus engine. The internals would be good donors to a aftermarket block. RIP:shiiiiiite::shiiiiiite::shiiiiiite:
 

Attachments

  • IMG_0484_10.JPG
    IMG_0484_10.JPG
    46.7 KB · Views: 3
  • IMG_0483_9.JPG
    IMG_0483_9.JPG
    49.4 KB · Views: 3
  • IMG_0482_8.JPG
    IMG_0482_8.JPG
    54.8 KB · Views: 3
  • IMG_0481_7.JPG
    IMG_0481_7.JPG
    33.5 KB · Views: 4
  • IMG_0480_6.JPG
    IMG_0480_6.JPG
    35.8 KB · Views: 3
  • IMG_0479_5.JPG
    IMG_0479_5.JPG
    48.7 KB · Views: 3
  • IMG_0473_7.JPG
    IMG_0473_7.JPG
    38.8 KB · Views: 6
  • IMG_0471_5.JPG
    IMG_0471_5.JPG
    39.1 KB · Views: 5
  • IMG_0486_12.JPG
    IMG_0486_12.JPG
    28.5 KB · Views: 16
  • IMG_0487_13.JPG
    IMG_0487_13.JPG
    30.9 KB · Views: 15
wow that's unusual
Yea, I spent a couple hours looking the cylinder walls and main bearing webs over with a bright light and magnifying glass. I've seen a half dozen that have cracked and looked most in the common places. Who'd a thunk it would try to rip the water jacket off.
I kinda forgot the good part. I now know I have a uncracked set of heads with new seals and small pre-cups.
 
I did forget to mention one other good thing. All the parts I bought can go on other engines. I bought ARP head studs,timing chain and gears,head and timing gaskets and alpine green paint.
 
Yea, I spent a couple hours looking the cylinder walls and main bearing webs over with a bright light and magnifying glass. I've seen a half dozen that have cracked and looked most in the common places. Who'd a thunk it would try to rip the water jacket off.
I kinda forgot the good part. I now know I have a uncracked set of heads with new seals and small pre-cups.

Without having a bare block to look at, I can't recall how close the water jacket gets to that point? Any chance this crack could have been related to inadequate antifreeze concentration/freeze expansion?
 
Without having a bare block to look at, I can't recall how close the water jacket gets to that point? Any chance this crack could have been related to inadequate antifreeze concentration/freeze expansion?
I wouldn't rule that out but it is much thicker cast where it cracked than the outer skin of the block. The crack is on the passenger side where it gets all the torque load. I'm guessing that beings it was in a very heavy bus[10,000 lbs empty] it pulled very hard against that side and cracked:confused:
 
iv heard about a method of lock-n stich where you drill and tap and put a cast plug in and then you over lap that one with another the whole leangth of the crack would that work
 
iv heard about a method of lock-n stich where you drill and tap and put a cast plug in and then you over lap that one with another the whole leangth of the crack would that work
The crack goes the whole length of the block like it tried to tear the inner from the outer. I'd have to think there is internal cracks where you cant see them. The crack is a ways away from the main bearing cap bolts but it is way too long for me to stick any money into. I'll save the internals for another block someday.
 
Back
Top