• Welcome to The Truck Stop! We see you haven't REGISTERED yet.

    Your truck knowledge is missing!
    • Registration is FREE , all we need is your birthday and email. (We don't share ANY data with ANYONE)
    • We have tons of knowledge here for your diesel truck!
    • Post your own topics and reply to existing threads to help others out!
    • NO ADS! The site is fully functional and ad free!
    CLICK HERE TO REGISTER!

    Problems registering? Click here to contact us!

    Already registered, but need a PASSWORD RESET? CLICK HERE TO RESET YOUR PASSWORD!

Reviving The Bus Engine

bk95td

6.5 nut job/addict
Messages
2,548
Reaction score
29
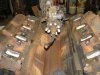
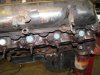
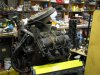
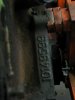
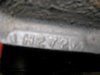
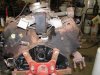
I'm starting work on reviving a 93 "599" "J" 6.2 engine out of a short bus. I purchaced this engine from a small junkyard 25 miles away for $300.:thumbsup: The bus had 92,000 miles on it and was junked because of 4l80E transmission troubles.
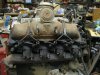
This engine is being set up to replace 92-93 pick-up engines with mechanical fuel injection and a turbocharger.
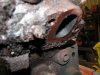
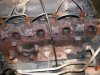
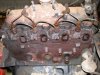
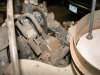
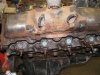
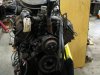
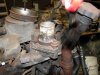
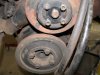
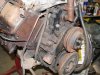
These engines have a few minor differences from a 6.5 turbo engine. This engine had v-belt accessory drive instead of a single surpentine belt. This ment that all of the accessory drive parts and waterpump and water pump backing plate will have to be swapped from a donor engine. 91-95 6.2 and 6.5 truck engines will have the right parts for use in a truck.Not shure how van engines run the accessorys.:confused:
The coolant crossover and oil dipstick were also different and would have to be swapped from a truck. Since this is going in a mechanical fuel injection application the timing cover will not need to be swapped for one with cps provisions.
 

Attachments

  • IMG_0142_23.jpg
    IMG_0142_23.jpg
    47.1 KB · Views: 8
  • IMG_0143_24.JPG
    IMG_0143_24.JPG
    42.7 KB · Views: 7
  • IMG_0145_26.JPG
    IMG_0145_26.JPG
    43.7 KB · Views: 7
  • IMG_0384_2.JPG
    IMG_0384_2.JPG
    37.3 KB · Views: 7
  • IMG_0386_4.JPG
    IMG_0386_4.JPG
    52.1 KB · Views: 7
  • IMG_0387_5.JPG
    IMG_0387_5.JPG
    53.5 KB · Views: 7
  • IMG_0393_11.JPG
    IMG_0393_11.JPG
    47.7 KB · Views: 6
  • IMG_0392_10.JPG
    IMG_0392_10.JPG
    44.3 KB · Views: 7
  • IMG_0391_9.JPG
    IMG_0391_9.JPG
    50 KB · Views: 8
  • IMG_0390_8.jpg
    IMG_0390_8.jpg
    45.9 KB · Views: 8
Sounds like a great project. Good photos! Please keep up updated with photos and commentary!

-Rob :)
 
continued

Some other small differences are the oil fill was different and the oil pressure switch will need the 90 degree elbow. As a note: this engine is very similar to a military take-out/surplus engine. I have had this engine for almost a year and had been soaking the exhaust bolts and glow plugs every time I thought about it with PB Blaster. The exhaust manifold bolts had rusted so bad that instead of a 15mm socket I had to pound a 1/2" socket on them to be able to turn them out. Of coarse one glow plug snapped off even after all that soaking:mad2: I welded a 3/8 nut to the stub 5 times before it finally started to wiggle. It obviously hadn't had anti-seize used on it when installed.:nonod:
My plan is to remove the heads to replace head gaskets ,check cylinders, install ARP head studs, HO water pump, replace timing chain, if needed, new front and rear main seals and reseal oil pan and valve covers. I'll be checking the webs of the block and heads for cracks and checking the heads and decks for warpage. Maybe peek at the bearings and plastigauge for clearance.
 
Hey this sounds just like the build im going to do glad you are going to document it sure will be helpfull to this newbee in engine building
 
Cliced the wrong place and couldn't load pics on the last post. More disassembly pics
 

Attachments

  • IMG_0419_3.JPG
    IMG_0419_3.JPG
    47.2 KB · Views: 8
  • IMG_0404_22.JPG
    IMG_0404_22.JPG
    37 KB · Views: 5
  • IMG_0403_21.jpg
    IMG_0403_21.jpg
    46.1 KB · Views: 5
  • IMG_0402_20.jpg
    IMG_0402_20.jpg
    45.6 KB · Views: 5
  • IMG_0399_17.JPG
    IMG_0399_17.JPG
    43.9 KB · Views: 6
  • IMG_0398_16.JPG
    IMG_0398_16.JPG
    38.7 KB · Views: 7
  • IMG_0397_15.JPG
    IMG_0397_15.JPG
    47.5 KB · Views: 6
  • IMG_0396_14.JPG
    IMG_0396_14.JPG
    51 KB · Views: 7
  • IMG_0421_5.JPG
    IMG_0421_5.JPG
    46.6 KB · Views: 6
  • IMG_0420_4.JPG
    IMG_0420_4.JPG
    49.2 KB · Views: 7
continued

Intake off. Got the fuel injection lines off[pia on the pump]. Injectors out. Valve covers off. Rocker arms removed. Important note:Quart and gallon ziplock bags and a sharpie marker are a must to keep track of bolts and parts. I also took a piece of 2x6 wood and drilled holes1 inch deep to store push rods in. Twisties from baggies are good to mark which end is up on the push rods also.
As I remove different parts ,I take the bolts and nuts to the wire wheel to clean grease,rust and any sealant off the threads.I also take a thread chaser to all threaded holes in the block heads and any other parts. My thread chaser set is a KA Star metric and standard male and female set. It was around $30 and worth it's weight in gold. I use foam rod that you can buy at home depot or others to plug the injector holes and intake holes. More pics
 

Attachments

  • IMG_0440_10.jpg
    IMG_0440_10.jpg
    44.9 KB · Views: 3
  • IMG_0439_9.jpg
    IMG_0439_9.jpg
    47.5 KB · Views: 4
  • IMG_0437_7.JPG
    IMG_0437_7.JPG
    43.7 KB · Views: 3
  • IMG_0436_6.JPG
    IMG_0436_6.JPG
    42.3 KB · Views: 3
  • IMG_0432_2.JPG
    IMG_0432_2.JPG
    34.3 KB · Views: 3
  • IMG_0427_11.JPG
    IMG_0427_11.JPG
    41.5 KB · Views: 3
  • IMG_0423_7.JPG
    IMG_0423_7.JPG
    39.9 KB · Views: 3
  • IMG_0422_6.JPG
    IMG_0422_6.JPG
    27.3 KB · Views: 3
  • IMG_0441_11.JPG
    IMG_0441_11.JPG
    45 KB · Views: 4
  • IMG_0442_12.jpg
    IMG_0442_12.jpg
    46.3 KB · Views: 3
heres a dum question how the heck do you take the block heater out???
There is a hex socket [allen head] screw in the center of the heater. Loosen that as far as you can and pry it out with a chisel or flat screwdriver.
 
Time to pull the heads. I use my torque wrench to gradually loosen the head bolts in a reverse pattern from what they were tightened. I take it in 3 steps. 80ft. lbs.-40-loose. The head bolts on this engine varied widely in torque. This is the reason I won't use the tty bolts. They don't retain their torque under heat and vibration. I gave the heads a whak with the rubber hammer in several places to help unstick the head gaskets. Lifted right off holding in opposite corners. Now to cleaning the gasket material off the heads and block.
This is one of the worst things to do in this project. I start by scraping most of the material off with a razor blade while holding the shop vac hose with the other. This stuff ends up going all over even with the vac right there. I stuff rags down on top of the lifters to catch it.After i think I have it all I start scraping again. More of the graphite stuff keeps coming off. Then I take a wire cup brush in a slow electric drill to go over it again. Then another time with the razor blade. This takes a very long time and is the reason I wouldn't replace heads in the truck.
checking for warpage
This is a very critical part of this whole job. I have a precission straight edge that I bought from summit racing. $75 for a piece of ground barstock.I set the straight edge on the block deck and try to slip a .003 feeler gauge under it. Wont fit under anywhere on either deck either way. Looking good so far. Next to check the heads. I took 4 long bolts that thread into the valve cover bolt holes to use as legs when standing the head upside down. Lat the straight edge on the surface being shure not to have it on any of the pre cups because they can stick up .002". Check both directions 1st head good. 2nd head not so good. .008 bow in the center of the head. One for the scrap bin. It had no cracks and did not leak. I'll have to find a mate or a pair in my parts pile.
 

Attachments

  • IMG_0451_21.JPG
    IMG_0451_21.JPG
    53.8 KB · Views: 6
  • IMG_0452_22.JPG
    IMG_0452_22.JPG
    43 KB · Views: 5
  • IMG_0453_1.JPG
    IMG_0453_1.JPG
    36 KB · Views: 4
  • IMG_0455_3.JPG
    IMG_0455_3.JPG
    47.8 KB · Views: 4
  • IMG_0454_2.jpg
    IMG_0454_2.jpg
    45 KB · Views: 7
where did you get the thread chaser
I bought it at Fleet Farm store. I doubt that they have stores in nebraska. You might try googleing KA Star to see if they have a contact or directory where to buy. I would have to think some on-line tool store would sell them.Maybe e-bay?
 
ill check Tractor supply they got lots of stuff

how do you remove the pre cupps i am setting my old heads back on the block and i will want the T cups for the new heads how the heck do you get them out???
 
Thats awesome your doing another engine buildup. You truly have a talent for engine buildups. Especially the paint job lol.
 
where did you get the thread chaser

Seems the trick to finding them online is searching the keyword "rethreader" instead of thread chaser.

I've seen a set somewhat similar on the Sears/Craftman website. Just saw Summit Racing has added a selection of thread chasers under the ARP label - pricey, but most likely good quality if you're gonna use them a lot.

Both Harbor Freight & Northern Tool (among others) sell that parts washer. Not a bad value for the cost. Been using mine for 10+ years. Most common failure is the power switch. They go on sale rather consistently, so logical to buy on sale if you can wait.
I've seen the arp chasers. Yes,very spendy. The KA Star set is very good quality. I have not broke any pieces in 15 years. I had a standard set where I used to work and used a impact wrench on them all the time.:thumbsup:
You hit the nail on the head with the parts washer.It came from northern tool about 15 years ago and the power switch is starting to fall apart.:eek:
 
Back
Top