• Welcome to The Truck Stop! We see you haven't REGISTERED yet.

    Your truck knowledge is missing!
    • Registration is FREE , all we need is your birthday and email. (We don't share ANY data with ANYONE)
    • We have tons of knowledge here for your diesel truck!
    • Post your own topics and reply to existing threads to help others out!
    • NO ADS! The site is fully functional and ad free!
    CLICK HERE TO REGISTER!

    Problems registering? Click here to contact us!

    Already registered, but need a PASSWORD RESET? CLICK HERE TO RESET YOUR PASSWORD!

Redneck 1-Piece Rear Main Seal Installer Tool

emmott

Well-Known Member
Messages
173
Reaction score
352
Location
Alberta
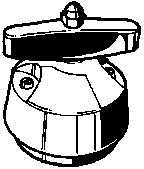
Installing the one piece rear main seal is difficult without tool J-39084, because the back of the crank sticks out past where the installed seal is supposed to go.
1625891937661.png
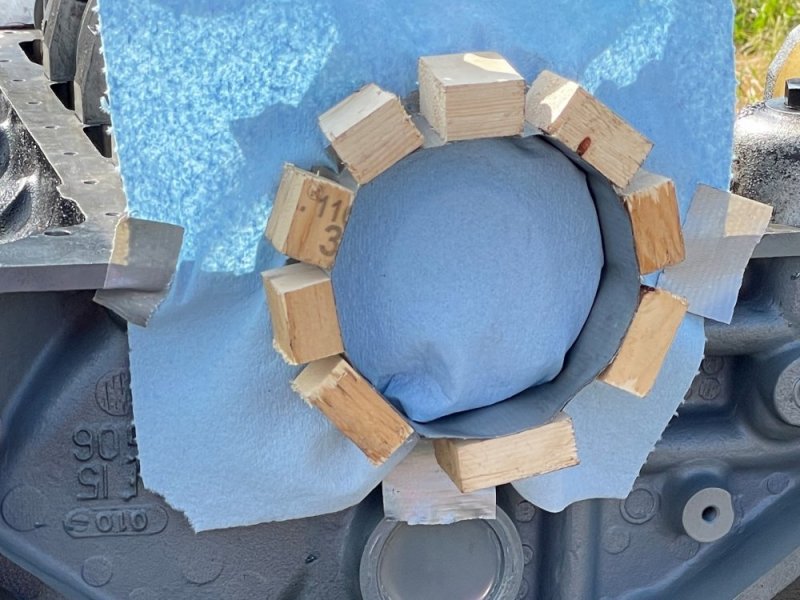
Here's what I rigged up if anyone else is looking for ideas. No idea how anyone else does it, this is just what I impatiently came up with on the fly.
Considering the price of wood these days it's probably cheaper to just buy the right tool.

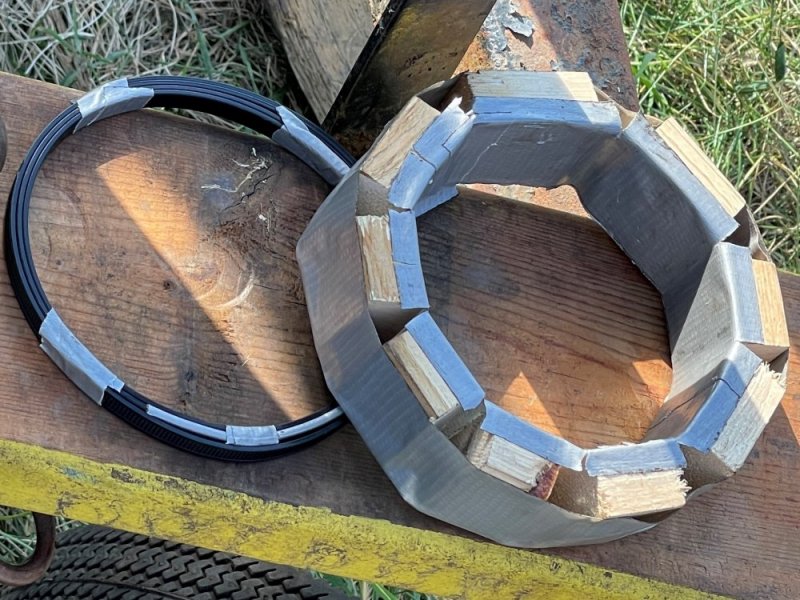
I started by cutting a survey stick into smaller pieces and taped them into a circle. The cuttings were oriented so the height of the circle was consistent all the way around. A shop towel was placed over the block and seal to protect the seal from contaminants.
20210704_234849812_iOS.jpg
The seal can be installed flush or be inset, there is a lip inside the cavity which prevents the seal from going too far in (the ID of the lip is smaller than the OD of the seal), unless you try to really thrust the seal in and damage it. If you want to install it flush with the block, the wood circle, a 2x6, and a mallet is all that is needed. Place the 2x6 over the wooden circle then tamp it squarely in. The GM manual says to apply grease or oil to the seal where it will contact the crank. My seal came in the box with lube already on it.

If you want the seal to be inset, a second circle can be made from cutting up zip ties and taping the tags into a circle. The zip tie circle would go on the seal then the wood circle would go over the zip tie circle.
20210705_002801267_iOS.jpg
20210705_002726637_iOS.jpg
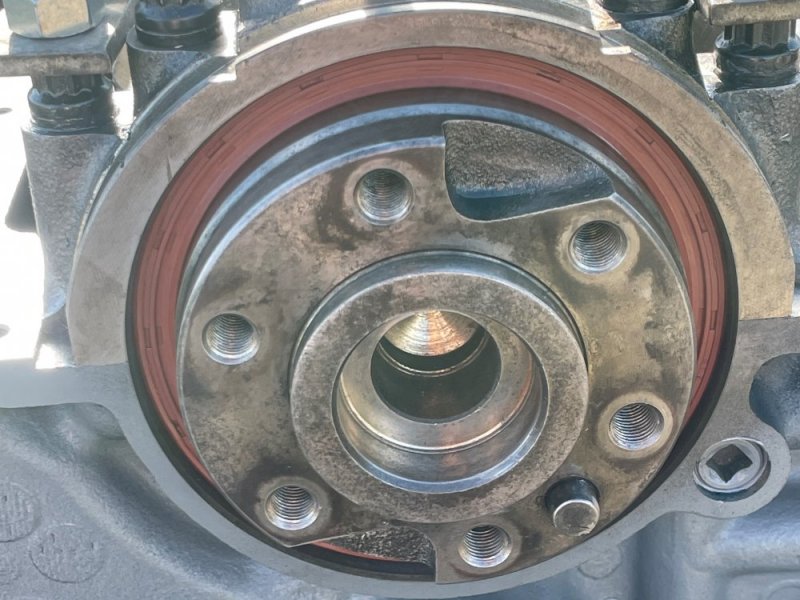
Here a picture showing how far the seal can be inset before contacting the inner lip in the cap / main.
20210705_002837023_iOS.jpg
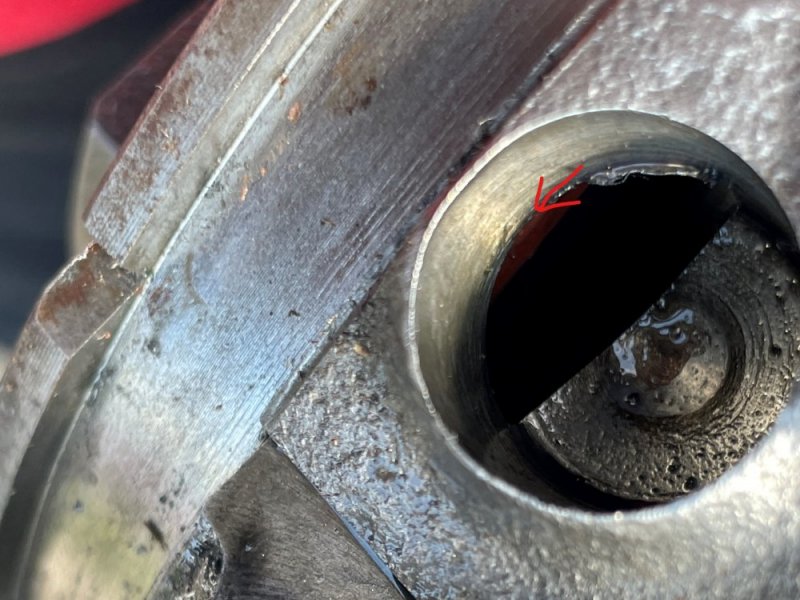
When inset enough to contact the inner lip in the cap / main, the back of the seal sits flush with the edge of the oil entry hole.
Inked20210705_002908445_iOS(1)_LI.jpg
If anyone has an easier way of doing it please share!
 
Last edited:
Thats a mighty ingenious tool You built there.
Looking in ebay, I see there is the GM tool for $49.99 with free shipping.
I think that for a one time use, Your system would work just fine for Me.
One thing I sometimes forget to do, look to see how deep in the original is recessed. Then when I install the new seal, either dont install it as deep, or install it deeper so it will be running on virgin surface.
 
I usually take a good looking at how deep the old seal is.
After removing to old seal then giving a good visual to the wear on the crankshaft sealing surface.
If the sealing surface is rough or grooved, try to get in and clean it up with some 400 grit. As best as possible.
The when installing the new seal, push it into the bore deeper, or, shallower, depending on the situation.
I try to never use a speedy sleeve. Those things makes the shaft diameter larger, when the new seal is installed, there is a LOT of extra pressure on the sleeve and in a short amount of time, the sleeve is cut through and the leak is worse than ever. It is too bad that the seal companies dont make seals that allow for that extra diameter.
If on a harmonic balancer, not a diesel engine balancer, I have taken them to the machine shop and had them turned down and, a sleeve of the same diameter installed, same as factory specs.
Usually with a diesel engine balancer, the compression is so much higher, if they are machined down, they will crack at the key way. Even with a sleeve installed.
I dress up the old sealing surface as good as possible, install a new seal and run with it.
 
This must be a werid issue cause i have 10k on my new engine but its be like 4 years. Roughly

But its man made and just a few hours of work no biggie.
That is weird. And absolutely no place from above it could be leaking ?
You could try some dye in the oil, run it for a week or so then, one of those inexpensive UV flash lights would let You see anyplace that the oil would be leaking from.
 
That is weird. And absolutely no place from above it could be leaking ?
You could try some dye in the oil, run it for a week or so then, one of those inexpensive UV flash lights would let You see anyplace that the oil would be leaking from.
For sure running down back of oil pan and out torque convertor dust cover check ops hose cause its relocated to firewall checked oil filter adaptor and housing as its relocated. I cant remember but im hoping the p400 has same style seal
 
if you do determine it's the rear main, get a good look at the crank area the seal is in and the block area, make sure there isn't any wearing or scaring. though it's possible you had gotten a defective seal that was sitting a long while on a parts shelf somewhere and has dry rotting.

I don't know enough about these engines but is your's a manual tranny? just thinking about the thrust bearings and how a worn thrust bearing causes crank end play. not sure if excessive end play can cause a seal to fail quickly. though I think excessive end play would wreck havoc on a timing chain and cover too! isn't there a "freeze" plug in the back of the block where the cam is, covering it and an oil passage too?
 
This must be a werid issue cause i have 10k on my new engine but its be like 4 years. Roughly

But its man made and just a few hours of work no biggie.
I’m with D Brannon on the old seal idea. How long the seal had set before being installed into the engine.
Be sure to check the new seal for flexability before installing it.
I’m also a bit sceptical about if the oil is coming from up higher. Sometimes it is mighty tough to determine where an oil leak is originating from.
For instance :
A 305 V6 in a 67 GMC I once owned. Oil leak at the back of the engine. I crawled around that thing for a week trying to determine where it was originating from.
I had determined the rear main seal was out. I did not have time to mess with it so I took it to a shop.
Several hours later the mechanic called Me and asked if there was a specific reason to replace the rear main seal, told him I figured it is leaking. He replied that the leak is coming from tje rear of the valley cover. Okay, he replaced that gasket and that engine never leaked another drip or drop.
So, before doing a bunch of dismantling, be sure where the oil is coming from. Possibly even a rocker cover.
 
Walked this road too many times. Clean the heck out of it especially around the valve covers and even plug the drain hole and let it build up in the valley. Use baby powder around to help find where the leak is coming from.

I never had the above problem with speedy sleeves, quite the opposite in fact. Ran many for tons of miles personal and in fleet rigs, I really can’t remember a single one failing after having installed around 30 myself and another 10 or so by other fleet mechanics. But I can not remember ever doing on on the rear main seal, so maybe that area could be bad for them?

When it comes to the 1 piece seal, making sure it is pliable and getting it wet with oil or assembly lube before install is critical.
Just as critical is using the specialty tool. I don’t understand why, I have installed countless seals by tapping into place with hammers, drifts, pieces of wood, etc.
But everyone I did rear main seal like that leaked within 50,000 miles. I bought the kentmoore tool and installed maybe 40-45 before the lip wore out it wasn’t worth using anymore. The seal tore so I removed that one and threw away that seal and tool. Another guy in the shop loaned me his and the truck was on the road that day with a new, new seal.

I didn’t buy a new one thinking I was done with wrenching and did try one more time to install one on in my hummer (the new optimizer at about 30,000 miles very slightly after 40,000 miles. I tried without a tool again having done so many with it, figured experience would cover me. Nopers. It started leaking again, very slowly and I didn’t even know it until I pulled the engine for this ruined piston. So I bought the new tool again. Crankshaft is absolutely perfect. When the machinist balanced the rotating assembly, perfecting yonder surfaces is a given. His opinion was same as mine- surface was perfect.

That is one of only two seal installer tools I have ever thought was better that doing without them. I simply do not understand, but there is something about this design. Just get the tool.

I hope for his sake, emmott gets to prove me wrong on his, but I just never seen one make it 100,000 miles without using it. But using the tool- they out last engines all the time.
 
Back
Top