• Welcome to The Truck Stop! We see you haven't REGISTERED yet.

    Your truck knowledge is missing!
    • Registration is FREE , all we need is your birthday and email. (We don't share ANY data with ANYONE)
    • We have tons of knowledge here for your diesel truck!
    • Post your own topics and reply to existing threads to help others out!
    • NO ADS! The site is fully functional and ad free!
    CLICK HERE TO REGISTER!

    Problems registering? Click here to contact us!

    Already registered, but need a PASSWORD RESET? CLICK HERE TO RESET YOUR PASSWORD!

My 1994 6.5 intercooler setup

Suburbank2500

New Member
Messages
144
Reaction score
1
Location
Norway
Hi

As i promised, here is some pictures from my custom Intercooler project. :)

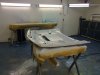
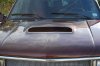
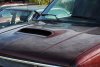
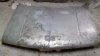
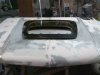
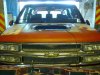
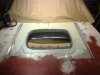
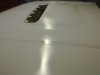
I got me a used, dented hood. Startet to straighten out the hood.
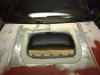
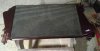
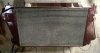
Cutted out the piece from the donor hood(Subaru Forester Diesel).
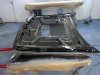
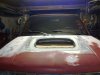
After carefully measurments i cutted the hole in the hood.
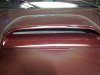
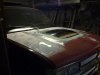
The donor piece matched the curves on the GM hood very good. :)
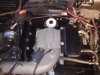
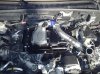
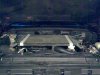
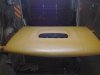
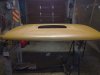
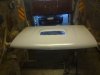
Then i started to test fit the Cooler in the engine bay, to get the correct height. and make romm for selings, and movements of the engine. When all this fidling was done i finished the hood, primed it with epoxy primer, and filler.
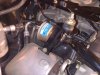
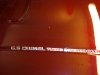
Painted the cooler im matching color. Some pics from the paint shop.
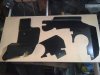
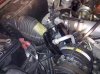
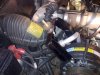
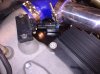
Then i made some covers to protect the electronic, and the fuel pump, i figured that there could be some dirt, and water "flying" in.
I made the cover in a way so it would not stop the airflow to cool the pump, and FSD cooler. The piec on the right in the image side is the one covering the pump.
Next pictures shows the covers installed.
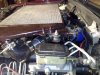
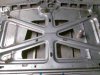
Then it is pictures of the brackets for the cooler.
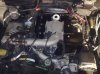
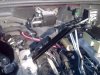
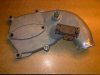
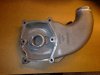
Two pics of the intake, and the way i cut it to make it fit.
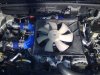
As you can see i turned the intake 180 degrees. This way i have room for the electric pull fan.( from a Toyota)
It makes it alittle bbit troblesome tho change the fuelfilter, but i figured thet will be ok.
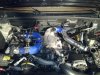
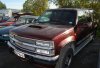
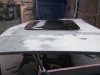
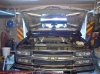
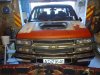
Then we have som pictures of the routing of the "plumbing", and the finished hood all installed.

Børge
 

Attachments

  • 000.jpg
    000.jpg
    42.3 KB · Views: 44
  • 001.jpg
    001.jpg
    21.3 KB · Views: 30
  • 002.jpg
    002.jpg
    12.6 KB · Views: 27
  • 003.jpg
    003.jpg
    12.1 KB · Views: 31
  • 013.jpg
    013.jpg
    16 KB · Views: 47
  • 014.jpg
    014.jpg
    86.3 KB · Views: 42
  • 015.jpg
    015.jpg
    85.9 KB · Views: 34
  • 016.jpg
    016.jpg
    85.3 KB · Views: 37
  • 017.jpg
    017.jpg
    83.8 KB · Views: 35
  • 033.jpg
    033.jpg
    65.1 KB · Views: 32
  • 034.jpg
    034.jpg
    61.9 KB · Views: 31
  • 035.jpg
    035.jpg
    56.8 KB · Views: 30
  • 043.jpg
    043.jpg
    52.7 KB · Views: 29
  • 049.jpg
    049.jpg
    42.6 KB · Views: 31
  • 050.jpg
    050.jpg
    50.5 KB · Views: 29
  • 053.jpg
    053.jpg
    46.3 KB · Views: 29
  • 054.jpg
    054.jpg
    44.8 KB · Views: 33
  • 055.jpg
    055.jpg
    40.9 KB · Views: 32
  • 056.jpg
    056.jpg
    75.9 KB · Views: 35
  • 057.jpg
    057.jpg
    77.2 KB · Views: 37
I bought the hood decals from Ebay. 6.5 DIESEL TURBO GMC CHEVY HOOD DECALS STICKERS C/K (380199124604)


Member id prop_kulture

Børge
 

Attachments

  • 065.jpg
    065.jpg
    63.3 KB · Views: 25
  • 067.jpg
    067.jpg
    83.9 KB · Views: 24
  • 068.jpg
    068.jpg
    53.9 KB · Views: 23
  • 074.jpg
    074.jpg
    56.4 KB · Views: 23
  • 077.jpg
    077.jpg
    84.8 KB · Views: 33
  • 078.jpg
    078.jpg
    66.3 KB · Views: 26
  • 084.jpg
    084.jpg
    85.9 KB · Views: 25
  • 085.jpg
    085.jpg
    54.8 KB · Views: 30
  • 086.jpg
    086.jpg
    93 KB · Views: 25
  • 087.jpg
    087.jpg
    85.1 KB · Views: 24
  • 088.jpg
    088.jpg
    84.6 KB · Views: 25
  • 091.jpg
    091.jpg
    71 KB · Views: 23
  • 092.jpg
    092.jpg
    75.4 KB · Views: 25
  • 096.jpg
    096.jpg
    88.5 KB · Views: 51
Added a cover to protect the Generator from direct moisture.

Børge
 

Attachments

  • 096.jpg
    096.jpg
    88.5 KB · Views: 33
  • 097.jpg
    097.jpg
    81.8 KB · Views: 37
  • 098.jpg
    098.jpg
    76.1 KB · Views: 33
  • 100.jpg
    100.jpg
    87.2 KB · Views: 33
  • 101.jpg
    101.jpg
    85.9 KB · Views: 39
  • 102.jpg
    102.jpg
    84.7 KB · Views: 35
  • 103.jpg
    103.jpg
    68.9 KB · Views: 30
  • 104.jpg
    104.jpg
    49.3 KB · Views: 34
  • DSC_1770.jpg
    DSC_1770.jpg
    76.4 KB · Views: 32
  • DSC_17681.jpg
    DSC_17681.jpg
    70.4 KB · Views: 32
  • DSC_176922.jpg
    DSC_176922.jpg
    72.4 KB · Views: 32
i forgot to mention how if installed the scoop to the hood.
The sccop piece was attached with bodywork glue used instead of welding, and reinforced in the seams with 6mm stinless steel rod glued on the inside of the hood.

Børge
 
So the Forester scoop if a composit?
Look like top notch work. What do you do for a living? must be in fabrication of some sort?
 
So the Forester scoop if a composit?
Look like top notch work. What do you do for a living? must be in fabrication of some sort?

Hi Burning Oil, and thanks. :)

The donor piece is of metal.(from a damaged hood.)
The insert piece is of Abs (original part).
I don work with fabrication, just love to make things:).
Went high scool in Electro.
Thet made me think of another project on the truck i did some years ago.
The carputer :)
i will post some Photos of this to in "interior components"

Børge
 
He has the puller fan so air is not an issue.

I like the structual adhesives available for body work also. Much easier to use, rust protection in the joint, no warpage from heat of welding....I use it when I can also.
 
First let me say....VERY NICE!

You have given me some ideas and I will run with them! I had an air to air brought to me a few days ago that would be perfect for this! Even bought it for $0.56 a pound!

I was planning a cowl hood anyway but now instead of giving 400+ for one I will be building my own!

Am I right in assuming that doing it this way cuts down on pipe length over a front mount and saves from some of the lag?

Great job and thanks for sharing it with us.
 
A tall enough scoop can definately pull in more air than a cowl setup. It just has to be tall enough to be in the airstream going over the hood, which should only be about 2" above the hood. There in lies the problem with most of the fake scoops on cars these days, they are fake because they wouldnt work being so short.
 
First let me say....VERY NICE!

You have given me some ideas and I will run with them! I had an air to air brought to me a few days ago that would be perfect for this! Even bought it for $0.56 a pound!

I was planning a cowl hood anyway but now instead of giving 400+ for one I will be building my own!

Am I right in assuming that doing it this way cuts down on pipe length over a front mount and saves from some of the lag?

Great job and thanks for sharing it with us.

Hi countryboy69, and thanks for nice words.

What kind of cooler do you have available.
I guess you can save 1-2 mtrs. of plumbing when fitted on top.

Depending on the way you are designing the hood, there is not a lot of clearanse. between the hood and cooler.
i think my cooler is about 45mm thick. You also have to make room for rubber sealing between the cooler and the hood.
And clearance for the engine to "shake it".

Børge
 
A tall enough scoop can definately pull in more air than a cowl setup. It just has to be tall enough to be in the airstream going over the hood, which should only be about 2" above the hood. There in lies the problem with most of the fake scoops on cars these days, they are fake because they wouldnt work being so short.

That was my point about turning the scoop around, Ive been to the windtunnel many times and the air will go right over a low scoop and actually pull a vacuum there
bat at the base of the windshield there is positive pressure
 
A tall enough scoop can definately pull in more air than a cowl setup. It just has to be tall enough to be in the airstream going over the hood, which should only be about 2" above the hood. There in lies the problem with most of the fake scoops on cars these days, they are fake because they wouldnt work being so short.

Hi buddy

I totally agree, i tried the suction effect with a t-shirt. I held it in fron of the intake and dropped it, it got sucked right in. :)

Børge
 
Hi buddy

I totally agree, i tried the suction effect with a t-shirt. I held it in fron of the intake and dropped it, it got sucked right in. :)

Børge
They are refering to the vehicle at interstate speeds/55-70MPH. Personaly I think you'll get plenty of air with a suction fan under the IC.
 
Back
Top