88gmctruck
02GMCtruck
Change This 
Brake lights

Parking lights

To This
Brake lights

Parking lights

I have always wondered why the upper bulb in the 88-98 taillights will only light up the parking circuit. The bulb is the same dual element bulb as the lower bulb. So I took the time to wire the Brake/Turnsignal element in. I also added two 194 style lights on the top and bottom to mock the 03+ taillights.
Tools:
wire
wiring connectors
12V voltage test light
solder gun
drill and bits
light socket
light bulb
screwdriver(s)
Dremel tool or files
Silicone
First go to your truck and remove the two screws and take the lights out.

If you want to add the extra bulbs to mock the 03+ tails, get the number and style of light sockets you want. I used two of each (four total) of the black twist in gauge cluster light sockets. They are in-expensive, and have a very slim design.

Then decide on the location of your new lights, mark and drill the proper hole. Be careful NOT to add too much pressure and crack the plastic, or to go through the outside lense. Then take a dremel or files and make the small side indents for the twist in connector (if that style was used). ALSO NOTE: The area near the backup light has very little clearance, and i had to grind a small amount off the stock circuit board to make it fit.

Now for the fun part. Take your circuit board. Use a test light to find the Parking and the Brake/Turn circuit. Run a wire from the Brake/Turn circuit to the upper bulb in the circuit board. Figure out which connector is the second "bright" element of the bulb. I soldered mine directly to the bulb.

Then drill a hole for the wires for the new lights. Solder one to the Brake/Turn circuit, and the other wire to the Parking light circuit. Take something (silicone) and seal up the hole you drilled.

Plug the circuit board in and make sure everything lights up. Repeat to opposite side. Now take and install the circuit board and lights into the assembly, plug it in and turn it on. Go out and enjoy your new tails! Now you have 2x the light for parking lights, and 2x the light for the brakes lights. Great safety mod that also looks cool! If you added the two new bulbs, they will even flash like the 03 tails!
Many people have simply taken this mod and used its information to light up the second element, and not installing the 194 bulbs. In either case, this will give more light and increase safety.
Also note I first did this mod to the 88-89 style bayonet based blubs/circuit boards, but the same principle can be applied to the 90-98 style with the wedge based bulbs.
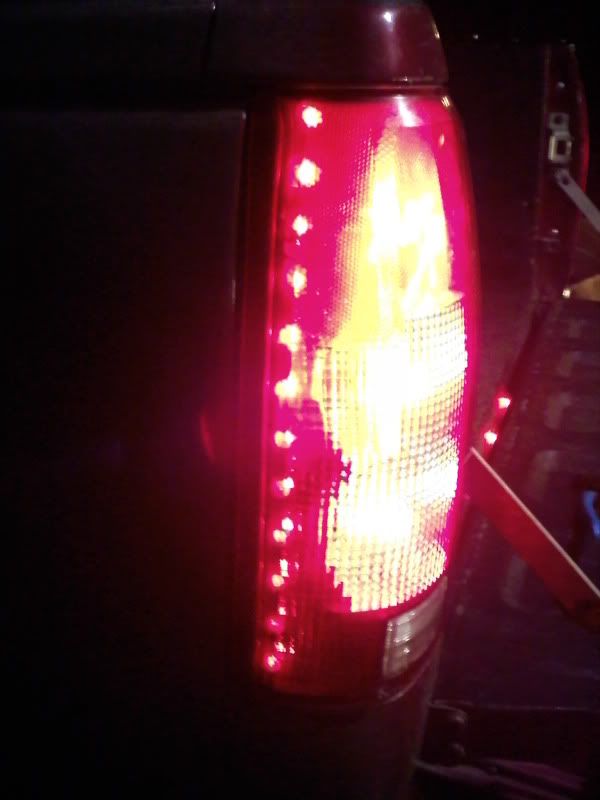
Finished Photos
Brake Lights

Parking lights

Brake lights
Parking lights
To This
Brake lights
Parking lights
I have always wondered why the upper bulb in the 88-98 taillights will only light up the parking circuit. The bulb is the same dual element bulb as the lower bulb. So I took the time to wire the Brake/Turnsignal element in. I also added two 194 style lights on the top and bottom to mock the 03+ taillights.
Tools:
wire
wiring connectors
12V voltage test light
solder gun
drill and bits
light socket
light bulb
screwdriver(s)
Dremel tool or files
Silicone
First go to your truck and remove the two screws and take the lights out.
If you want to add the extra bulbs to mock the 03+ tails, get the number and style of light sockets you want. I used two of each (four total) of the black twist in gauge cluster light sockets. They are in-expensive, and have a very slim design.
Then decide on the location of your new lights, mark and drill the proper hole. Be careful NOT to add too much pressure and crack the plastic, or to go through the outside lense. Then take a dremel or files and make the small side indents for the twist in connector (if that style was used). ALSO NOTE: The area near the backup light has very little clearance, and i had to grind a small amount off the stock circuit board to make it fit.
Now for the fun part. Take your circuit board. Use a test light to find the Parking and the Brake/Turn circuit. Run a wire from the Brake/Turn circuit to the upper bulb in the circuit board. Figure out which connector is the second "bright" element of the bulb. I soldered mine directly to the bulb.
Then drill a hole for the wires for the new lights. Solder one to the Brake/Turn circuit, and the other wire to the Parking light circuit. Take something (silicone) and seal up the hole you drilled.
Plug the circuit board in and make sure everything lights up. Repeat to opposite side. Now take and install the circuit board and lights into the assembly, plug it in and turn it on. Go out and enjoy your new tails! Now you have 2x the light for parking lights, and 2x the light for the brakes lights. Great safety mod that also looks cool! If you added the two new bulbs, they will even flash like the 03 tails!
Many people have simply taken this mod and used its information to light up the second element, and not installing the 194 bulbs. In either case, this will give more light and increase safety.
Also note I first did this mod to the 88-89 style bayonet based blubs/circuit boards, but the same principle can be applied to the 90-98 style with the wedge based bulbs.
Finished Photos
Brake Lights
Parking lights