• Welcome to The Truck Stop! We see you haven't REGISTERED yet.

    Your truck knowledge is missing!
    • Registration is FREE , all we need is your birthday and email. (We don't share ANY data with ANYONE)
    • We have tons of knowledge here for your diesel truck!
    • Post your own topics and reply to existing threads to help others out!
    • NO ADS! The site is fully functional and ad free!
    CLICK HERE TO REGISTER!

    Problems registering? Click here to contact us!

    Already registered, but need a PASSWORD RESET? CLICK HERE TO RESET YOUR PASSWORD!

Help, Problem with Feed The Beast Install

Big T

Well-Known Member
Messages
13,692
Reaction score
31,534
Location
Fullerton, CA
Here's the fitting from the top of the IP:
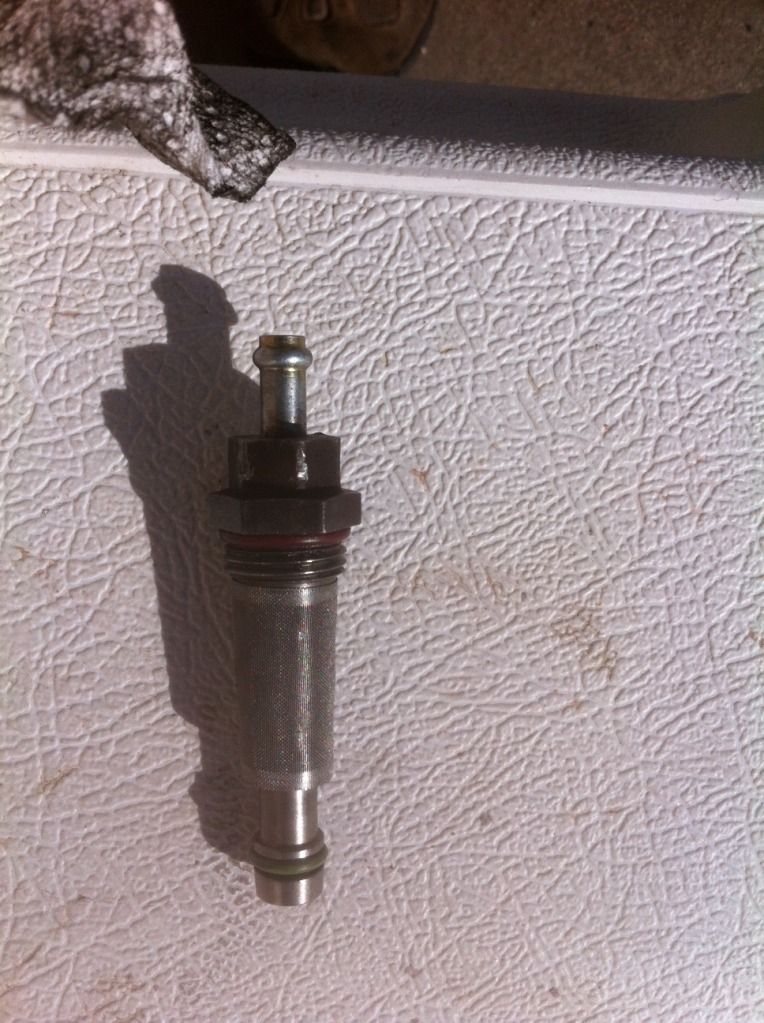
1359583721.jpg


The instructions that came with the FTB 2.0 Stainless kit say "replace the o-ring fitting on top of the IP with our newer Walking J fitting." The fitting provided looks nothing like the above with the filter on it. It looks like it should screw into the bottom portion with the filter screen, but I can't separate the barb from it. Do they even separate? I've tried to break it free but no go and I don't want to screw this up. Do you drill and tap this fitting too?

On another note, some have said that you can do this mod without removing the intake manifold. How do you do that? How do you get the fuel lines off the FM?

There is a small line and large line at the front of the FM. The large one goes to the IP. Where does the small one go.

Honestly, the instructions are a bit light for someone who has never done this before. I've read every thread on this here and again, too much of the procedure is assumed for the novice to get this done.
 
That upper nipple fitting unscrews out of the bottom inlet fitting that is in your pic.

You can proably fish the feed line up under the intake. Maybe try using a copper wire to pull it through.

The bottom ip fitting in your pic has 4 holes under that screen, if you have a drill press you can drill the holes to 5/32 for increased flow.
 
I have not done the FTB yet but have taken an IP apart for fun. And have worked on the fuel manager and supply lines. Yes, the IP fitting is 2 pieces and they unscrew but many of the IP bolts and screws are tight as heck. You need good tools that don't deflect/spread and a vice would be nice. I broke some cheaper torx and twisted some allen wrenches taking apart a junked IP. You have to cut off the screen to see the holes to drill out. I think they can be left the original size since there lenght to diameter ratio isnt too bad and I don't think they will choke much of any flow. Hose on the other hand builds a good bit of resistance due to the material roughness, length to diameter ratio, and bends (especially that somewhat distort the cross section ie unformed hose) etc.

You have to unscrew the filter manager and take it all the way out. There are three fuel lines connected to the bottom of the fuel manager.

Fishing the fuel line under the intake is tough and annoying. I used longer hose than needed poked wiggled and twisted the fuel line until I could see it between runners then used some Xtra long needle nose pliers to help it along and fish it out for the end at the water drain. Once in place I left it a bit long but cut off excess. For the Ip inlet I routed up between the back intake runners then on top of drivers side intake runners to the IP inlet. The OE fuel line is formed to bend nice and like running regular hose replacement on top of intake runners and let the new hose bends be big and lazy. Try any and all tricks that you like coat hanger bent like a j hook or other what ever you can dream up. Its one of the those jobs thats going to be tight and frustrating so start with mind set to be patient.

Fuel manager connections are
1. Supply in
2. Fuel to the IP
3. Line to the water drain petcock/valve.

Nut drivers will help to tighten any hose clamps easier since its tight work. The first time I just used a screw driver and did not get the IP inlet tight enough and it leaked after a good while. With a nut driver you can easily torque the hose clamps up really tight without much worry of pushing / turning it around the hose to a spot harder to get off later. But not an area I like to use a socket nut driver. If you do have a long flexible magnet handy to find the socket if it falls under intake. ;-).
 
Thanks, got the FM removed and the IP fitting separated. Also got the FTB stainless hose in place. However, getting that drain line back on the FM will be a bear.

The bottom of the FM was wet. Looks like the base was leaking. I have the viton O-ring seal for that. Back fuel hose was fine.

There is also a smaller pencil sized O-ring that Leroy sold me, but I have no idea where that goes? Does it go on the bottom of the IP fitting?

I'm ready to drill and tap the FM, but the Walking J instructions just say to take it to a shop for this and advise to drill just enough. What's just enough? If this was my wife, after 20 years I know what's enough. But it's a stinking FM.

The instructions say 11/32 drill bit and 1/8" NPT tap, but in the following thread, Turbine Doc says 5/32 drill bit:

http://www.thetruckstop.us/forum/showthread.php?24503-feed-the-beast&highlight=Feed+Beast+FTB

There's a pretty big difference between 11/32 and 5/32.
 
The 5/32" drill bit is for enlarging the 4 holes behind the screen on the IP inlet fitting, the screen can be worked off the bottom of the fitting, just be gentle.
 
I'm not drilling that fitting during this effort. Read the thread on it and don't have a drill press to do it.

Still trying to figure out proper depth to drill. Measured the FTB fitting and I get 7/16" on the threaded side. I stuck a zip tie in the FM and it measures 1" when I hit bottom. So do I drill 7/16" or 1"?

BTW Bison's recommendation to tap the FM off the barb worked great:

1359589467.jpg
 
Is this the new barb going to the IP? If it is drill completely through but be care not to puncture the tube in the center.
 
That pencil sized 0 ring is for the water sensor on the side of the FM.

I drilled the hole for the barb 3/4" deep,i drilled the remainder 3/8" so it confirms with the hose dia.

BTW, You won't see any flow/performance improvement or increased fuel pressure with FTB unless you upgrade the LP.
 
What I mean is the one on the FFM that goes to the IP. It has the 3/8" hose barb.
 
That pencil sized 0 ring is for the water sensor on the side of the FM.

I drilled the hole for the barb 3/4" deep,i drilled the remainder 3/8" so it confirms with the hose dia.

BTW, You won't see any flow/performance improvement or increased fuel pressure with FTB unless you upgrade the LP.

I'm down 3/4" with the 11/32" bit. It does not open up wider down there. How do you drill the remainder with a 3/8" bit which is wider than 11/32"? I'd basically have a 3/8" hole all the way down which is bigger than the original 11/32" that was recommended in the instructions.

The PO of this Suburban had a Heath Lift Pump installed. My main interest was to find the source of my fuel leak and do the mod while I was in there.
 
I think Simon had one of the earlier FTB kits like I did. The early ones used a 1/4" NPT tapped fitting instead of 1/8" NPT.
 
You confuse me.
Maybe you have a diff size barb than i used.
You can also drill the remainder the same size or a wee bit bigger than the ID of the barb.
 
It's dark now so I brought the FM inside.

1) That pencil sized o-ring is slightly over sized for the recess under the water sensor on the side, so it must not go there. It must be for the base of the the new fitting to the FM.

2) All these different drill and tap size recommendations are confusing, as is the ill defined depth measurement. Does the drill reach a wider area before you hit the inner tube? If so, will the drill open up this wider area before the tip hits the tube?
 
2) All these different drill and tap size recommendations are confusing, as is the ill defined depth measurement. Does the drill reach a wider area before you hit the inner tube? If so, will the drill open up this wider area before the tip hits the tube?

Yes, it opens up. The tip of the bit may touch the center tube before the hole is complete. Usually if this is the case it's just a small burr left. The bit angle may have to be flattened or a very small dremel bit used. The tap may even clean it up.
 
Yes there is some space around the inner tube, breaking trough with the bit will be hard to control with a hand drill,... use caution!

What kind of barb do you have?
If it is OSB( straight tread with 0 ring) i would not use it cause you'll have to drill abolutly straight with the orig hole in FM base and then use a milling bit to create a recessed flat for the 0 ring to seat.
A barb with NP tread don't need or uses an 0 ring.
 
OK, I broke through to the wider area per this photo:

1359597654.jpg


I tapped it and blew all the chips out with a can of WD40. A stream blew out the drain line. Yes it's a NPT fitting and it does not snug down to the FM per this photo:

1359598380.jpg


So the question remains, where does that little o-ring go?
 
I could be wrong but that fitting that you have threaded in the FFM might be the fitting for the IP

No, I already have the barb installed on the IP fitting and the fitting installed on the truck. That fitting is much larger on the threaded side. The one in the picture above would drop into the IP fitting without touching the sides, it's that much smaller. It definitely threaded into 1/8" NPT.
 
The kits must have changed, mine had a JIC fitting like the one in your pic that threaded into the IP inlet. Then a barbed fitting threaded onto it. The FFM in my kit was just a hose barb with a 1/4 NPT thread.
 
Back
Top