• Welcome to The Truck Stop! We see you haven't REGISTERED yet.

    Your truck knowledge is missing!
    • Registration is FREE , all we need is your birthday and email. (We don't share ANY data with ANYONE)
    • We have tons of knowledge here for your diesel truck!
    • Post your own topics and reply to existing threads to help others out!
    • NO ADS! The site is fully functional and ad free!
    CLICK HERE TO REGISTER!

    Problems registering? Click here to contact us!

    Already registered, but need a PASSWORD RESET? CLICK HERE TO RESET YOUR PASSWORD!

Head studs - what will stop the leak

Will L.

Well-Known Member
Messages
19,223
Reaction score
37,092
Location
Boulder City Nv
After speaking and Emailing with Permatex:

Best: Optimum Black -27037
#2: The Right Stuff (black)
#3: Ultimate Black
#4: Optimum Grey
#5: The Right Stuff (grey)
#6: Ultimate Grey

There is one other possible option, but it has not been properly tested, even by Permatex for it- Seal & Lock. All the other products have been tested for stud applications.

We went over various thread lockers including (red) high strength and (blue) medium strenght. The problem with them, is there are additives in some coolants that react poorly with them and could eventually cause leaking and lower the strength capacity.
@WarWagon -This combined with oil temps is why they think you were able to remove your red locked studs without additional heat.

The reason they want the Blacks instead of the Greys is the Black is more viscous and can fill the threads better, Stays more pliable, and can resist the coolant chemicals better. He said Grey is more for things like foriegn valve covers with a lot of little bolts, and a small block Chevy valve cover with only 4 needs to have far better flexability and withstand more vibration.

The difference between Optimum and Right Stuff is a close call. Basically take the right stuff and make it withstand higher heat= Optimum. It also withstands harmonic vibration slightly better.

(For the absolute strongest studs- red threadlocker if it is a blind dry hole, for those wondering.)

Run studs all the way down and mark height. Clean with brake cleaner and dry with air. Coat threads fully. Ensure stud is fully seated with height mark. Tighten stud nuts and allow to cure 24 hours before use.

And incase he gets around to reading this, The biggest thanks to:
Chris Fox
Technical Trainer/Product Applications Specialist
ITW Permatex Inc.


And thanks to someone here that told me his technique and got this ball rolling!
 
Last edited:
Red treadlocker put in 2011 and studs double nut tight into block - as tight as we could get them. Around 60k miles later on the engine in 2 trucks, destroyed heads off 2x. Only one time after pulled from wreck to check things so 3x heads removed. Fired once without coolant to decide on buying it back.

Only green coolant used and last few years the long life prestone sludge.

Yeah surprised they came out without a fight. Been a running joke of mine that the block was going to the scrap yard with red thread locker ARP studs still in it. (ARP stud cost was one reason I ran it with mains cracks)

Yet UOA confirmed no studs leaked coolant... So better than ARP stuff. IMO it did the job l asked of it, but, failed to be a threadlocker.

So 8 years later something better comes along.

@Will L. You have downplayed the difference of heat in your top two spots. Adding destroyed RED threadlocker to my concerns of asking myself before I open the UOA results "Did I destroy engine oil Again" ... Can they be a little more specific about the temp limits?
 
@Will L. , as promised here is how I install head studs...

First, I use a "clean out" tap to remove anything from the threads,
Then clean the threads & gasket surface with Acetone,
I then prep the studs by cleaning in Acetone, wire brush the block end threads, clean with Acetone again,
Then, prep the head gasket, I spray both sides 3 times with Permatex copper spray, linked below,
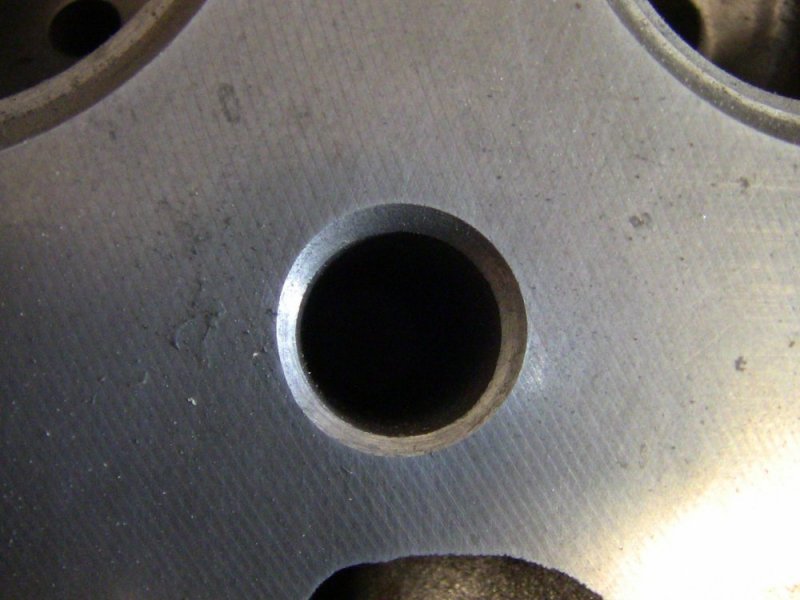
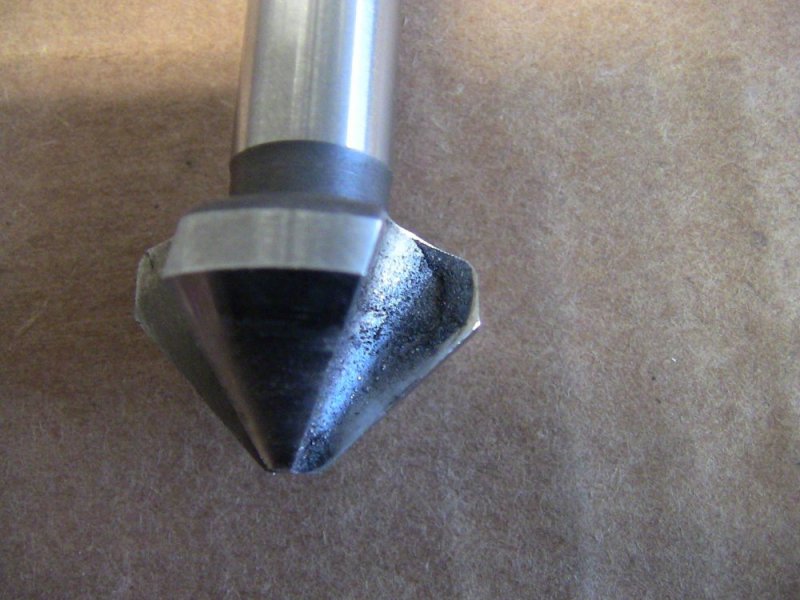
now, I use a chamfer bit in a hand drill, a small chamfer on each bolt hole about 1/16" deep and I also prep the head the same as the block, see pics below..
Then I squirt a blob of the "right stuff", "optimum black" will be good also, I lay the gasket on the block & dowel pins,
Next with the studs clean & ready I "roll" the threads in the blob of sealant, you only need the amount that stays in the threads not a large amount, you want a small bead left around the stud but not a big blob.
install the studs snug with a allen wrench,
Once all the studs are in drop the head on and torq as required..

The chamfer on both the block & head create a o-ring type area on the smooth part of the stud and once torqued a permanent seal to the studs..

Head gasket sealer - https://www.permatex.com/products/g...rmatex-copper-spray-a-gasket-hi-temp-sealant/

Chamfer area 1/16" deep

001.JPG

Chamfer bit

002.JPG
 
The red is “good” or “suitable” to 450f. At 455-460 it is gone.
Actually 300 is where it starts to soften, and the longer it is there, or the more heat cycles into that range, the softer it gets.
So, don’t think : OH, only 350, I could get a lot hotter. Nope. It’s a scale of strength on one side of the teeter totter and temp with time on the other.

The fact that you got that life out of it, means it is some Good stuff.

The take away for people is to know there are a few options that will get you there. Some just a tad better than others.
Head gaskets and main webs are 2 of the weak links, and studs help solve it. Head studs are so cheap compared to tty bolts-everyone would use them if only folks would learn quit using the cheap stuff. $20 frigin more is good insurance.

And Thank You Chris for sharing.

I spoke to Permatex about his technique, and they spome to both felpro and victor rienze for us about it. All 3 are in agreement this is the way all engines using studs should be done for long life on the street and track when dealing with wet holes. I was in on the last conference call with felpro, and they said they can’t officially approve the method for liability, but the guy at felpro commented- expect no issue with the gaskets. Just dont use so much it overtakes the flat areas. The permatex guys are going to start doing the chamfer on their own hotrods and say thanks for the idea.

Now everyone quit panicking over coolant in the oil and stud up!
 
The permatex guys are going to start doing the chamfer on their own hotrods and say thanks for the idea.

I find it a little hard to believe sometimes the "old timer" ways of building motors has been forgotten or maybe not even known these days.. makes me feel old LOL... maybe some of my way of doing stuff isn't far fetched after all... :wacky:
 
To be fair Chris Fox said he has used The Right Stuff black on some of his personal rides wet holes. He has been in the industry longer than the 6.2 has been around. The chamfer is the twist. The move from right stuff (around since 92-93) to optimum black is fairly new.

I got a couple calls from folks about the oring on top of the head instead. It works, but the problem is longterm. Orings have a lifespan shorter than the magic goo. The oring is a fraction of an inch, but the other is inches thick to travel through, even if you don’t do the chamfer. But as long as you’re doing it- might as well get the best out of it.

It’s a good idea to sample your oil anyways, and if you already oringed the head, don’t panic. Just continue the samples and years down the road, coolant starts to show, just pop the heads, use the goo, and do new orings again or use it there also.
 
@Will L. , as promised here is how I install head studs...

First, I use a "clean out" tap to remove anything from the threads,
Then clean the threads & gasket surface with Acetone,
I then prep the studs by cleaning in Acetone, wire brush the block end threads, clean with Acetone again,
Then, prep the head gasket, I spray both sides 3 times with Permatex copper spray, linked below,
now, I use a chamfer bit in a hand drill, a small chamfer on each bolt hole about 1/16" deep and I also prep the head the same as the block, see pics below..
Then I squirt a blob of the "right stuff", "optimum black" will be good also, I lay the gasket on the block & dowel pins,
Next with the studs clean & ready I "roll" the threads in the blob of sealant, you only need the amount that stays in the threads not a large amount, you want a small bead left around the stud but not a big blob.
install the studs snug with a allen wrench,
Once all the studs are in drop the head on and torq as required..

The chamfer on both the block & head create a o-ring type area on the smooth part of the stud and once torqued a permanent seal to the studs..

Head gasket sealer - https://www.permatex.com/products/g...rmatex-copper-spray-a-gasket-hi-temp-sealant/

Chamfer area 1/16" deep

View attachment 55702

Chamfer bit

View attachment 55703


Chris, the chamfer bit that I have is too steep of an angle so that it will grind away at the threads on the block side.
Do you have a source for the one you use?
 
At this stage, do you mean the heads have been installed and you are torquing them down and don't run it for 24 hours?

Yes. Install 1 side head gaskets, studs, head, and torque. Use 3 step method of reaching max torque. Do not wait extra time before reaching maximum torque. Do not alter torque after curing has set. Doing so only risks breaking the liquid tight seal.

After 1 head is complete, do the second head.

You can either stop at that point, or Continue the engine assembly until complete. Do NOT start the engine for a 24 hour period.

There is an activator product for speeding up the cure time that simply sprays on the threads before applying any of the Black, Grey, or thread locker materials. However the set up time occurs so rapidly that unless you have 2 people per head using power tools, and have practiced it well, the material will start to set too soon. It takes the 1-2 hour set time to within 5 minutes. This is the same product in use for aluminum and a couple other alloys we don’t seal with on these engines. I rather not post it’s name here since it doesn’t apply to our engines, and adds risk to the best assembly process.

Temperature, humidity, etc. alter cure and set times, but unless you are facing heat exposure in 1 hour or working in the rain- they really are not worth factoring in.

1 head installed within 1 hour is your goal, with any of the products.
 
I too am old school and curious.
has anyone tried the old fashioned no. 1 Permatex sealer on the threads of the studs ?
That is all I have ever used and have never had a problem with coolant leaks around head and manifold threads, but, that was mostly all gas engines and a couple of diesels.
 
Being asked about torque spec. I NEVER try remembering them for fear of error. And some studs get torqued at bolt spec, while others change. Some people believe in under torque or over torque for specific resons. Also if they should be snug, tight, or backed off slightly is debatable. So
For this ARP instructions should be mentioned so...

@Burning oil or anyone that has an ARP set in hand:
Can you please post ARP’s listed spec for the head studs?
Main studs too if possible so they can be referenced for future.
 

Attachments

  • ARP Headstud Instructions.pdf
    892.8 KB · Views: 29
After speaking and Emailing with Permatex:

Best: Optimum Black -27037
#2: The Right Stuff (black)
#3: Ultimate Black
#4: Optimum Grey
#5: The Right Stuff (grey)
#6: Ultimate Grey

There is one other possible option, but it has not been properly tested, even by Permatex for it- Seal & Lock. All the other products have been tested for stud applications.

We went over various thread lockers including (red) high strength and (blue) medium strenght. The problem with them, is there are additives in some coolants that react poorly with them and could eventually cause leaking and lower the strength capacity.
@WarWagon -This combined with oil temps is why they think you were able to remove your red locked studs without additional heat.

The reason they want the Blacks instead of the Greys is the Black is more viscous and can fill the threads better, Stays more pliable, and can resist the coolant chemicals better. He said Grey is more for things like foriegn valve covers with a lot of little bolts, and a small block Chevy valve cover with only 4 needs to have far better flexability and withstand more vibration.

The difference between Optimum and Right Stuff is a close call. Basically take the right stuff and make it withstand higher heat= Optimum. It also withstands harmonic vibration slightly better.

(For the absolute strongest studs- red threadlocker if it is a blind dry hole, for those wondering.)

Run studs all the way down and mark height. Clean with brake cleaner and dry with air. Coat threads fully. Ensure stud is fully seated with height mark. Tighten stud nuts and allow to cure 24 hours before use.

And incase he gets around to reading this, The biggest thanks to:
Chris Fox
Technical Trainer/Product Applications Specialist
ITW Permatex Inc.


And thanks to someone here that told me his technique and got this ball rolling!

BTW, Right Stuff is rated for -75°F to 450°F (-59°C to 232°C) continuous, 500°F (260°C) intermittent.
Optimum Black is rated for Temp. Range: -65°F to 500°F.
 
Back
Top