• Welcome to The Truck Stop! We see you haven't REGISTERED yet.

    Your truck knowledge is missing!
    • Registration is FREE , all we need is your birthday and email. (We don't share ANY data with ANYONE)
    • We have tons of knowledge here for your diesel truck!
    • Post your own topics and reply to existing threads to help others out!
    • NO ADS! The site is fully functional and ad free!
    CLICK HERE TO REGISTER!

    Problems registering? Click here to contact us!

    Already registered, but need a PASSWORD RESET? CLICK HERE TO RESET YOUR PASSWORD!

Engine Coolant Heater, Proper Hole

MrMarty51

Well-Known Member
Messages
17,527
Reaction score
40,804
Location
Miles City, Montana
And so, engine on stand and all freeze plugs removed.
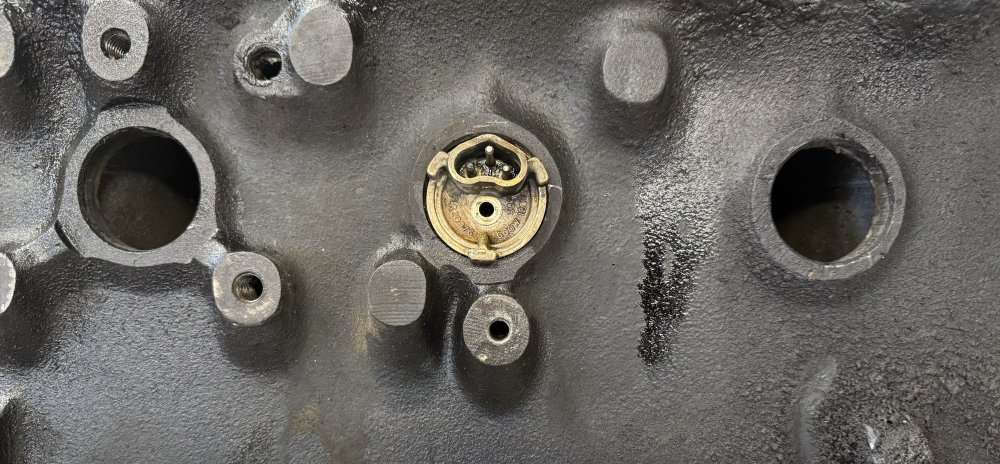
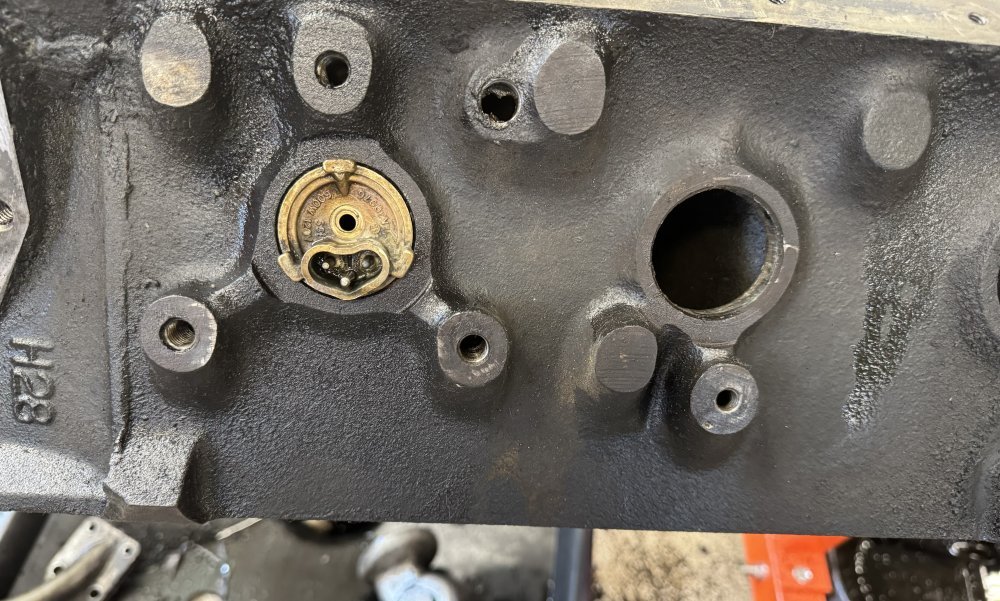
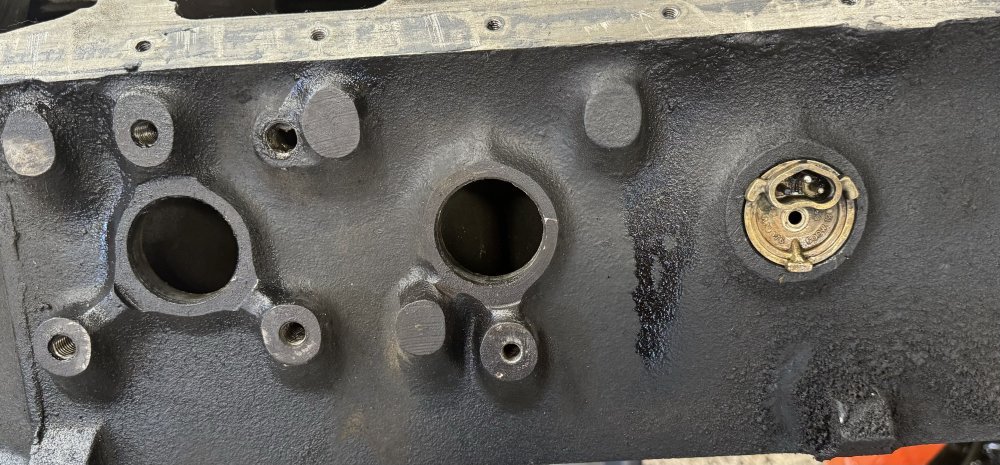
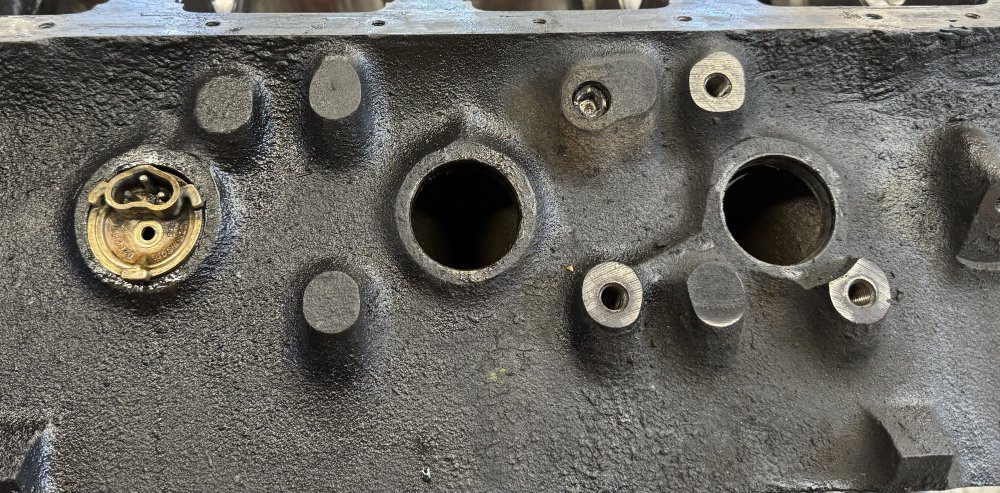
Removed the oring from the freeze plug coolant heater and tried it in the various bores.
The original position was in the left bank, center hole and the element pointing downwards.
Removing the oring seal allowed me to move it freely from bore to bore and position it in any angle to the block.
IMG_0448.jpeg
IMG_0449.jpeg
IMG_0450.jpeg
IMG_0451.jpeg

Aaand, My conclusion.
The bores for the freeze plugs are exactly centered between the cylinders.
The freeze plug heaters can be installed in any one or two, three four or six of the bores without interference as long as the element is pointed in the upward or downwards position. 90 degrees to the block flat surfaces, oil pan or head surfaces.
I might install four into this engine, burn on two at a time. If one of them burns out then link to another to continually run two.
Lets see, I’m near 73, four of those should run for longer than what My existence here on earth should be. 😹😹😹
And so, that should end the time old debate of which holes to mount the engine coolant heater into.
🫣🤣😹
 
No, it will fit but won’t function. You won’t be able to plug the cord onto it.

Make sure you get brass plugs - no steel for the water jackets.
And brass screw in plugs for the drains.
Them darn steel plugs with the square, female, for a square drive socket to fit into, there is one that has been screwed in so far that it must be at least 1/4” from the top of the plug to the level surface of the block.
I heated the block with the bernzomatic torch, didnt seem to help at all like it did the other side.
Just rounded off the inside of the plug.
I could just leave it in there but for some reason my head tells me it needs to come out of there.
So now it will need to be drilled then operated on until it will relieve and get removed.
The plugs are pretty much worthless as they are, I believe that the engine mounts covers over them.
I might have a look at that too and if possible clear out enough of the mount plate so the plugs can be removed if ever need be.
 
I would run one on the drivers side towards the rear of the block and one on the drinkers side towards the front near where the turbo drain line goes in. when I looked at my engine I noticed that there would be interference issues also with the starter bracket if that hole is used. I think the center holes are both covered with the engine mount brackets. instead of running one 1200 watt heater like others have done (OEM iirc is 600 watt) I would run two 600 watt, one on each side along with some sort of switching temp contraption that would shut them down so you can leave them plugged in over night and not worry about "boiling" coolant.
 
And brass screw in plugs for the drains.
Them darn steel plugs with the square, female, for a square drive socket to fit into, there is one that has been screwed in so far that it must be at least 1/4” from the top of the plug to the level surface of the block.
I heated the block with the bernzomatic torch, didnt seem to help at all like it did the other side.
Just rounded off the inside of the plug.
I could just leave it in there but for some reason my head tells me it needs to come out of there.
So now it will need to be drilled then operated on until it will relieve and get removed.
The plugs are pretty much worthless as they are, I believe that the engine mounts covers over them.
I might have a look at that too and if possible clear out enough of the mount plate so the plugs can be removed if ever need be.
both plugs are just barely uncovered by the rear of the mount brackets and almost a PIA to get to when the engine is in the bay. you might consider putting a brass nipple in and a good quality drain valve like is used on semi trucks. I'll let Will and other chime in on that idea.

as for drilling out the one plug, look in the bore of the one you were able to remove and make sure there isn't anything up in the hole really close that you might hit when drilling into the other one. use a 1/4" drive socket with the OD as close to the size if the plug with a center punch so you can get as close as possible to a center mark for drilling. your worst case is you would need to drill out the plug with a bit the same size as the threads of the hole to get it out and re-thread/clean the block hole for another plug. Last thing you want is an offset hole in this scenario!
Yup.
I do have a set of those step size centering punches.
Even though the hole is square, an appropriately sized centering punch will still mark mighty close to the center of that square hole.
I’ll have to increase drill sizes about a 1/32nds each pass to keep the bit from bouncing and binding until it clears the square portion.
I have had to drill plugs, fittings and bolts, get the drill bit right up to the threads then clear the material from the threads until just the bare threads is exposed.
After getting that stripped DP removed then I will dress that engine mount and make clearance for those nipplized drain cocks. 😹😹😹
Do you have a set of left hand drill bits?

I've had the left hand drill bits pull threads out for me when I got close to tap size.

I had a plug on either the 1989 6.2 or maybe The 2000 6.5 - actually could have been any of them. It was for a place that had oil pressure - it was very close or exactly 5/16 square female.

I didn't have that socket. I made one out of a piece of 5/16 key stock. It fit perfectly.

Possibly could have been a metric size.

Something to watch out for.
No, no LH drill bits.
I’ve always managed to get the broke item removed.
Only twice has it failed, both on exhaust manifolds.
One was on my 6.5 so bored on through and that hole now has a bolt/nut to keep that corner of the cross over flange in place. Seemed like the manifold to head bolts were seized and I did not want to bust off one of those in the head and create a real mess. I did try heating the corner of the manifold but it was just too close a quarters to items that could create a fire so I just bored on through for a bolt and a nut.
The other one was an exhaust manifold for a SBC engine another guy was working on.
I mentioned using the cutting torch and just torch it out.
He tried that but it also blasted away part of the manifold. He said it was worth a try because the manifold was no good as it was.
There was a welding shop that I would hang around in, lots of beer consumption.
I told the guy that owns the shop about that exhaust manifold deal that happened the night before.
Sunny, the shop owner told Me, get a hole drilled all the way through the broke off bolt.
Make sure that the cutting tip is clean and putting out a perfect flame.
Heat the bolt to the inside edge of the hole then hit the oxygen. That will burn the bolt out and leave the threads in the cast iron.
The next manifold I came across with a broke off bolt, I ground the bolt off to level with the manifold then drilled a hole all the way through the bolt.
Fired up the torch and heated the inside edge of the bolt hole until a puddle formed, touched the oxygen lever and melted that bolt right out of that hole.
Left the threads perfectly intact.
I run a tap through the threads/hole to clean them up and was totally amazed with the results.
I would not attempt such a process on an engine block, at least a drain plug, they are too easy to drill out until threads show anyplace in the hole then pick and punch out the remaining steel plug.
 
Back
Top