Navigation
Install the app
How to install the app on iOS
Follow along with the video below to see how to install our site as a web app on your home screen.
Note: This feature may not be available in some browsers.
More options
-
Welcome to The Truck Stop! We see you haven't REGISTERED yet.
Your truck knowledge is missing!
- Registration is FREE , all we need is your birthday and email. (We don't share ANY data with ANYONE)
- We have tons of knowledge here for your diesel truck!
- Post your own topics and reply to existing threads to help others out!
- NO ADS! The site is fully functional and ad free!
Problems registering? Click here to contact us!
Already registered, but need a PASSWORD RESET? CLICK HERE TO RESET YOUR PASSWORD!
You are using an out of date browser. It may not display this or other websites correctly.
You should upgrade or use an alternative browser.
You should upgrade or use an alternative browser.
Downpipe gasket doubled?
- Thread starter SnowDrift
- Start date
Wreckinball67
Well-Known Member
- Messages
- 134
- Reaction score
- 314
There's no harm in trying. By the looks of it, it should work.
MrMarty51
Well-Known Member
In my experiences.
Doubling gaskets on an exhaust leak will more than double the leak. The exhaust will burn out the gaskets even quicker than one gasket.
Best to make a sanding block with a 2X4 maybe three or four inches long. Staple 80 grit or courser to the block and sand away the high spots.
The only way to make it work is to make both sides to come together on a parallel basis.
Will L.
Well-Known Member
Problem is: someone over tightened it and bent the flanges. Straighten the flanges, grind/sand them flat as mentioned above. A far faster and far more dangerous method than block sanding is use a grinder with new wheel on it. But you have to be flat- so when you can find a way to clamp them together lightly on both sides of the disk it works well.
Out here we have a supplier called PacMech (Pacific Mechanical), they sell every kind of gasketing material I have ever seen. If you could get the metal material gasket thats thinker- that would be an easy fix. You just have to cut it out of sheet material. Some of the gasket houses you can pay an extra $10 and they cut out the gasket for ya.
Out here we have a supplier called PacMech (Pacific Mechanical), they sell every kind of gasketing material I have ever seen. If you could get the metal material gasket thats thinker- that would be an easy fix. You just have to cut it out of sheet material. Some of the gasket houses you can pay an extra $10 and they cut out the gasket for ya.
SnowDrift
Ultra Conservative. ULTRA!
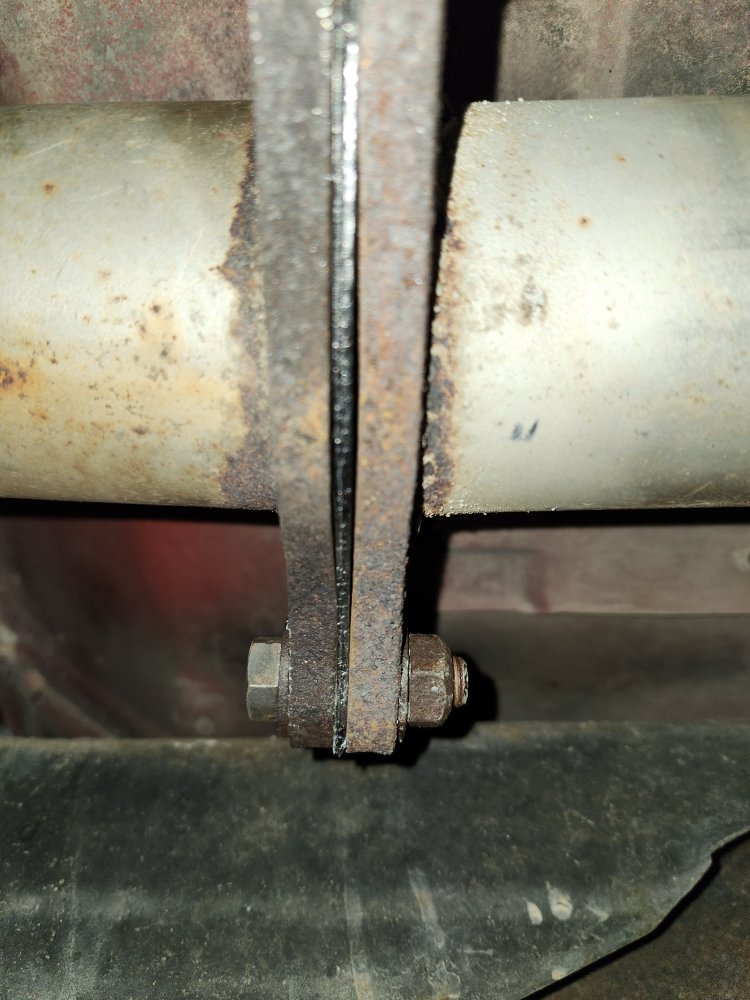
It isn't deformed flanges. Looking at the second picture, you can see the metal is delaminating from both flanges in the center on the bottom side only.
SnowDrift
Ultra Conservative. ULTRA!
I am wondering about a copper ring just outside the pipe opening. If I can embed the ring in the existing gasket then it may work if the ring doesn't cut through the gasket material.
Thoughts?
Thoughts?
Will L.
Well-Known Member
What I see is a gasket failing BECAUSE the flanges are bent.
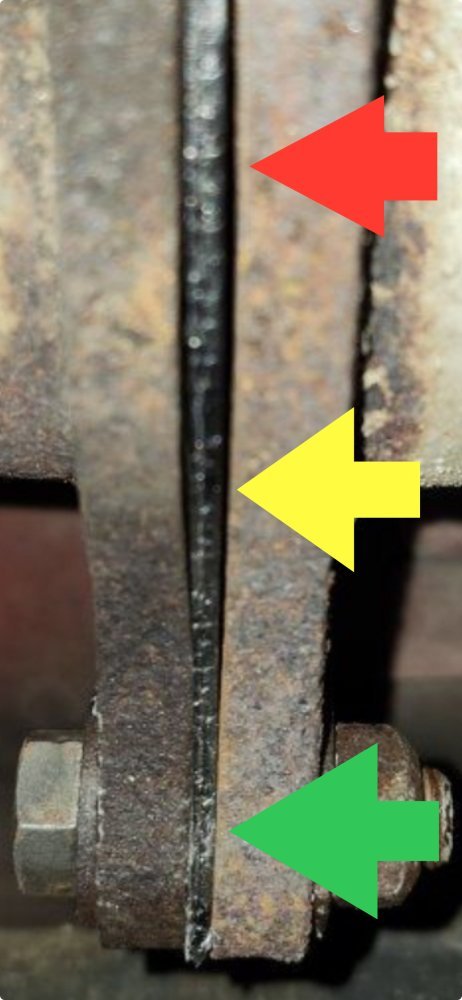
Zoomed in on your picture:
Green arrow flanges tight (over tight actually) and zero gap.
Yellow arrow flanges are beyond the fulcrum and have spread apart allowing a small gap.
Red arrow flanges are flexed apart with a large gap. This gap is large enough that it is not holding pressure against the gasket material enough to retain the pressure allowing the failure of the gasket.
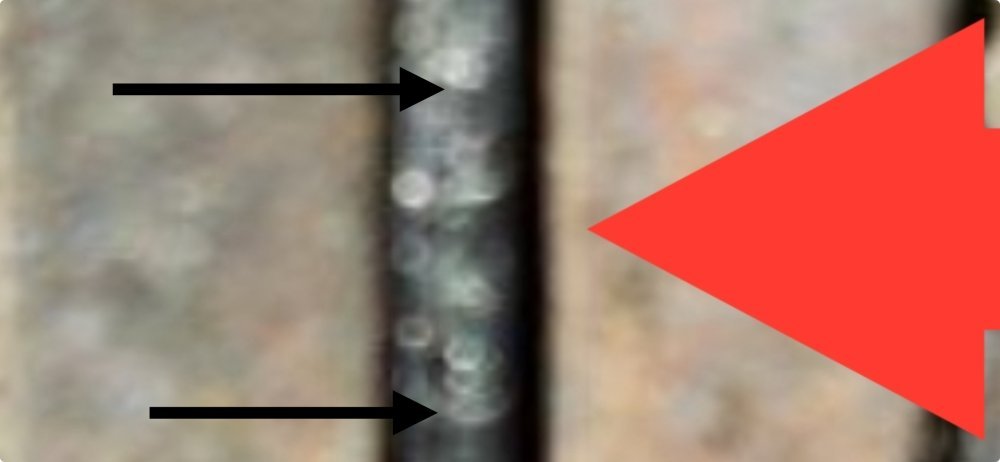
Second picture:
Look at the two black arrows where the tips of the arrows line up. There is a vertical line in the gasket. That is where the gasket blew out under pressure because it wasn’t being held together tightly enough there.
Put a straight edge against the inside edge of the flange and use a feeler gauge like you test a head or block for straightness and you will see the warp. This is a common error that occurs. I did my share of over tightening these and a couple header collector flanges along the way. Could be where I learned the 8” grinder trick…


SnowDrift
Ultra Conservative. ULTRA!
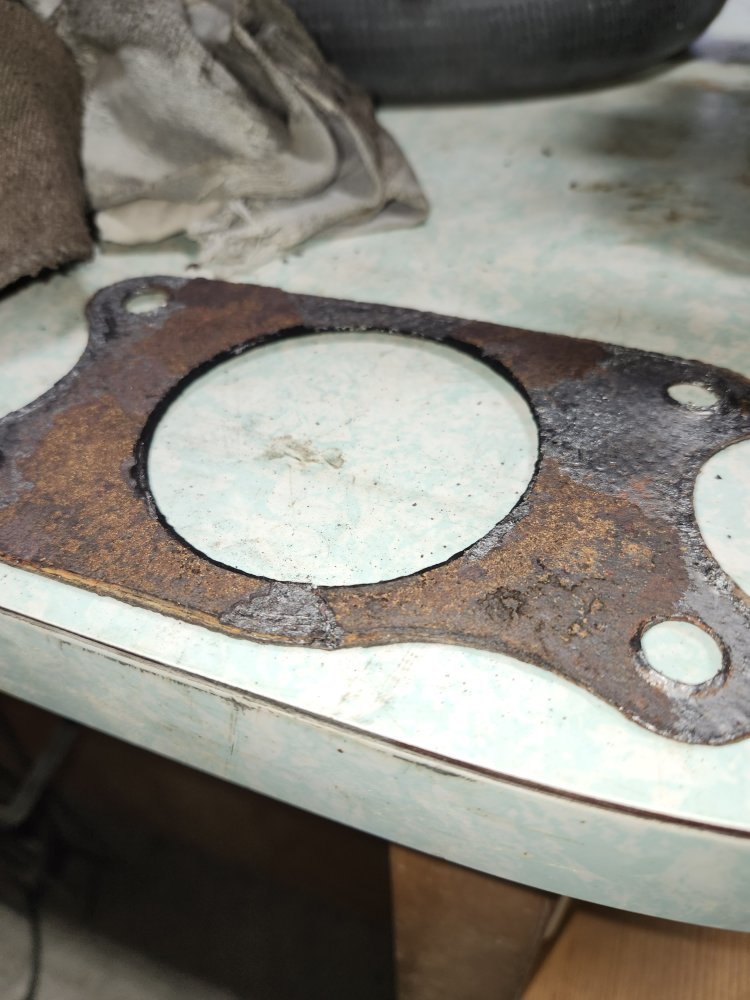
The gasket in the picture is the new one. The previous one is in the other image but didn't blow out. There was no exhaust leak.
The steel has delaminated. Notice the steel on the old gasket.
That said, I went back and checked the flanges for warp. They are indeed warped. I checked them on the side opposite the mating surfaces. What I don't know is if that happened when it was installed originally or if the delamination caused it when the center began to "grow".
The flanges have lost 1mm of thickness in the center of each. This is the material stuck to the old gasket.
I took the downpipe back out (which is a chore all of its own. I have no idea how I maneuvered it up there yesterday but I am pretty sure it was different from how I got it out) and squirted panther piss on the clamp hardware in case there is the slightest chance it will come apart. It will be best to do the work on the floor instead of up overhead. I think we will try to heat the flanges to try to straighten the mating surfaces. Might still need to grind the surfaces but would rather keep all the metal thickness I can.
dbrannon79
I'm getting there!
Looks like both sides of the flange are bent. once you have them separated you might do well to heat the flange in the area between the bolt holes and the pipe opening with a torch and give them a couple smacks with a hammer. this will give some separation around the bolt area and allow the area around the pipes to seal better. when going back together smear some furnace cement on both sides of the gasket. that stuff will seal up and the hotter it gets the harder it gets. I have used it on a donut collector with a broken bolt and it sealed until I had time to pull the manifold to extract the broken bolt.
jrsavoie
Recruit
Maybe a high temperature epoxy shaft repair product.


