Kind of long review I submitted to Amazon (poor grammar to shorten writeup). It includes detailed instructions, modifications and a configuration option for positive case pressure (almost said PCV)... I have often wondered if these would work on cooling PMDs? If they can be shock-protected, I think the larger units may do the job. When I fire up the Beast, I think I'll replace my remote FSD cooler with one of these suckers but with temperature probe(s) installed. Anyhow...
http://www.amazon.com/dp/B002QG2H7K/?tag=jhuntlink-20
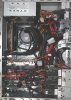
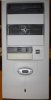
Finally installed the Corsair H50 (newer model is available) in our ATX 3.6 GHz "Frankenstein" mid-tower. Prior to the conversion, the mid-tower had a medium-sized (~ 4" cube) copper/ aluminum heatsink with top-mounted cooling fan blowing down onto the cooling fins. Pre-conversion configuration included:
- tandem set of 80 mm fans pulling in cool air into rear of case, blowing directly onto CPU cooling fan/heatsink
- single 80 mm fan pulling in cool air into front of case, blowing directly onto 3 of 5 hard drives
- 5.25 drive bay twin-fan (small) kit pulling in cool air into front of case, and
- single 80 mm fan boosting power supply's fan pulling hot air out to rear
All fans pulling in cool air had dust filters. This setup created positive pressure within the case, and kept out a mound of dust! Also, one would think, as I did, that 5 x SATA hard drives would generate most of the heat... I was SO WRONG! Normal to heavy use would generate 175degF CPU temps and 150+ degF system/chassis zone temps. Noisy, high-pitched whining when the MoBo fan controls kick all fans into highest speeds of 4400+ RPM.
Post-conversion idle temps: 108degF CPU and 102degF system/chassis zone.
Post-conversion normal to heavy use temps: CPU never goes over 138degF, and system/chassis never go over 130degF.
120 mm fans are much quieter, too!
Pre-Disassembly!
- record all BIOS settings (trust me on this)
- patiently label drive bays, drives, power cables, signal cables, MoBo headers and header cable connectors (trust me on this)
- take digital photos of MoBo connectors and internal's physical configurations (trust me on this; helped me with the case' front connectors; used son's iPod)
Disassembly!
- Carefully remove each component and lay them out neatly in sequence for reverse installation
- Use of anti-static pads is highly recommended, as is removal of wool/synthetic clothing and going barefoot
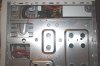
- Thoroughly survey internal space of the case with the MoBo still installed to determine the mounting location of the H50's radiator
--- If there are vent holes for 120 mm fan and screw holes for fan mounting screws, proceed
--- If there are no vent holes, there will, probably, be no screw holes for fan mounting screws: consider obtaining a new case with these features (I didn't)
--- I chose to proceed with my existing case and had to use a bi-metal hole saw to cut five (5) holes arranged in a pentagon with an overall outside diameter of 120 mm
--- This, by far, was the most difficult part of the project and it would have been easier to purchase an ATX mid-tower with the proper/required vent and screw holes
(hey, I overhaul engines for a hobby...).
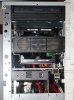
Once MoBo is out (if you've ever taken one out, you'll know why it's called a mother board):
- vacuum/thoroughly clean inside of case, including fans/dust filters
- ensure mounting holes for the H50's radiator line up exactly with mounting holes in chassis (FYI, the H50's threads are 6-32)
- cover openings for power supply (unless it was removed) and other devices left in case (recommend remove all, especially hard drives, due to shocks they will be subjected to)
- drill holes for mounting screws vent openings for cooling fans as required (for the section of chassis with perforations and slots, I used a waste piece of hard wood to back up the metal as I cut into it, using light pressure/medium speed... careful, it gets hot!)
- vacuum and thoroughly clean inside of case
Re-Assembly!
Practice the following sequences before actually doing them:
NOTE: please do not use power drills/drivers because you have to "feel" what you are doing
- re-install the MoBo, snug-tightening mounting screws
- install metal threaded inserts onto correct black plastic bracket (insert threaded inserts (so named) from back of bracket)
- affix included double-sided tape onto correct side of black plastic bracket (bracket attaches to back/bottom side of Mobo, so tape has to be between plastic bracket and MoBo)
- mount black plastic bracket onto back/bottom side of MoBo using above double-sided tape
- make sure threaded inserts just peek through front/top of MoBo
- insert plastic bushings onto feet of matching metal mounting bracket (match of black plastic bracket) making note of correct holes in bushings for mounting screws
- insert metal mounting screws into plastic bushings making sure they line up exactly with metal threaded inserts peeking through MoBo
- carefully clean the old thermal transfer paste off top of CPU with clean coffee filter paper wetted with alcohol (acetone works, too); allow to dry
- remove plastic cover off H50 heat transfer head/pump assembly (cover protects pre-installed thermal transfer paste)
- install matching metal mounting bracket onto H50 heat transfer head
- rotate metal bracket just enough to engage indentations in back of heat transfer head
- line up metal mounting bracket's four (4) feet with metal threaded inserts peeking through top/front of MoBo
- use fingers of both hands to put light pressure on metal mounting bracket, ensuring it is still engaged into heat transfer head
- keep increasing pressure until metal mounting screws "drop" into metal threaded inserts, readjusting as necessary
- DO NOT PRESS TOO HARD or metal threaded inserts might pop out of black plastic bracket!
- use light pressure with screwdriver to start/engage each screw
- when all four (4) screws are started, gently release pressure off metal mounting bracket and confirm that all screws remain started/engaged
- commence tightening screws equally (e.g., two turns each) in a criss-cross pattern (not circular sequence)
- continue as above until each screw is snug-tightened
- connect MoBo header connectors that will be covered or inaccessible once H50 radiator is installed
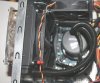
- for H50 radiator cooling fan(s), I installed a pusher/puller configuration as follows:
--- 120 mm fan mounted onto hot side of radiator with SHORT 6-32 screws (not included, short so as not to puncture radiator!) to pull air through fins
--- 120 mm fan mounted onto cold side of radiator with included long 6-32 screws to push air through fins
--- 120 mm dust filter, metal frame and metal screen type (may need to "bulge out" to prevent fan blades from touching/scraping)
--- included screws go in as follows: washer, dust filter, exterior 120 mm cold fan, PC case, interior 120 mm hot fan, H50 radiator
--- tighten screws until exterior fan case starts to deform, then half turn
- Reinstall/reassemble internals of case (drives, cables, etc.) and take your time!
During first bootup attempts, I kept experiencing BSODs:
- After fifteen minutes of trying different BIOS settings, I reloaded default BIOS settings and allowed the system to bootup completely into WinXP
- For devices I did not want configured (e.g., internal Ethernet adapter), I canceled autoconfiguration
- I shutdown and went back into BIOS setup and started fine-tuning the config
- Saved changes to BIOS and rebooted
Good luck! I hope you thoroughly enjoy, and are extremely satisfied with, the performance of the product as I am. It's reliability has yet to be proven. Perhaps, an update in a few months if all goes well... definitely, if something goes awry!
...SHUZZBUTT!!! Just tried to use a USB flash drive on a front USB slot, first time since conversion. No good. Tried other USB slot. No good, either... I forgot to connect MoBo header connectors for the USB ports...
I will post pics soon...
http://www.amazon.com/dp/B002QG2H7K/?tag=jhuntlink-20
Finally installed the Corsair H50 (newer model is available) in our ATX 3.6 GHz "Frankenstein" mid-tower. Prior to the conversion, the mid-tower had a medium-sized (~ 4" cube) copper/ aluminum heatsink with top-mounted cooling fan blowing down onto the cooling fins. Pre-conversion configuration included:
- tandem set of 80 mm fans pulling in cool air into rear of case, blowing directly onto CPU cooling fan/heatsink
- single 80 mm fan pulling in cool air into front of case, blowing directly onto 3 of 5 hard drives
- 5.25 drive bay twin-fan (small) kit pulling in cool air into front of case, and
- single 80 mm fan boosting power supply's fan pulling hot air out to rear
All fans pulling in cool air had dust filters. This setup created positive pressure within the case, and kept out a mound of dust! Also, one would think, as I did, that 5 x SATA hard drives would generate most of the heat... I was SO WRONG! Normal to heavy use would generate 175degF CPU temps and 150+ degF system/chassis zone temps. Noisy, high-pitched whining when the MoBo fan controls kick all fans into highest speeds of 4400+ RPM.
Post-conversion idle temps: 108degF CPU and 102degF system/chassis zone.
Post-conversion normal to heavy use temps: CPU never goes over 138degF, and system/chassis never go over 130degF.
120 mm fans are much quieter, too!
Pre-Disassembly!
- record all BIOS settings (trust me on this)
- patiently label drive bays, drives, power cables, signal cables, MoBo headers and header cable connectors (trust me on this)
- take digital photos of MoBo connectors and internal's physical configurations (trust me on this; helped me with the case' front connectors; used son's iPod)
Disassembly!
- Carefully remove each component and lay them out neatly in sequence for reverse installation
- Use of anti-static pads is highly recommended, as is removal of wool/synthetic clothing and going barefoot
- Thoroughly survey internal space of the case with the MoBo still installed to determine the mounting location of the H50's radiator
--- If there are vent holes for 120 mm fan and screw holes for fan mounting screws, proceed
--- If there are no vent holes, there will, probably, be no screw holes for fan mounting screws: consider obtaining a new case with these features (I didn't)
--- I chose to proceed with my existing case and had to use a bi-metal hole saw to cut five (5) holes arranged in a pentagon with an overall outside diameter of 120 mm
--- This, by far, was the most difficult part of the project and it would have been easier to purchase an ATX mid-tower with the proper/required vent and screw holes
(hey, I overhaul engines for a hobby...).
Once MoBo is out (if you've ever taken one out, you'll know why it's called a mother board):
- vacuum/thoroughly clean inside of case, including fans/dust filters
- ensure mounting holes for the H50's radiator line up exactly with mounting holes in chassis (FYI, the H50's threads are 6-32)
- cover openings for power supply (unless it was removed) and other devices left in case (recommend remove all, especially hard drives, due to shocks they will be subjected to)
- drill holes for mounting screws vent openings for cooling fans as required (for the section of chassis with perforations and slots, I used a waste piece of hard wood to back up the metal as I cut into it, using light pressure/medium speed... careful, it gets hot!)
- vacuum and thoroughly clean inside of case
Re-Assembly!
Practice the following sequences before actually doing them:
NOTE: please do not use power drills/drivers because you have to "feel" what you are doing
- re-install the MoBo, snug-tightening mounting screws
- install metal threaded inserts onto correct black plastic bracket (insert threaded inserts (so named) from back of bracket)
- affix included double-sided tape onto correct side of black plastic bracket (bracket attaches to back/bottom side of Mobo, so tape has to be between plastic bracket and MoBo)
- mount black plastic bracket onto back/bottom side of MoBo using above double-sided tape
- make sure threaded inserts just peek through front/top of MoBo
- insert plastic bushings onto feet of matching metal mounting bracket (match of black plastic bracket) making note of correct holes in bushings for mounting screws
- insert metal mounting screws into plastic bushings making sure they line up exactly with metal threaded inserts peeking through MoBo
- carefully clean the old thermal transfer paste off top of CPU with clean coffee filter paper wetted with alcohol (acetone works, too); allow to dry
- remove plastic cover off H50 heat transfer head/pump assembly (cover protects pre-installed thermal transfer paste)
- install matching metal mounting bracket onto H50 heat transfer head
- rotate metal bracket just enough to engage indentations in back of heat transfer head
- line up metal mounting bracket's four (4) feet with metal threaded inserts peeking through top/front of MoBo
- use fingers of both hands to put light pressure on metal mounting bracket, ensuring it is still engaged into heat transfer head
- keep increasing pressure until metal mounting screws "drop" into metal threaded inserts, readjusting as necessary
- DO NOT PRESS TOO HARD or metal threaded inserts might pop out of black plastic bracket!
- use light pressure with screwdriver to start/engage each screw
- when all four (4) screws are started, gently release pressure off metal mounting bracket and confirm that all screws remain started/engaged
- commence tightening screws equally (e.g., two turns each) in a criss-cross pattern (not circular sequence)
- continue as above until each screw is snug-tightened
- connect MoBo header connectors that will be covered or inaccessible once H50 radiator is installed
- for H50 radiator cooling fan(s), I installed a pusher/puller configuration as follows:
--- 120 mm fan mounted onto hot side of radiator with SHORT 6-32 screws (not included, short so as not to puncture radiator!) to pull air through fins
--- 120 mm fan mounted onto cold side of radiator with included long 6-32 screws to push air through fins
--- 120 mm dust filter, metal frame and metal screen type (may need to "bulge out" to prevent fan blades from touching/scraping)
--- included screws go in as follows: washer, dust filter, exterior 120 mm cold fan, PC case, interior 120 mm hot fan, H50 radiator
--- tighten screws until exterior fan case starts to deform, then half turn
- Reinstall/reassemble internals of case (drives, cables, etc.) and take your time!
During first bootup attempts, I kept experiencing BSODs:
- After fifteen minutes of trying different BIOS settings, I reloaded default BIOS settings and allowed the system to bootup completely into WinXP
- For devices I did not want configured (e.g., internal Ethernet adapter), I canceled autoconfiguration
- I shutdown and went back into BIOS setup and started fine-tuning the config
- Saved changes to BIOS and rebooted
Good luck! I hope you thoroughly enjoy, and are extremely satisfied with, the performance of the product as I am. It's reliability has yet to be proven. Perhaps, an update in a few months if all goes well... definitely, if something goes awry!
...SHUZZBUTT!!! Just tried to use a USB flash drive on a front USB slot, first time since conversion. No good. Tried other USB slot. No good, either... I forgot to connect MoBo header connectors for the USB ports...
I will post pics soon...
Last edited:
As an Amazon Associate we earn from qualifying purchases.