• Welcome to The Truck Stop! We see you haven't REGISTERED yet.

    Your truck knowledge is missing!
    • Registration is FREE , all we need is your birthday and email. (We don't share ANY data with ANYONE)
    • We have tons of knowledge here for your diesel truck!
    • Post your own topics and reply to existing threads to help others out!
    • NO ADS! The site is fully functional and ad free!
    CLICK HERE TO REGISTER!

    Problems registering? Click here to contact us!

    Already registered, but need a PASSWORD RESET? CLICK HERE TO RESET YOUR PASSWORD!

AC = Major Mistake

No they were properly fitted wrenches. That nut is basically welded in place. The evaporator pipe was just the weakest point.

When you're using the two wrenches are you aligning them on the nuts so the ends you are grabbing are like squeezing pliers? Doing it this way will put even torque on both sides and should not twist anything if you make sure to apply pressure evenly to both wrenches. This puts enormous amounts of torque on the nuts and should break them free. May have to shoot em with PB blaster.

I had a heck of a time with that dissimilar metal corrosion on my dryer too. PB blaster did the trick though.
 
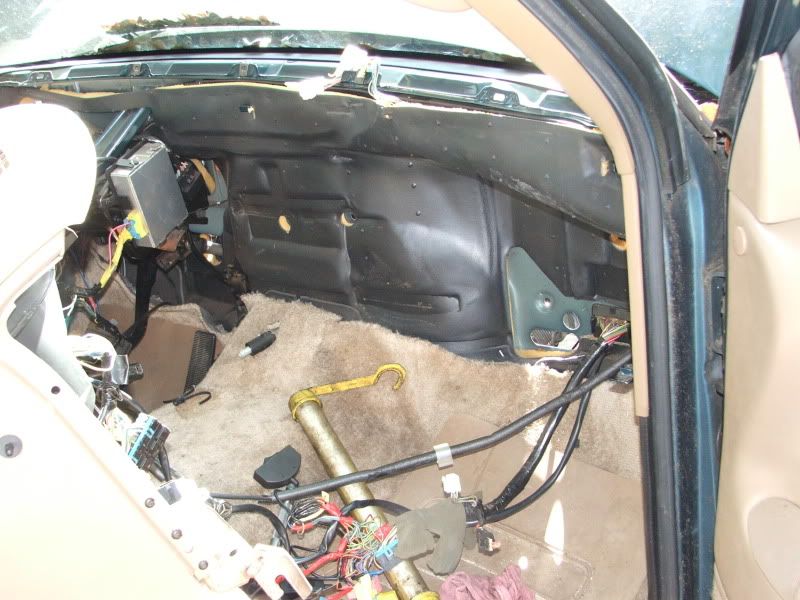
Looking at the tube to the dryer, which is actually the end of the evaporator, you have little choice but to replace the evaporator core. I have been there and done that and it ain't no fun! While you are in there I would go ahead and change the heater core as well.. And a suggestion from someone that has done this: Check the operation of the blend doors before you remove the evaporator and change them when its out if they need it! There are several threads on removing the evap, so do a search. Here is what I did on the my Sub, but you do not have to remove the dash entirely.

On my Sub the threads on the hose to the condenser were damaged (corroded) so I had to replace the hose as well. Its a dealer only item, the parts house said a gas Sub one would fit but it will not, the 6.5 with twin air uses its own hose assembly and I had to go to the dealer. You need clean and sound threads on every connection or they will leak, even with new O rings. Good luck, its going to be a job to get it all sorted out.
 
Minor detail, but, looking at the nut in the picture it appears the O ring is on the outside? It should go on the tube(s) in the area pointed to on the left.
 

Attachments

  • oring.jpg
    oring.jpg
    39.3 KB · Views: 9
Minor detail, but, looking at the nut in the picture it appears the O ring is on the outside? It should go on the tube(s) in the area pointed to on the left.

Those are some sharp eyes you've got there. That seal came on the plastic plug in the new dryer. I placed it on the pipe of the evaporator in a half hearted attempt to mop up space hoping that the dryer would snug up in the vertical position. By then I was in this thread and realizing my true fate.

With those eyes, I gotta ask if you do any hunting? That or are you interested in working the gyro binos during the upcoming marlin season off SoCal?
 
I'm afraid that your fate is sealed. You will probably have to replace the evaporator core. I have done this, takes time, but be patient, take your time, and it can be done.
 
On a side note, I usually do something like this. Doing something that is way out of my league to do. So don't feel too bad.
 
Seems like just a TON of small steps......... Super PITA job. We have faith in you Big-T! One weekend out of your life, and this should all be better than new! Maybe get some Protecto-Wrap or cheap Dyno-Mat stuff and apply it on the bare metal (if any) by the firewall. From experience this helps tremendously on engine noise in cab. Door and window rolls at HD are under 20 bux would be more than enough.
 
Maybe get some Protecto-Wrap or cheap Dyno-Mat stuff and apply it on the bare metal (if any) by the firewall. From experience this helps tremendously on engine noise in cab. Door and window rolls at HD are under 20 bux would be more than enough.

Probably no need for this. There was a factory sound mat behind the dash on my Suburban

Dashout.jpg
 
Well thanks for the words of support. I'll be sure to tap into it here when I'm into it. After resolving my rotatable CPS here, I'm sure that I'm game for this job and I'll be better for it. Looking forward to the adventure.
 
you had a out of time crank sensor too? I would try a small butane torch on that fitting to get it freed up as long as the nipple part with the oring is still round and will seal I pull many a dash at work and would avoid it at all cost ! I would be replacing the condensor too no matter what ,they hold crap that kills and so do the linesets with round muffler looking things in them A/C can be a real pain it only takes such a small mistake or leak and it is all for nothing
 
Per ehow.com removing the dash has a difficulty rating of EASY:

http://www.ehow.com/i/#article_6127648

Per wikiAnswer.com

How do you remove the dashboard from a 99 Suburban?
In: Chevy Suburban, GMC Suburban
A:
Answer

The question you ask is too involved for a proper answer. You may want to go to a car parts store, or book store, and get a repair manual for your car. They cost about $16.00 Or, go to a Public Library.
 
If you are seriously looking at those websites for help to do this, you may be better off sending it out. Somethings are worth the money. It sucks. I pulled a dash outta one of these. It wasn't fun.
 
If you are seriously looking at those websites for help to do this, you may be better off sending it out. Somethings are worth the money. It sucks. I pulled a dash outta one of these. It wasn't fun.

Aces, I did a google search on my iPhone; it's what you do when bored on the road. I thought it was funny that one said it was easy while the other said it was
too complicated to describe so guy buy a book on it.
 
It is probably easy if you know where the hidden screws and bolts are which means it is not hidden anymore. Other than that, you will probably spend a few hours figuring out why it won't come out and keep finding more screws, etc.
 
took me over 10 hours the first time I did it, I could probably cut
a couple of hours off that if I had to do it again.
I got a quote of 700.00 labor to change mine, in retrospect,
I probably would just pay it next time - it's a PITA
 
I too twisted the line when i rebuilt my engine right where you did. So i made an executive decision to abandon it and install the dodge I/C instead of replacing all the A/C components:D. The A/C works in the stang, so if i need it ill drive that. Helped a friend do his and we ended up having a bunch of "throw over your shoulder" bolts..lol
 
Back
Top