Drew
<font color=blue>Capa'n</font>
In an effort to have more light output when driving on rural roads, I made it possible to have my FOG lights on, even when my high beams are on.
For some reason, most manufactures make it so that when you turn your high beams on, your fog lights go off. This reduces the amount of light closer to the vehicle and sides of the road.
I connected the output wire from UpFitter #1 to one of the passthru wires. I then ran a wire from the passthru wire down to my fog light harness under the truck. I soldered in two diodes. One diode keeps the power from the upfitter going back to the BCM and thereby possibly confusing it. The second diode, keeps power from the BCM going back to the upfitter. I dont believe this one was needed, but since I had a pack of 25 diodes, I put it in.
The end result is beautiful.
1) I can have my fog lights on with no parking lights
2) I can have my fog lights on with my high beams
3) I can still leave it all auto and have my fog lights come on/off as it was from the factory.
Here are some pictures of the wiring. You will splice your power feed into the brown/yellow stripped wire after the harness.

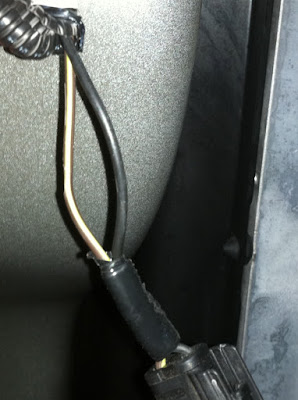
Peel back the tape and loom to expose the two wires. Black is ground. You want the striped wire.

Cut the wire and cut about a 1/2 piece out to make room for the diode and solder it in. Be sure to orient it the correct direction.

Next tape over the end closest to the connector, so that when you solder the feed diode in, you dont cause the annode sides to touch and bypass the purpose of the diodes.
Then solder in your feed wire with its own diode on it.

All done. Tape it up, put the loom back and cable tie all wires.
For some reason, most manufactures make it so that when you turn your high beams on, your fog lights go off. This reduces the amount of light closer to the vehicle and sides of the road.
I connected the output wire from UpFitter #1 to one of the passthru wires. I then ran a wire from the passthru wire down to my fog light harness under the truck. I soldered in two diodes. One diode keeps the power from the upfitter going back to the BCM and thereby possibly confusing it. The second diode, keeps power from the BCM going back to the upfitter. I dont believe this one was needed, but since I had a pack of 25 diodes, I put it in.
The end result is beautiful.
1) I can have my fog lights on with no parking lights
2) I can have my fog lights on with my high beams
3) I can still leave it all auto and have my fog lights come on/off as it was from the factory.
Here are some pictures of the wiring. You will splice your power feed into the brown/yellow stripped wire after the harness.

Peel back the tape and loom to expose the two wires. Black is ground. You want the striped wire.
Cut the wire and cut about a 1/2 piece out to make room for the diode and solder it in. Be sure to orient it the correct direction.
Next tape over the end closest to the connector, so that when you solder the feed diode in, you dont cause the annode sides to touch and bypass the purpose of the diodes.
Then solder in your feed wire with its own diode on it.
All done. Tape it up, put the loom back and cable tie all wires.
